Adding a YouTube end card to your video is a great way to keep your audience engaged. What’s even better is that it can boost your views and increase the numbers of subscribers, which are both important factors when trying to grow your YouTube channel.
That’s because YouTube end cards give you the opportunity to link to relevant content and resources. Linking to additional resources at the end of your video will help your viewers on their learning journey, and drive engagement on your channel.
Important: When available, we use affiliate links and may earn a commission!
All of this probably sounds great so far, but we haven’t even gotten to the best part. With the right tools, creating a professional, animated end screen template to use in your YouTube videos is quick, easy, and affordable!
In this guide, we’ll give you step-by-step information on how to make a YouTube end card template that can be used in ALL of your videos.
So if you’re ready to make an animated, professional-looking end card to use across your entire channel, let’s get started!
About YouTube End Cards
In the past, the easiest option for creating a YouTube outro was to make a simple, static end card with no moving graphics and animations. Things have changed, though, and now it’s easier than ever to make a customized animated end screen in a matter of minutes.

Before getting into the steps below on how to make a YouTube end screen, let’s quickly cover exactly what should be included in your end card.
To engage your viewers and increase views, an end screen can include a small bit of text – something like “Thanks for Watching” works well. This is also your chance to link to a “Subscribe” button as well as relevant links to other videos on your channel.
In terms of the clickable links and elements that can be included, it will be possible to link to a few different resources. This includes things like additional videos (a maximum of 2), a playlist, a Subscribe button, or your YouTube channel.

Limitations for Creating a YouTube End Screen Template
Now there are some limitations when making an end screen template. The first is that the end screen will be restricted to a maximum of 20 seconds, but this is plenty of time to thank your viewers and link to additional resources.
The second restriction is that the screen can only appear at the end of the video. It’s called a YouTube end card for a reason, so using it at the very end of your content is your only option.
One last restriction is that the contents of your end card will be confined to a specific amount of space on the screen. The end card border restricts the content to stay within that border, so expect to have a limited amount of space to work with.

While you will be able to adjust the size of the videos, links, and resources within the border, none of the elements can overlap.
Steps for Creating a YouTube End Card Template
There are 6 steps to creating the perfect YouTube end card:
- Creating the End Card Template
- Customizing the End Card Template
- Adjusting the Template Duration
- Downloading the Video End Card Template
- Adding the End Card Template to Your Videos
- Adding the End Card Elements to YouTube
To make these steps happen, our favorite resource right now is a website called Placeit.
Placeit is an amazing tool for improving the quality of your video content. Not only does it allow you to create a video end card in mere minutes, but it also makes it easy to make animated logos, video intros, slideshows, Instagram stories, and more.
#1 Creating the End Card Template
Once you’ve entered the Placeit website, head straight to the ‘Videos’ tab and click on ‘YouTube Videos’. This will take you to the page that’s dedicated to YouTube video templates.
Next, click ‘YouTube End Card’ on the left-hand menu to see all of the template options to choose from.

Spend some time browsing through the templates to find the one that works best for you and your YouTube channel. Placeit has a really good variety of templates with a range of color schemes and animations, so you shouldn’t have any trouble finding one you like.
After browsing the selection, choose a template so that you can move onto the next step and start customizing with your specific brandings and logos.
#2 Customizing the End Card Template
Once you’ve selected your template, it’s now time to customize it to your exact liking. This is where Placeit’s features really shine through – customizing templates has literally never been easier.
A Quick Note on Placeit Pricing
After being taken to the customization page, you’ll notice right away that the “Made with Placeit” watermark is located in the bottom corner of the template. While it’s possible to make your YouTube end card template for free, the only way to get rid of that watermark is to pay.

Here’s where we have more good news for you. Placeit is extremely affordable, and the majority of the site’s templates cost less than $10. You can either pay the less-than-$10 fee to be able to download the template sans watermark or go with an unlimited subscription.
With the unlimited option, users get complete access to ALL Placeit templates for creating mockups, designs, logos, and videos. The monthly fee for this is around $12, or you can go with a yearly payment of about $80.
Steps for Customizing Your Template
Placeit gives you lots of options for different color schemes, so the first step in customization is to choose a color that goes well with your branding. From there, you can customize by adding in specific text, changing fonts, and background images.
Most of these templates will have a default image displayed in the background, so if you want to switch it out, scroll through images on the right side of your screen.

If you have your own custom image you’d like to use in the end card, Placeit gives you the option to upload it. Just click ‘Custom Image or Video’ and select one from your photo/video library.
Pro Tip: Preview the Video As You Go
At any point in the customization phase, it’s possible to preview the end card to check out the changes you’ve made to colors, backgrounds, texts, and images.
Even if you’ve only made minor changes to the template along the way, don’t be shy about using the preview feature often to see how your end card is coming together.
#3 Adjusting the Template Duration
We mentioned earlier that the maximum amount of time for the end card to run on the screen is 20 seconds. However, you do have the option to adjust the duration so that it’s less than 20 seconds if that works better for the video.
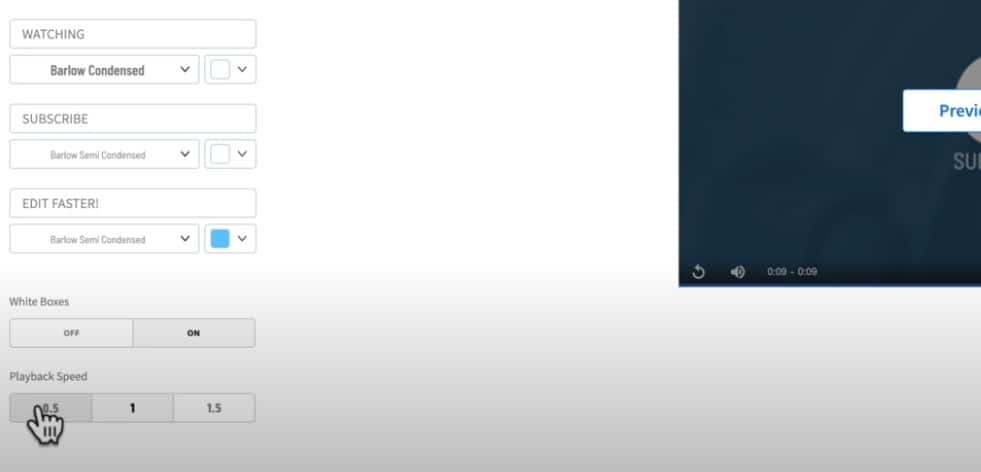
To change the duration, you can either speed up or slow down the animation by adjusting the playback speed. The default speed is set to 1, but if you want to slow it down, adjust the playback to 0.5. To speed it up, change it to 1.5 instead.
If you want your end card to play for the full 20 seconds, it’s recommended that you slow down the animation and change the template’s playback speed to 0.5.
#4 Downloading the Video End Card Template
After you’ve put all the finishing touches on customizing, the next step is to download the template so that you can add it to your videos. Just like everything else, Placeit makes the downloading process easy.
First, hit ‘Save Draft’, and this is where you can either create an account or log in to your existing Placeit account if you haven’t already.

Saving the draft will save the customized template on the Placeit platform, but to access it in your own files, hit ‘Download’ – it’s a big blue button at the top of the template page. Then select ‘Render All Slides’ and once the video has been processed, hit ‘Download’ one more time.
#5 Adding the End Card Template to Your Videos
To add your end card so that it seamlessly fits into your video content, it’s time to use an editing application or software. We recommend using pro-level software, like Final Cut or Adobe Premiere Pro, but there are a lot of quality editing tools out there.
For a full list, check out all our recommended video editing software for Mac and Windows PC.

Once you’ve entered the software interface, click ‘Import Media’ and select the end card file. From there, just drag the end card clip to the end of the video timeline you’re currently working on.
When positioning the end card, make sure it’s overlaid over a relevant talking point. So instead of the audience viewing the subject, they’ll be viewing the end card as you say something like “check out the video linked on screen for more information on (whatever it is you’re promoting)…”
Lastly, make sure the end card finishes at the same timestamp as the rest of the video content. You might have to trim down the end card by a few seconds to make that happen.
Pro Tip: Add a Transition Leading Up to the End Card
Adding a transition effect between your last video clip and the end card is the perfect finishing touch. Most editing tools make it really easy to drag and drop a transition into the video timeline.

Once you’ve added in your transition, save the file and move on to the final step on how to add the end screen on a YouTube video with the right elements.
#6 Adding the End Card Elements to YouTube
This is the last thing to cover in our end card tutorial where you can add in end card elements, like a Subscribe button and a link to the specific video you want viewers to click on.
After uploading the finalized video to YouTube, head to your video dashboard and select the video you’ve been working on. Next, move to the ‘End Screen’ setting and click on the edit icon.

From here you’ll just click on ‘+ Element’ and upload the specific elements you want within the end screen for that video.
Once an element has been uploaded, drag it on the end screen so that it’s positioned over its designated space. For the Subscribe button, it will be a circle. For a linked video, it’s a rectangle.

Now it’s time to play through the end screen to confirm everything is looking how it should. You might have to make slight adjustments to the runtime of the end card, but remember, you’re limited to 20 seconds max.
Once you’ve made your adjustments, hit the ‘Save’ button, and your end card is complete!
Now You’re Ready to Make an End Card Template for YouTube!
Who knew the steps on how to make a YouTube outro could be so simple?! End card creation is not only quick and easy; it’s also an effective way to boost viewer engagement and increase traffic to your channel.
For more information on how to make your YouTube videos better, check out our FREE YouTube Ranking Guide. In this guide, we cover the 3 most powerful tools and ranking strategies to increase your YouTube traffic by 10x!
Links
When available, we use affiliate links and may earn a commission!
Recommended Tools:
Recommended Tutorials:
Recommended Gear & Resources
Check out an up-to-date list of all the gear, software & tools we use and recommend right now at Primal Video on our resources page here!
Related Content