Today, we’re going to step through exactly how to use CapCut to create awesome videos on both iPhone and Android.
CapCut is one of the most popular video editing apps for iPhone and Android right now. And while it is created by the company behind TikTok, it’s far more than just a TikTok video editor.
Important: When available, we use affiliate links and may earn a commission!
In fact, CapCut video editing is super powerful. You can easily create videos on your smartphone for any platform or use case. We’ll cover all the best features, tools and effects to streamline your video editing process.
Because there are SO many awesome features, we just won’t be able to get through every single one of them. Instead, we’ll focus on the key things that will help you get the most out of the app so that you can start getting awesome results as fast as possible.
CapCut is an awesome option if you’re looking for an Android video editor or an iPhone video editor
We’ll be running through this CapCut tutorial on an iPad but the process is exactly the same on iOS and Android. Feel free to follow along on your device of choice.
By the end of this tutorial, you’ll have everything you need to create awesome videos yourself in CapCut!
Here’s exactly what we’ll cover in our complete CapCut video editing tutorial for beginners:
- How To Create A Project On CapCut
- CapCut Interface
- How To Edit Footage On CapCut
- How To Add B-Roll On CapCut
- How To Add Titles On CapCut
- How To Add Transitions On CapCut
- How To Add Effects On CapCut
- How To Remove Background On CapCut
- How To Adjust Speed On CapCut
- How To Stabilize Clips On CapCut
- How To Add Audio On CapCut
- How To Adjust Audio On CapCut
- How To Adjust Music On CapCut
- How To Color Grade On CapCut
- How To Export On CapCut
Plus we’ll share our top three tips to help you easily level up your videos in CapCut or ANY video editing software.
Let’s get started.
How To Create A Project On CapCut
First, open the CapCut app. Tap on New Project, then select your primary video clip and press Add.
If you have multiple primary video clips, you can select multiple. But don’t upload any B-roll footage just yet – we’ll be adding that later.
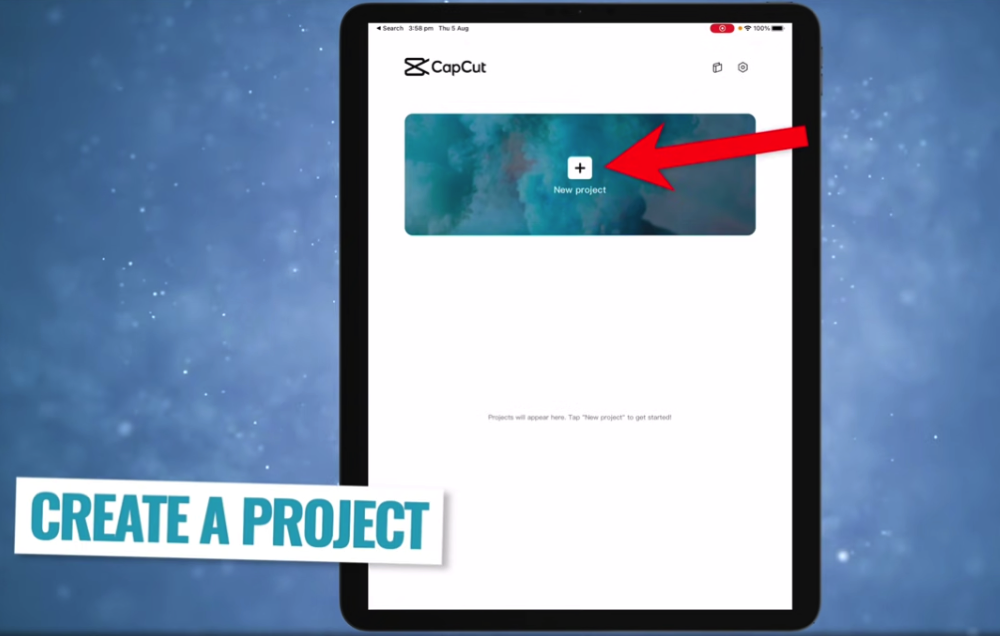
The first step in this CapCut app tutorial is to create a New project
CapCut will automatically set the project format to the type of footage you uploaded. So if your primary footage is a widescreen video, CapCut will set your project type to a widescreen project.
If you want to change the project type, you can do this by going to Format in the bottom menu.
You’ll see a range of options to choose from. Maybe you’re making a portrait video for TikTok, a square video for Instagram or a widescreen video for YouTube. We’ll be using the 16:9 widescreen option to create a YouTube video.

You can easily change the format of your video at any time – even after you’ve finished editing & exporting!
One really cool feature is that you can come back later and save out different versions of your video in different formats. This is awesome for repurposing your content.
Now let’s get familiar with the CapCut interface before we start diving into the editing side of things.
CapCut Interface
In the top right corner is the 1080p button. This is where you can adjust the resolution and frame rate. The project defaults to 1080p and 30 frames per second. It’s a good idea to go with the defaults unless you have some specific requirements for your video.
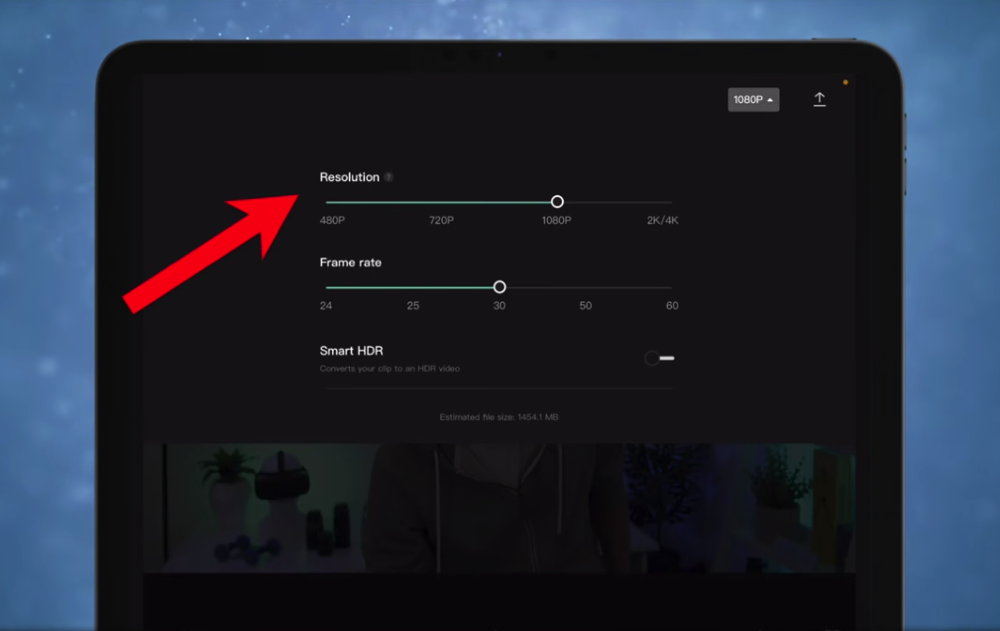
You can adjust the resolution and frame rate by tapping the 1080P button in the top right corner
The other main aspects of the CapCut interface you’ll need to know are:
- The Export button in the top right corner is how you save and export the project
- The playback window in the middle is where you preview your video
- The undo, redo and maximize buttons are below the playback window
- The editing timeline is where you add all of your footage and clips
- All of the settings (audio, text, effects, etc.) are located in the bottom menu bar
The CapCut editing timeline is where you’ll create your video masterpiece
Now that you’re familiar with the interface, let’s start editing.
How To Edit Footage On CapCut
First thing’s first – you need to remove all the mistakes and bad footage that won’t be used in the video.

When splitting your footage, align the white bar where you’d like the split to occur
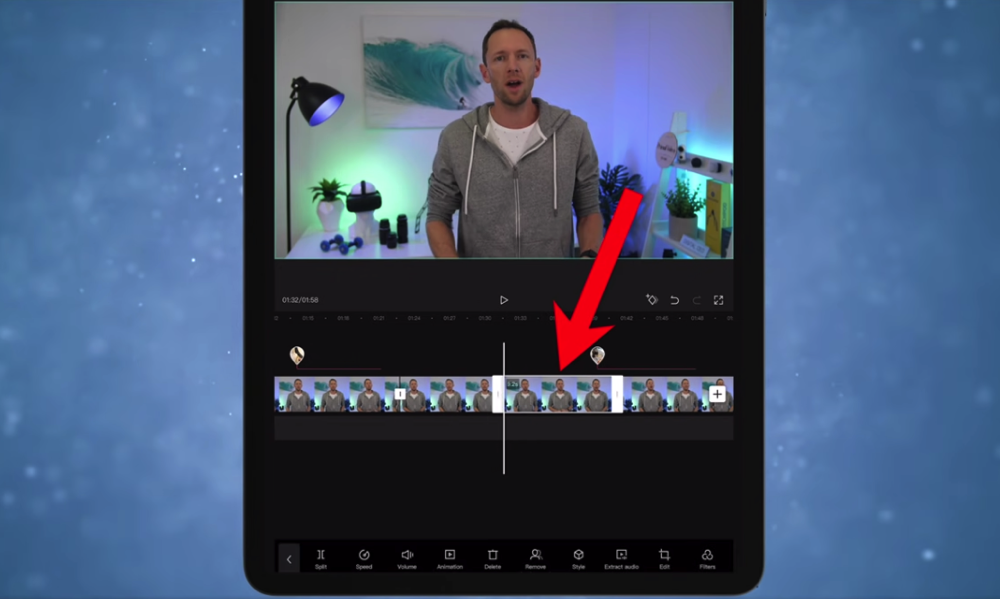
There are two ways you can remove footage: using the Split tool and using the handles.
To delete any bad takes using the Split tool, scrub forward through your footage until the white bar reaches the point where your video will start. Then bring up the editing tools by tapping on the clip – they will appear at the bottom of the screen.
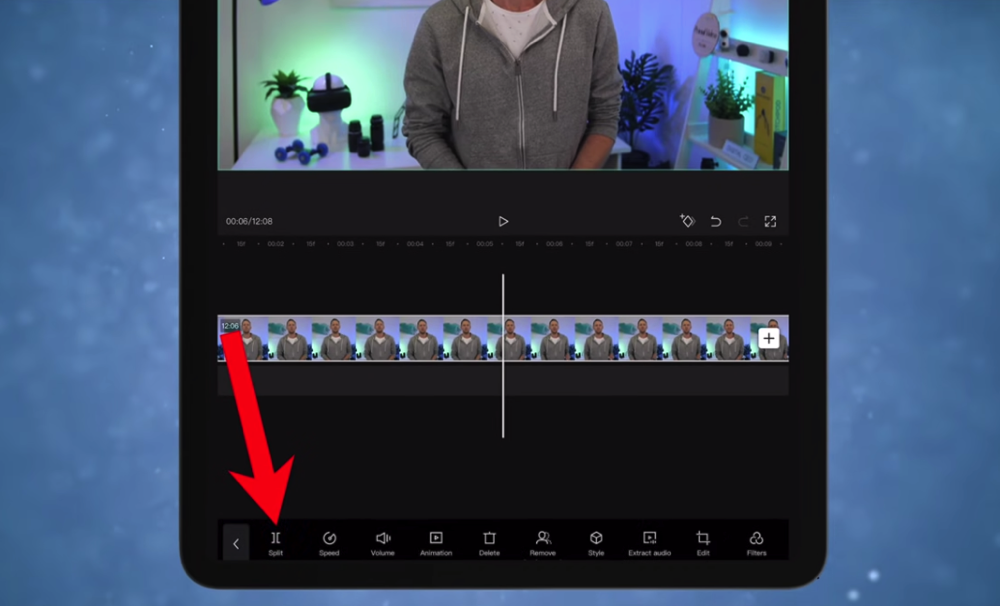
The Split tool is incredibly useful for trimming and editing any footage
Tap the Split button. You’ll now have two clips that are split exactly where you placed the white bar. Now select the first clip with the mistakes and press Delete.

You can also drag the white side handles to trim and edit down the footage
To remove footage using the handles, tap the clip to select it. At the beginning of the clip you’ll see a white handle. Tap and hold the handle so you can drag it along until it reaches the start of your good footage.
Both methods are great options and you can even use a combination of both. For example, if you want to remove footage in the middle of a clip, tap the clip to bring up the menu and press Split. Then drag the handles to trim the footage.
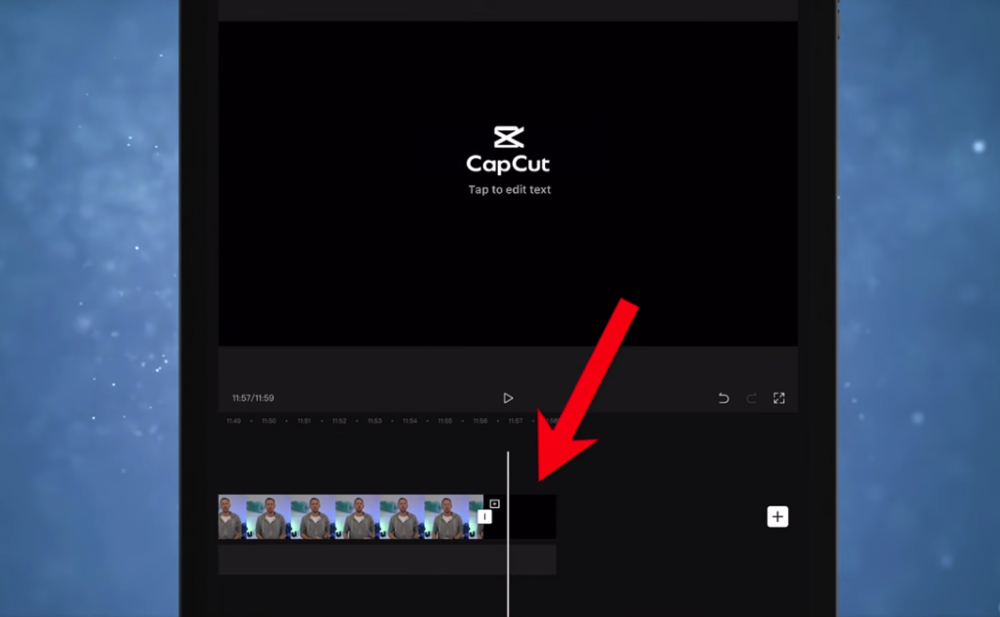
Make sure you delete the end CapCut clip from your project
It’s also a good idea remove the short promotional clip CapCut inserts at the end of video at this point. Select the clip and press Delete.
PRO TIP: We always recommend editing backwards. It may seem like a strange concept but hear us out. When filming, you don’t move on until you’re happy with the sentence or paragraph you needed to say. This means the last take is usually the best. So editing from the end of your footage will save you heaps of time going through all the bad takes!

When filming, only move on when you’re happy with the take – then you can edit backwards to speed up the process
After you’ve finished editing out the mistakes and bad takes from your footage, the next step is to add B-roll.
How To Add B-Roll On CapCut
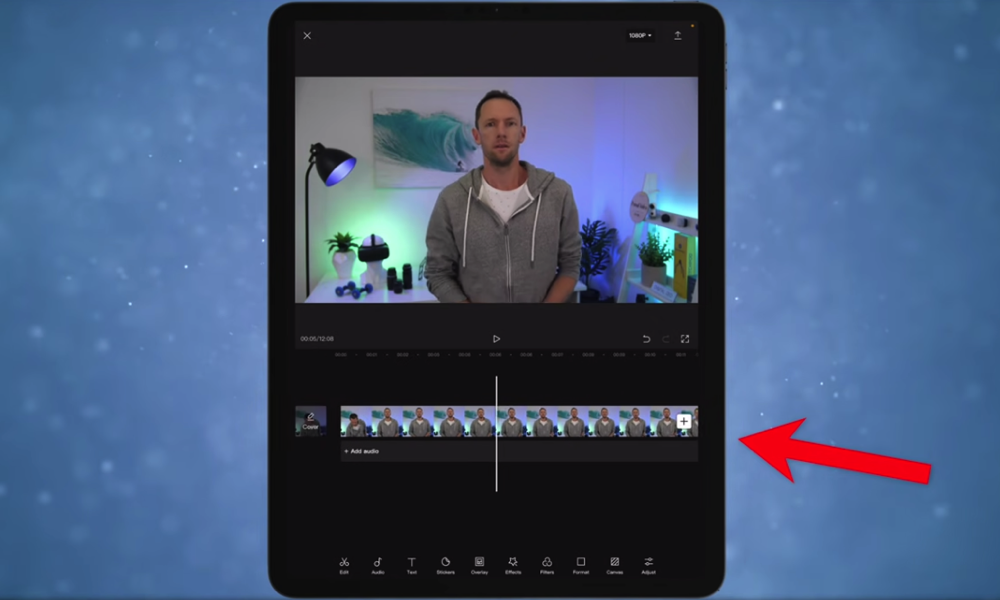
Now to add B-roll to your video. Press Overlay and then Add overlay. From here you can choose any graphics, videos or photos that you’ve got saved on your device. Select the footage you’d like to include and press Add.

Tap the B-roll footage you’d like to use in your video and then press Add
It may take a minute to load and then you’ll see your B-roll on the timeline below the primary footage.
To change the location of the clip on your timeline, click and drag it to move. You can trim the B-roll footage in the same way you trimmed the primary footage.

To layer B-roll on top of each other, simply drag it down to the layer beneath the first B-roll
You can even layer B-roll on top of each other. To do this, drag the clip to the row beneath the first layer of B-roll. This way you can go from the primary footage, to one B-roll clip, to another B-roll clip and then back to the primary footage.
Add in any other B-roll footage you want to include in the video using this process.
After the B-roll has been compressed, you can access it by tapping the B-roll icon (this will expand it again)
Once you’re done, exit the Overlay section by pressing the Back arrow in the bottom left corner. You’ll notice that the footage has been compressed. To get back into the B-roll at any point, just tap one of the B-roll icons on your footage.
Now it’s time to add titles.
How To Add Titles On CapCut
There are two main options when it comes to adding titles to your project.
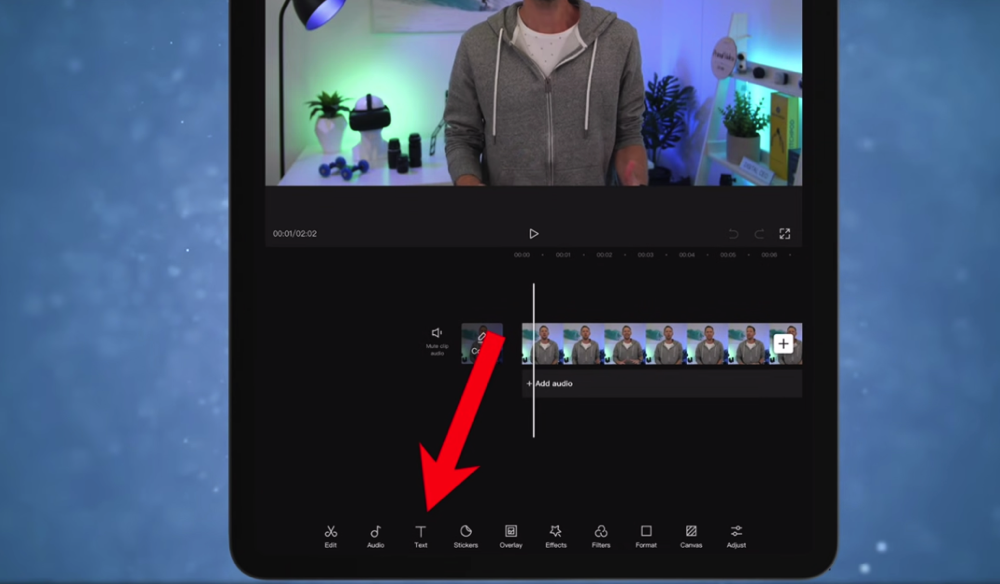
To add titles and text to your video, tap the Text button on the bottom menu
You can add and customize basic text – there are lots of features in here that allow you to create something really good. Or you can use the text templates.
First up, let’s cover how to add a basic title. Press Text and then select Add text. Type in the text and then you’ll be able to customize the font, color, effects, stroke and background.

CapCut has heaps of text customization options so you can easily make your titles stand out!
Be sure to stay true to your branding when you’re customizing the text. Think about using similar colors and styles so that your videos are recognizably yours.
To move the text box, just tap and drag. You can adjust the size by pinching in and out.
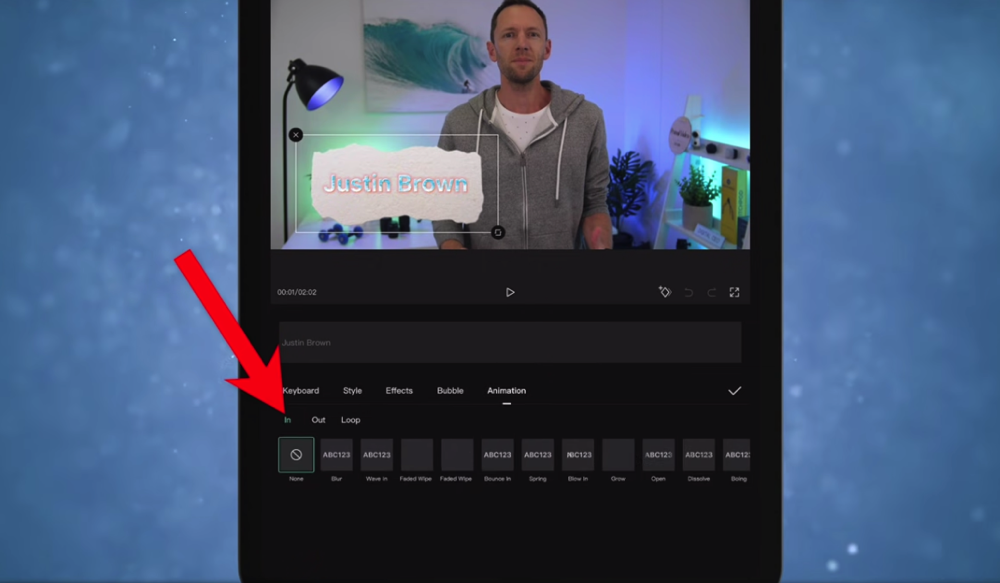
You can make your title animated by selecting the text box and going to Animation
When you’re happy with the text, you can make it animated. Tap Animation and then you can decide whether you want it to animate In, Out or in Loop.
There are lots of animations to choose from so play around until you find one that suits your style.
Just like with any other clip, in the timeline you can move it around and adjust the length using the handles.

There are some awesome preset animated titles you can play around with in CapCut
To insert one of the text templates, press the Back arrow and select Text template. There are heaps of fancy titles and animations in here that will make your title pop! There are also timers, clocks, subtitles and symbols.
Simply tap any of these to add them to the project. You can change the text and adjust its length/location just like you did with the basic text titles.

After you leave the Text tab, any titles will appear as a red line above your footage on the editing timeline
Once you’ve added titles, press the Back arrow. You’ll see the footage has compressed again. Any titles will appear as a red line above the primary footage. If you want to come back to edit these later, just press the Text button again.
Add all of the titles you want in the video and then let’s add transitions.
How To Add Transitions On CapCut
There are a few ways that you can add transitions between clips in CapCut. You can apply the transitions to the B-roll footage, to the primary footage or using a zoom cut.
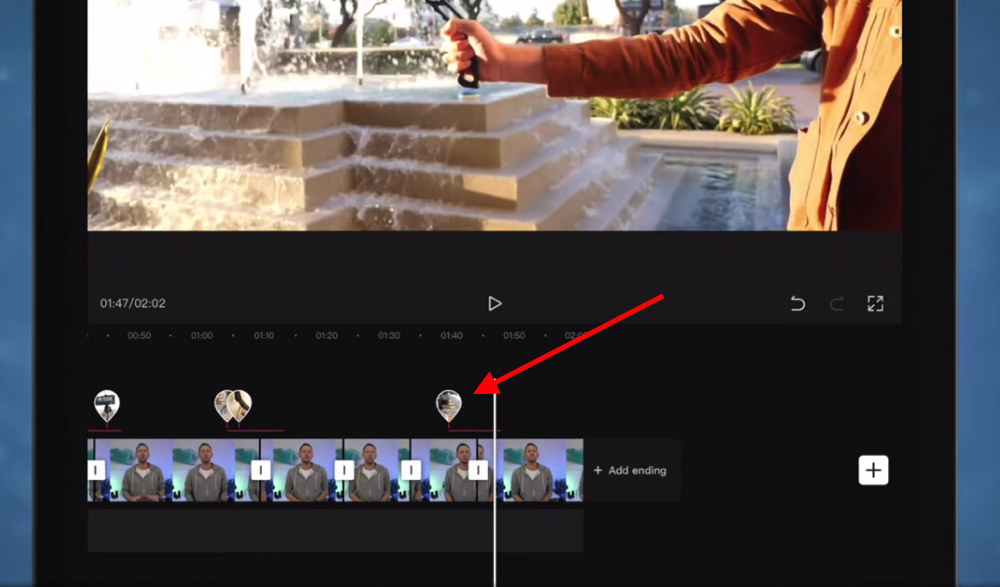
Adding Transitions To B-Roll Clips
Let’s start with the B-roll footage. Tap on one of the little B-roll icons coming off the primary footage. This will open up the B-roll clip.
Select the B-roll clip and tap the Animation button. You can choose between In, Out and Combo. Tap In and you’ll see all the traditional preset transitions and effects.

After you’ve chosen a transition and applied it to the footage, tap the Tick icon
Select Combo, and you’ll see presets that will add a whole new level of movement and polish to your video. If your B-roll clip is quite still or stagnant, adding one of these presets can make the B-roll a bit more exciting.
To change the length of the transition, adjust the Duration slider bar. Then select the Tick icon to save the transition.
Adding Transitions To Primary Footage
To add transitions to the primary footage, tap the White Square icon between two clips. Again, lots of different presets will appear. Simply tap one to apply it. You can adjust the duration by moving the slider.
With any of these transitions, be careful not to go overboard. It’s really easy to cheapen your video by adding hectic transitions.

Try not to use transitions that are too wild as this can cheapen your video
Especially if you’re transitioning between clips that look almost identical (i.e. one clip of you talking to another clip of you talking), it’s not a good idea to use these preset transitions. Instead, it’s best to add a zoom cut.
Adding Zoom Cuts As Transitions
Zoom cuts are pretty much what they sound like. It’s when you zoom in slightly on one of your shots so that it looks different to the previous shot. This makes it look like you’re using two different camera angles.
To do this, select the second shot on the timeline. Pinch the footage in the playback window to zoom in on it slightly. Adjust the placement of the clip so that it matches the framing in the previous shot.
To create a zoom cut transition, zoom in slightly on the second clip so that it looks slightly different to the first clip
Go back and play this through so you can see the subtle beauty of the zoom cut! It’s a simple way to change things up for the viewer and keep them engaged.
Now, go through and add present transitions or zoom cuts to your video. Then it’s time to add effects.
How To Add Effects On CapCut
To add effects to the video, press Effects in the bottom menu.
This is another area where there are heaps of options you can choose from. We wouldn’t usually use these types of effects in our videos but this is something you can play around with.

At Primal Video, we don’t usually use these kind of effects. But if you’re doing something different like a TikTok video edit, these could be useful!
These Effect filters aren’t the only awesome effects inside CapCut.
There are effects that allow you to remove background, adjust speed and stabilize footage. Let’s go over how you use these effects.
How To Remove Background On CapCut
This effect is seriously powerful. Select a clip and press Remove background. CapCut will then analyse the clip and take out the entire background.
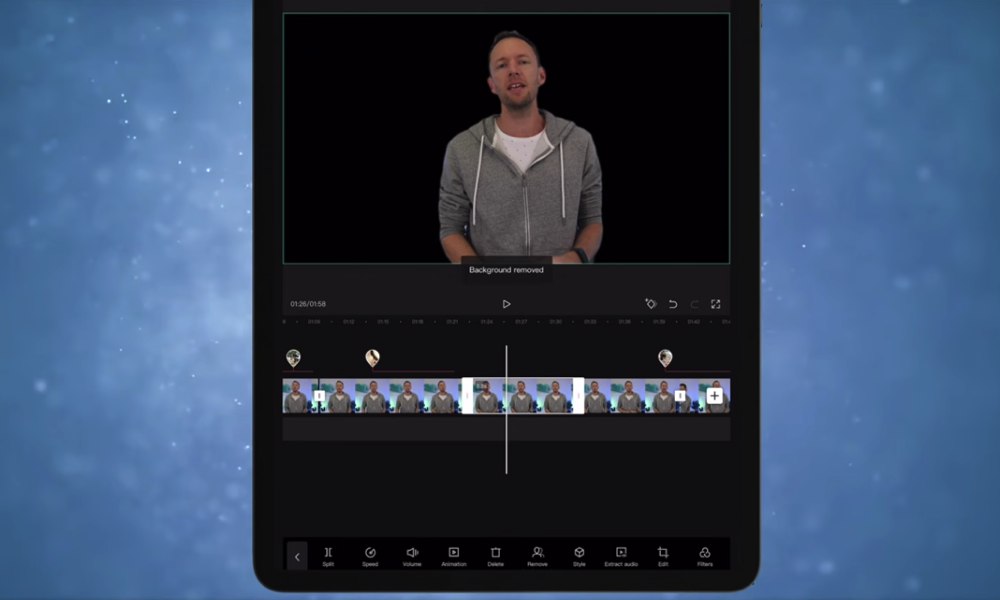
CapCut’s background removal tool is a really impressive feature
It does a really good job of this! This is such an awesome effect that allows you to get really creative with your editing.
How To Adjust Speed On CapCut
You can adjust the speed of a clip but selecting the clip and pressing Speed. There are two options here:
- Normal: You can adjust the slider bar to increase or decrease the playback speed
- Curve: This gives you more control over the speed adjustments as you go
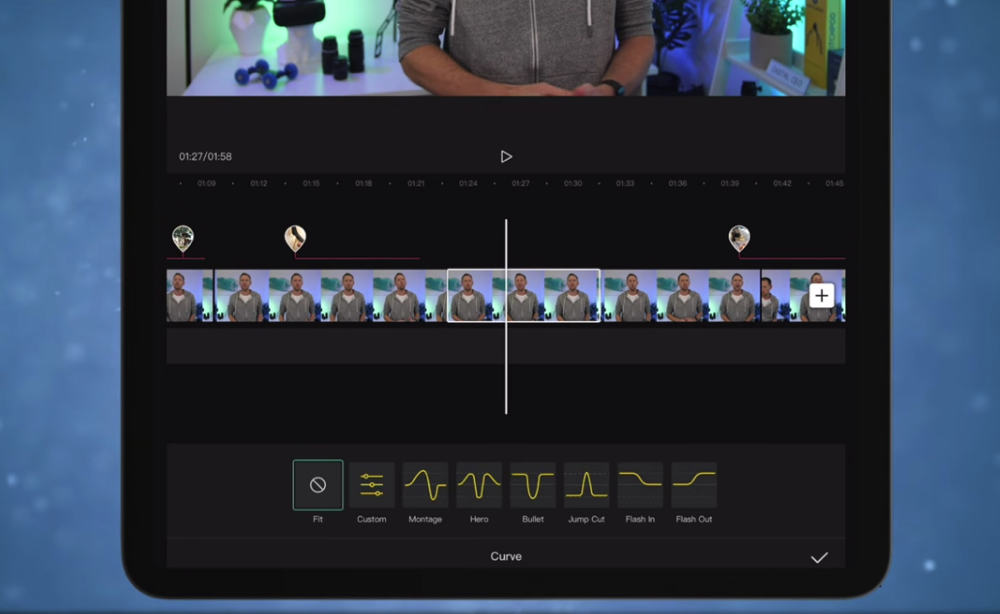
If you want more control over the speed adjustments, select Curve and you’ll see lots of different options
How To Stabilize Clips On CapCut
This one’s another standout feature of CapCut. Select a clip and slide along the bottom menu until you see Stabilize.
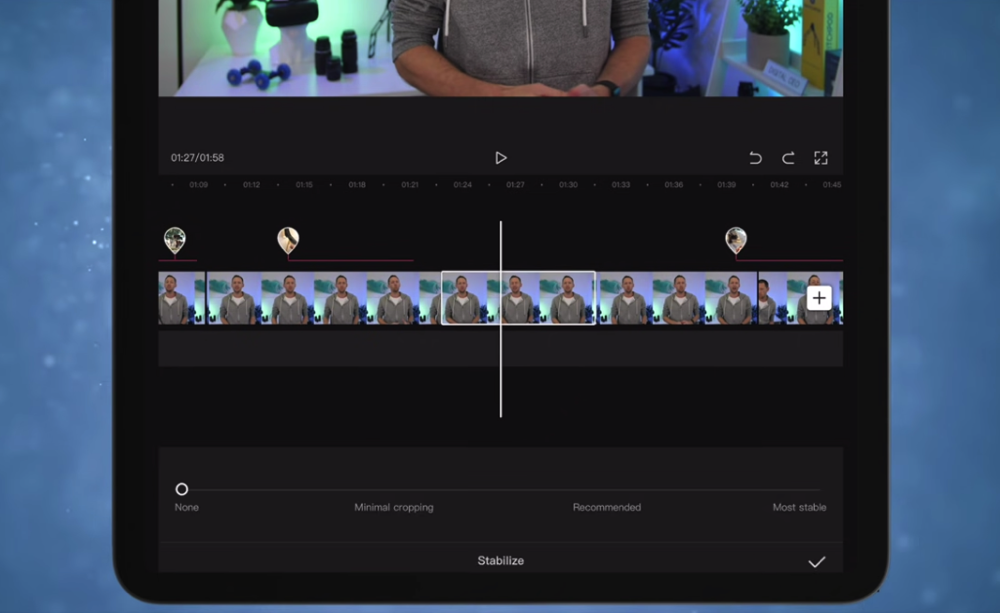
If you ever find yourself with shaky footage, the Stabilize feature will sort it out!
This will remove any camera shake in your footage. Super handy if you didn’t have a tripod when filming or your footage is just a bit shaky for some reason!
Now that you’ve added in any effects, it’s time to add audio.
How To Add Audio On CapCut
So let’s add in your audio or sound effects. Go to the start of your footage and you’ll see the + Add audio button.
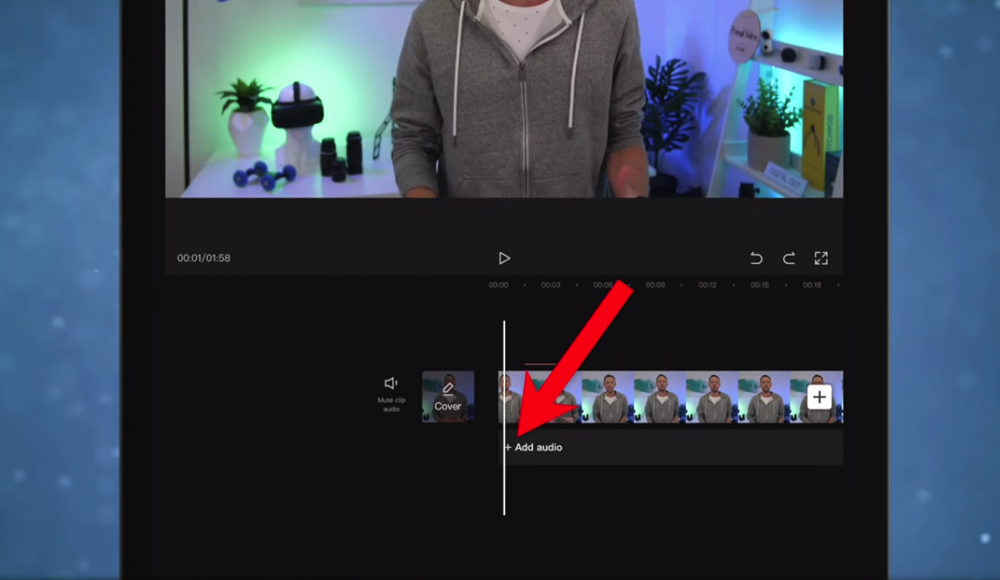
To add background music to your video, tap the + Add audio button
Tap Sounds and you’ll be taken to the CapCut music library.
We prefer to use audio that we’ve purchased using sites like Artlist and Epidemic Sound. This is just so we know for certain that we’re covered for licensing.

You have the choice of using one of CapCut’s tracks or uploading your own audio
If, like us, you’re uploading your own audio track, press Your sounds and then From device.
If you’re using a track from CapCut’s library then pick a track and press the Download icon. Then press + to add it to the timeline.

You can adjust the audio clip just like any other clip on the timeline
The audio clip will appear below the primary footage. You can move, cut and adjust the audio clip just like any other clip.
Once you’ve added in the background music, you’ll need to adjust the audio levels of your video.
How To Adjust Audio On CapCut
CapCut does a really good job of automatically adjusting the primary audio levels. If you find you do need to make adjustments, you can do this on a clip-by-clip basis.
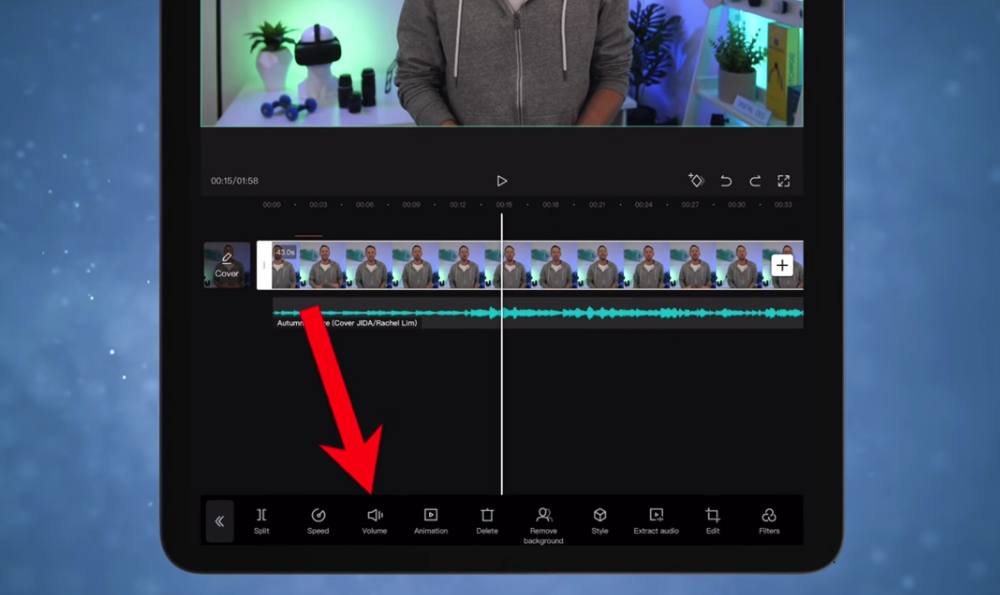
If you need to adjust your primary audio, select Volume
Select the clip and press Volume. Adjust the slider bar to increase or decrease the volume level.
Again, this isn’t something we’ve ever needed to use. But if you want more control over your audio levels, select the clip and press Extract audio.
You’ll then have the audio clip from your primary audio on the timeline. You can make changes to this separate to your footage.

If you extract audio from your primary footage, it will appear as an individual clip on the timeline
Once the primary audio levels are set, you can make sure the music levels are at a good volume as well.
How To Adjust Music On CapCut
Select the music track and press Volume. For background music, we usually find between 27 and 30 is the optimal level. But use this as a starting point and make any adjustments from there.
You don’t want the music to be so loud that you can’t hear the primary audio. But you also don’t want it to be so quiet that you can’t hear the music.
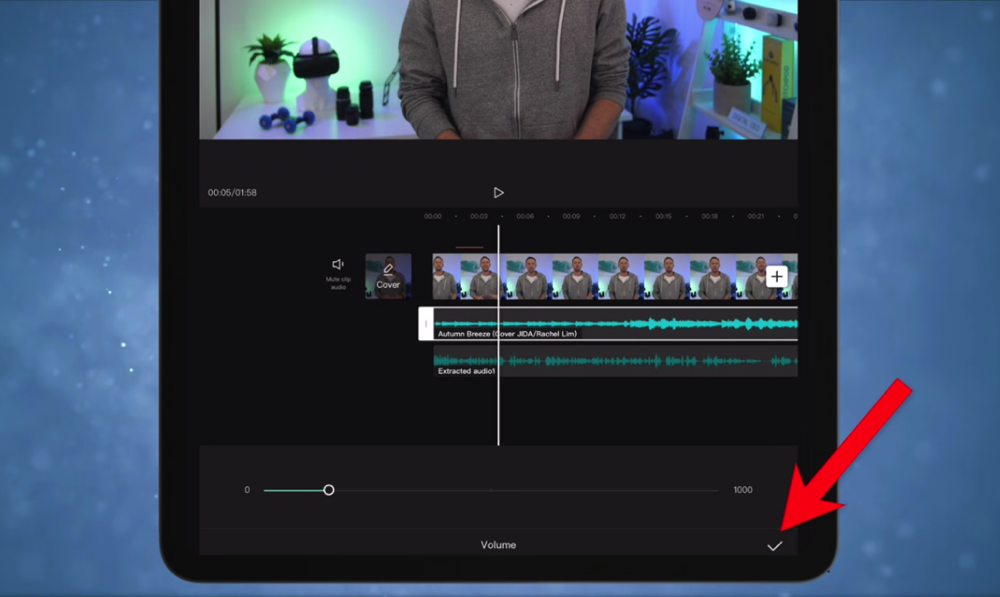
Try starting your background music at 20 – 30 and then adjust as required
PRO TIP: Make any adjustments to the audio levels while using headphones. This way you know exactly what the audio will sound like without any outside influences.
If you want the audio to fade in, select the audio clip and press Fade. You can specify the Fade-in duration and the Fade-out duration. Then tap the Tick icon.

You can even make your background music fade in and out by selecting the Fade button
After the audio levels are set, the last step in the editing process is color grading.
How To Color Grade On CapCut
When it comes to color grading in CapCut, you can apply a filter or you can manually adjust the look.

CapCut has lots of filters – you can apply them to either just one clip or to your entire project
To add a filter, make sure nothing is selected and press Filters. Think of these like Instagram filters. If there’s something that matches the look and feel that you’re after, tap a filter and press the Tick icon.
You’ll then have another clip on the timeline. Again, this clip can be adjusted just like any other clip. So it can be applied to just a small area or to the entire video.

To do the color grading process manually, go to Adjust in the bottom menu
To manually adjust the clip, make sure nothing is selected and tap Adjust. Here you’ll be able to make changes to the:
- Exposure: Make sure the shot is bright enough
- Shadows: Make adjustments to the dark areas of the shot
- Contrast: Increase the distinction between lighter and darker areas
- Color Temperature: Make the shot cooler or warmer
- Saturation: Increase to boost the colors (don’t go too far with this one)
Once you’re done, hit the Tick icon. Just like the filter, this will appear as a clip on the timeline. Make sure you drag the handles so that the effect stretches across the entire edit.

Once you’ve made color adjustments to your video, drag the clip so that it stretches along the entire project
If you’d rather make these changes to one specific clip, just make sure you have the clip selected before pressing Filters or Adjust.
When you’re finished color grading, the next step is to export!
How To Export On CapCut
In the top right corner press the Download icon. CapCut will then begin saving out the project using the optimal settings based on the primary footage you first imported.

Press the Download icon and your video will begin exporting
You can upload the video to Whatsapp, Facebook, Instagram or you can press Other. If you go to Other you’ll be able to press Save to Files or Save Video to save it onto your device.
Then press Done and you’ll be taken back to the homescreen.

You can upload straight to social media sites or you can download directly onto your device
After this process, make sure you playback the video. You’ll be able to pick up any mistakes and ensure you’re completely happy with the final product.
Top 3 Tips For Creating Awesome Videos
As promised, here are our top three tips to level up your CapCut video editing:
1. Use Stock Footage
Use sites like Storyblocks and Artgrid to find additional B-roll or footage. This additional B-roll allows you to keep viewers engaged and help them understand what you’re talking about. Best of all, you don’t need to go to the time and effort required to shoot the footage yourself.

Using stock footage means you can have awesome B-roll without needing to shoot all of it yourself
2. Use Animated Graphics
Animated graphics, titles and video intros make your videos look so much more professional. Our top recommended tool for this is Placeit – it allows you to create some awesome graphics really easily.
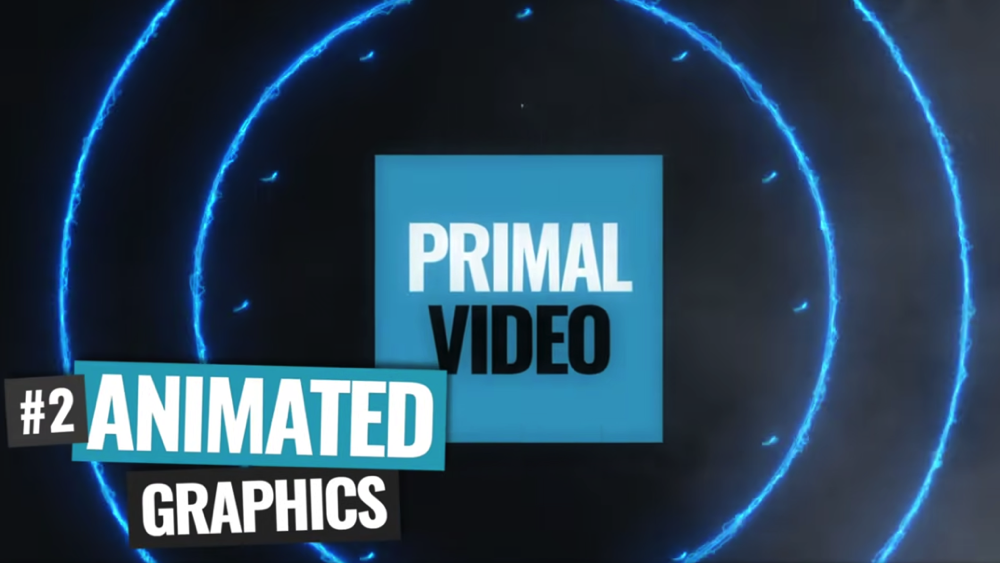
Using sites like Placeit to create animated video intros & titles for your videos makes them look more professional
3. Use Stock Music
Music is a super powerful storytelling tool that tells viewers what they should be feeling during your video. That’s why it’s so important to use the right tracks. Our favourite places to get stock music are Artlist and Epidemic Sound. They have massive audio libraries and make the whole copyright issue really straightforward.

Adding stock music to your video will do wonders for increasing your viewer engagement
Now You Know How To Use CapCut
In this CapCut video editing tutorial for beginners, you learnt how to edit videos from start to finish.
Hopefully you can see just how powerful CapCut is and why it’s such a popular video editing app for Android and iPhone. It allows you to create incredible videos on-the-go without having to sacrifice on quality.
We hope you enjoyed our new CapCut app tutorial. If you found it useful please feel free to give it a share on your favourite social media platform or shoot it through to someone who might want to learn more about this awesome Android & iPhone video editing app.
For more information on creating YouTube videos, check out the Primal Video YouTube Ranking Guide. You’ll learn about the latest tools and strategies for improving video rankings on both YouTube and Google – and it’s completely free!
FAQ
Is CapCut owned by TikTok?
CapCut is owned by ByteDance, the same company that owns TikTok.
Is CapCut on PC yet?
Yes! CapCut is now also available on desktop.
Is CapCut free to download?
Absolutely, CapCut is completely free to download on iPhone, Android, Mac and Windows.
Links
When available, we use affiliate links and may earn a commission!
Royalty-free stock video libraries for awesome B-roll and footage:
Easily create professional, branded effects & animations for your videos:
Royalty-free stock MUSIC to level up your videos:
Recommended Gear & Resources
Check out an up-to-date list of all the gear, software & tools we use and recommend right now at Primal Video on our resources page here!