There are lots of different reasons you might want to use a screen capture in your videos.
Screen recordings are a great way to demonstrate a process, teach people how to use software or online platforms, record a presentation with slides or you could even use a screen recorder to capture b-roll for your video projects.
Since our last review, some great new options have become available, making the process to record your screen even faster and easier.
In this screen capture Mac tutorial we’ll run through exactly how to screen record on Mac, and the best screen recorder software for you no matter what your budget!
From great FREE screen recorders for Mac up to paid video editing software suites that allow you to record Mac screen - there’s a number of tools you can choose from to create a Macbook screen capture.
We’ll start with the free, built-in options and work up to the professional software.
Here’s exactly what we’ll cover:
- Screen Recording Software #1: QuickTime Player
- Screen Recording Software #2: Wondershare DemoCreator
- Screen Recording Software #3: Tella
- Best Screen Recording Software For Mac in 2023?
Let’s dive in.
Screen Recording Software #1: QuickTime Player
There are two ways you can access QuickTime Player for screen recording on Mac.
The first one is simply to press the keyboard shortcut Command, Shift and 5.
This will trigger a small screenshot toolbar at the bottom of your screen.
The second way is to open QuickTime Player on your Mac, either by doing a Spotlight Search (Command and Space) or via Finder in the Applications section.
Then in the top menu bar go to File and select New Screen Recording.
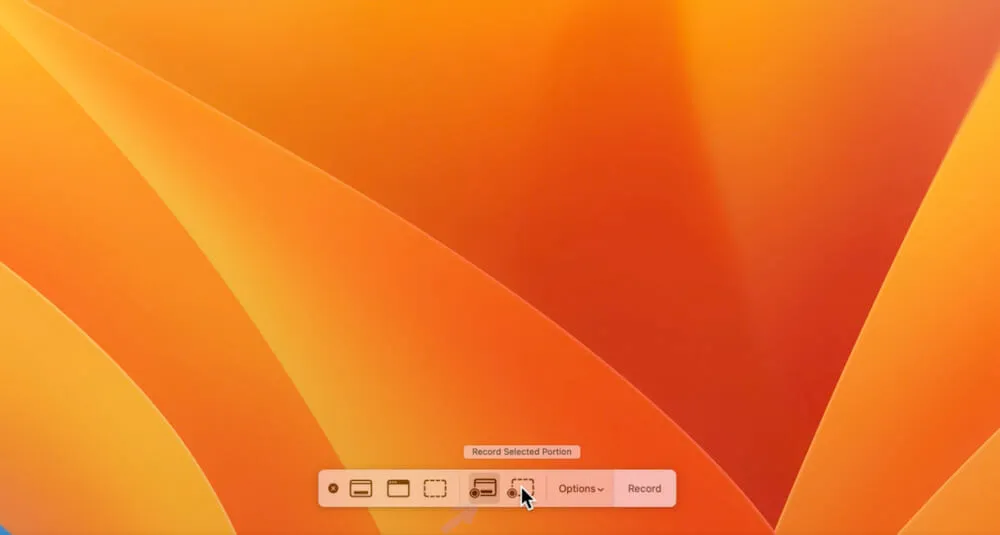
There’s a number of different tools in this window:
- Capture entire screen
- Capture selected window
- Capture selected portion
- Record entire screen
- Record selected portion
So not only can you screen record using this tool but you can also generate screenshots or screen captures.
QuickTime Player Options & Settings
Before you get started with this tool, it’s a good idea to check the settings.
Go to Options in the pop up window.
This is where you can adjust the following things:
- Where the file is saved to
- Whether there’s a countdown timer before recording begins
- Which microphone will be used
- Whether floating thumbnails are visible
- If you’d like these settings saved for next time
- Whether mouse clicks are visible on screen
Now that your settings are all good to go, let’s start recording.

Recording With QuickTime Player
For this example, we’re going to record the whole screen so we’ll select Record Entire Screen.
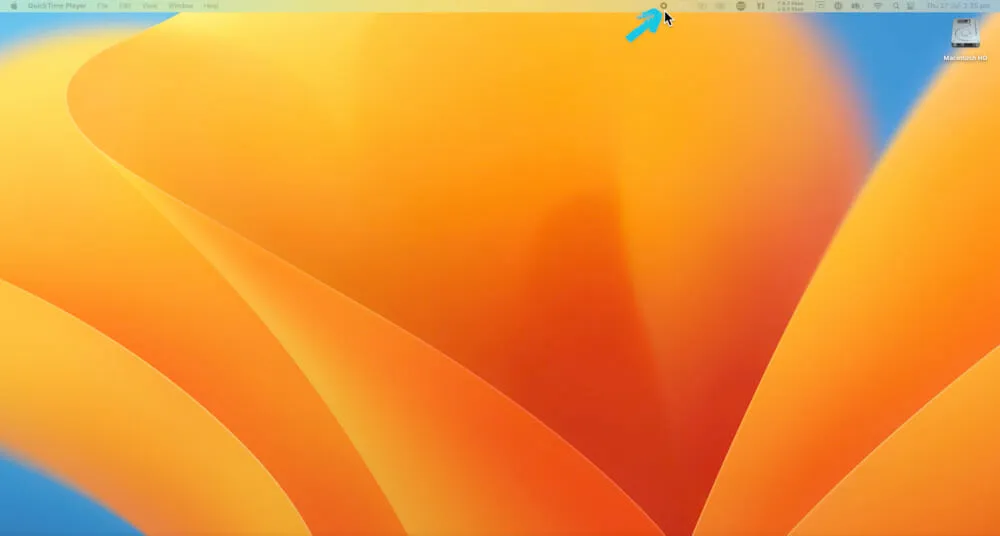
After that’s selected, you can click anywhere on the screen to begin recording.
You’ll know you’re recording by the little icon in the top menu bar. To stop recording, click on that icon.
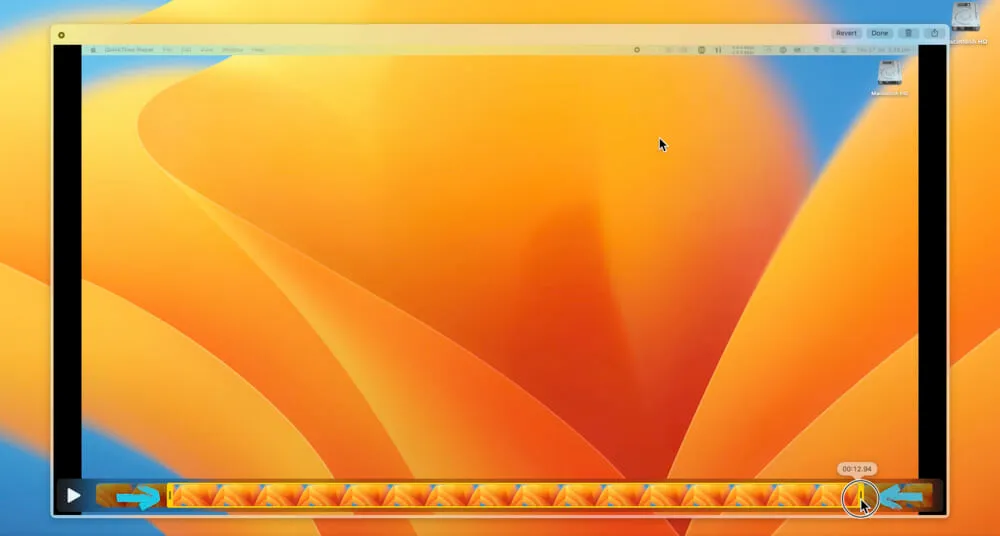
Once the recording has ended, you can view the recording.
There are some basic trimming tools you can use to trim footage from the beginning or end.
When you’re finished, hit Done and that file will be saved.
How To Screen Record With a Webcam in QuickTime Player
It’s also possible to share your webcam while screen recording with QuickTime Player.
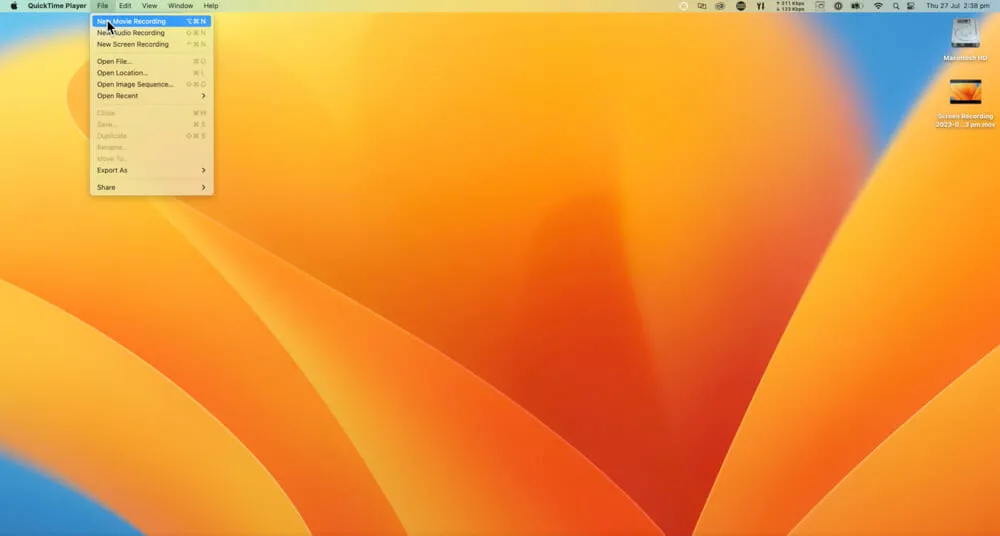
To do this, close the popup window and make sure QuickTime Player is open in the top menu bar.
Then go to File and select New Movie Recording.
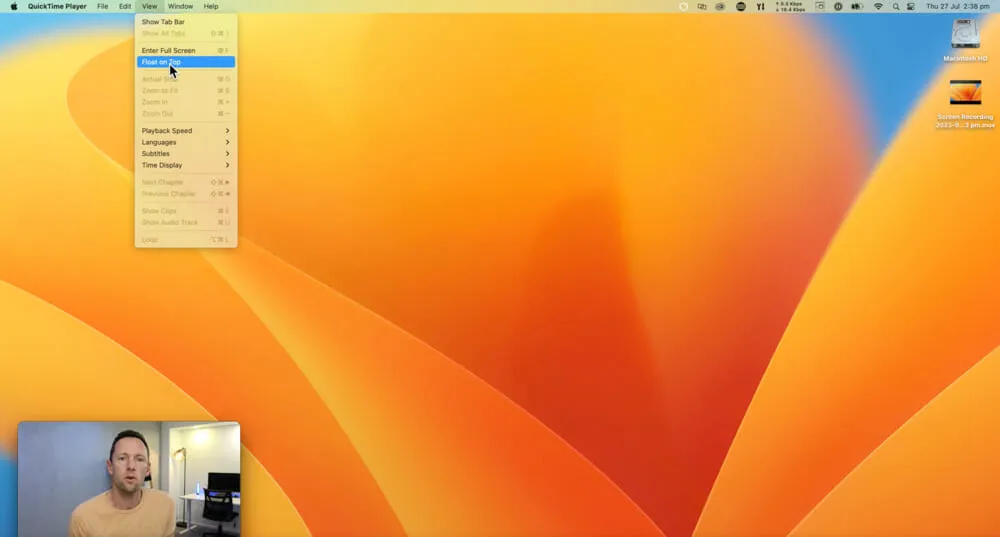
This will open a preview of your webcam. You can select which camera you want to be used here.
Scale down the preview window to the size you want it to be in your screen recording. You can position it wherever you’d like on the screen.
Go to View in the top menu bar and select Float On Top. Now the webcam preview will appear on top of any other windows that appear on the screen.
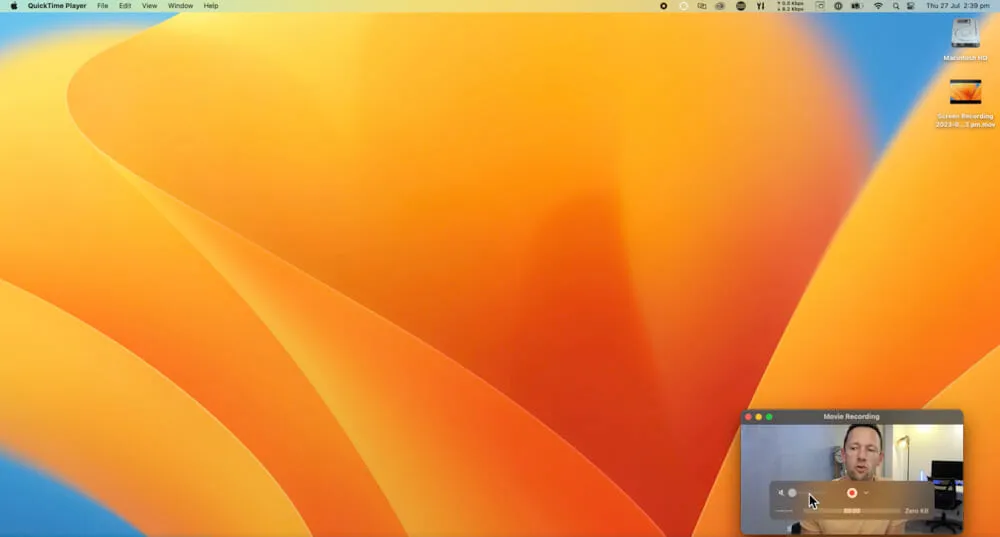
Then go to File again, select New Screen Recording and then you’ll be screen recording with your webcam shown.
However, you will notice that whenever you hover over the webcam window some settings will appear.
So it’s not great for professional-style recordings but it’s a solid option if you’re after something quick and easy.
Overall, QuickTime Player is a great free screen recorder option but it doesn’t offer a lot of customization. If you’re after something more advanced, the next options will be up your alley.
Screen Recording Software #2: Wondershare DemoCreator
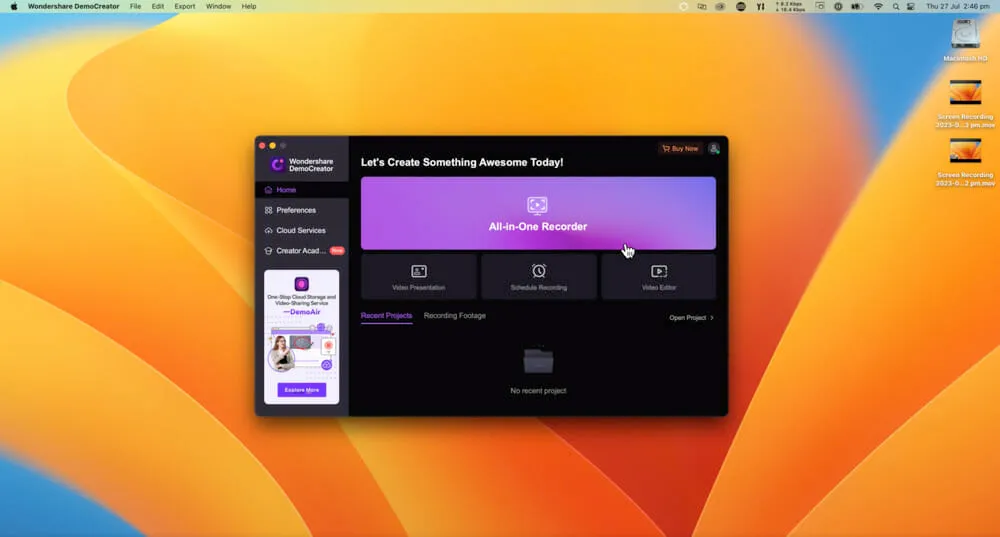
The next option is Wondershare DemoCreator. This tool packs in SO many more advanced features and controls than what you’ll find using the built-in Mac app.
It’s incredibly simple to use and it works on Mac, Windows & Chromebook.
PRO TIP: DemoCreator supports up to 120 frames per second, which is super handy if you’re going to be creating things like gaming videos.
There’s also a really powerful built-in video editing tool.
This means not only can you handle the recording piece in DemoCreator, but you can also edit down your recording and create really great videos as well.
DemoCreator is building out some solid AI tools and there’s also cloud compatibility making it a great option if you’re working with remote team members.
For best results, we recommend downloading the app. So go ahead and install DemoCreator on your Mac.
Then click on All In One Recorder and you’ll be taken to the screen recording section.
Now let’s dive into the different screen recording settings.
Wondershare DemoCreator Settings
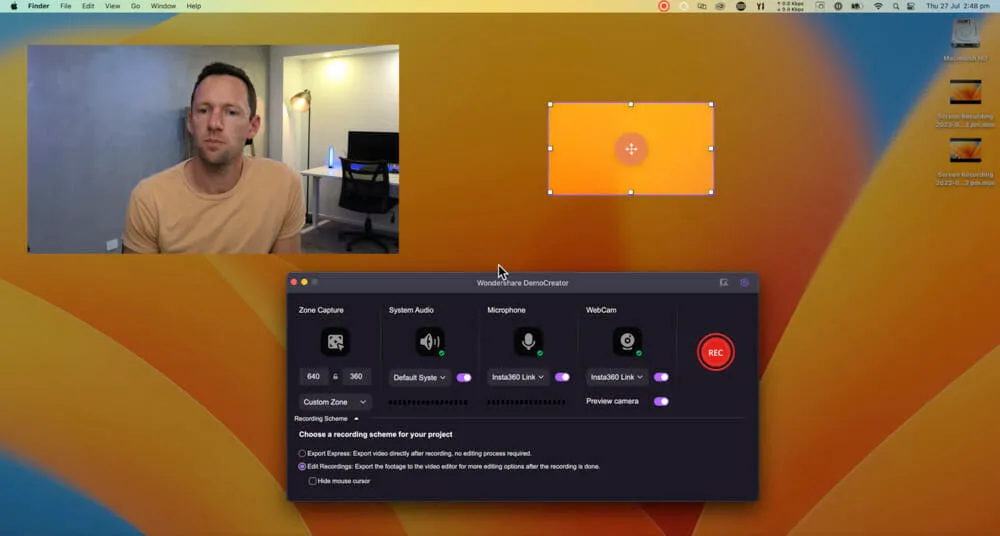
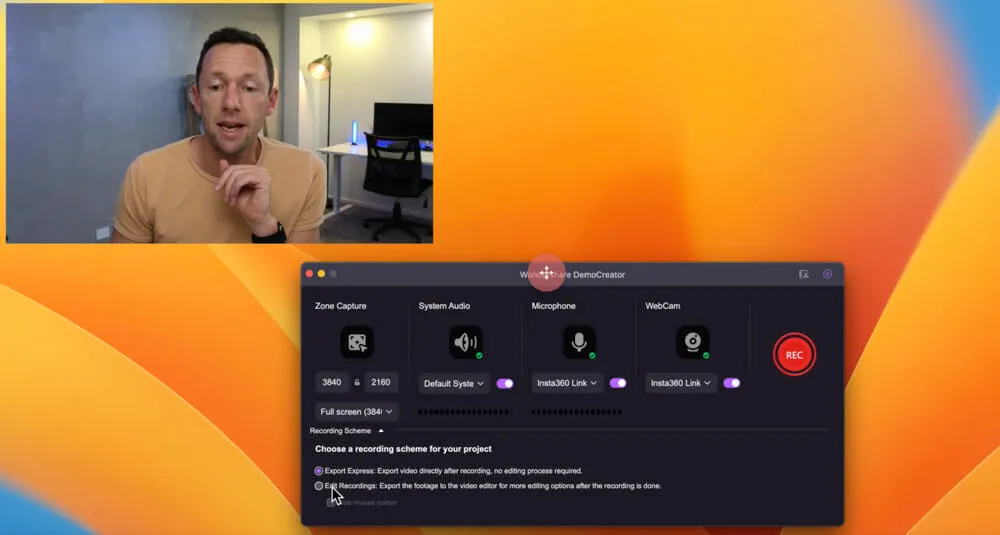
At the top of the main window there are a number of settings you can adjust:
- Webcam: Which webcam you want to use in the recording
- Microphone: Which microphone you want to use in the recording
- System Audio: If you want to record audio that’s played back through the computer
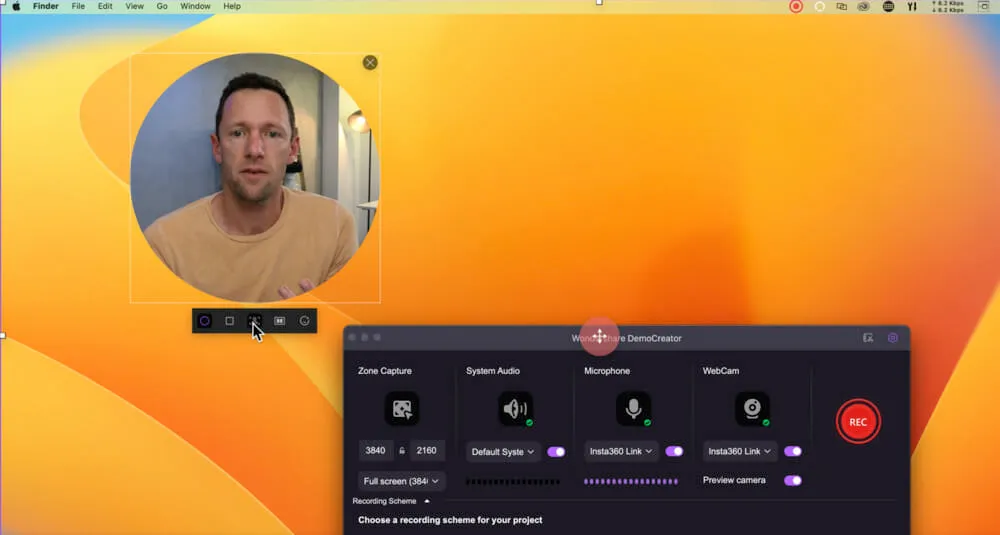
- Zone Capture: Where you want to record (you can specify a size here or adjust the box on screen)
- Preview Camera: Whether you want to preview your webcam on screen
PRO TIP: Under Zone Capture there are a number of presets you can choose from such as Portrait which is great if you’re creating TikTok or Instagram Reel style videos.
You can also adjust the webcam settings. If you hover over the webcam window, you can adjust:
- Webcam shape (you can choose from rectangle or circle)
- Effects such as AI background removal
- Flip camera image
- Beauty effects such as face thinning and eye size
One other important setting to mention is back in the Settings window.
Under Choose a recording scheme for your project there are two options:
- Export Express - this will export your recording exactly as it was recorded
- Edit Recordings - this allows you to edit the recording afterwards
If you select Edit Recordings, you can disable Preview camera as this can be added in after you’ve finished recording during the editing process.
Essentially, choosing the second option gives you a lot more flexibility and customization options.
But the right option for you will come down to your specific needs.
How To Record With DemoCreator
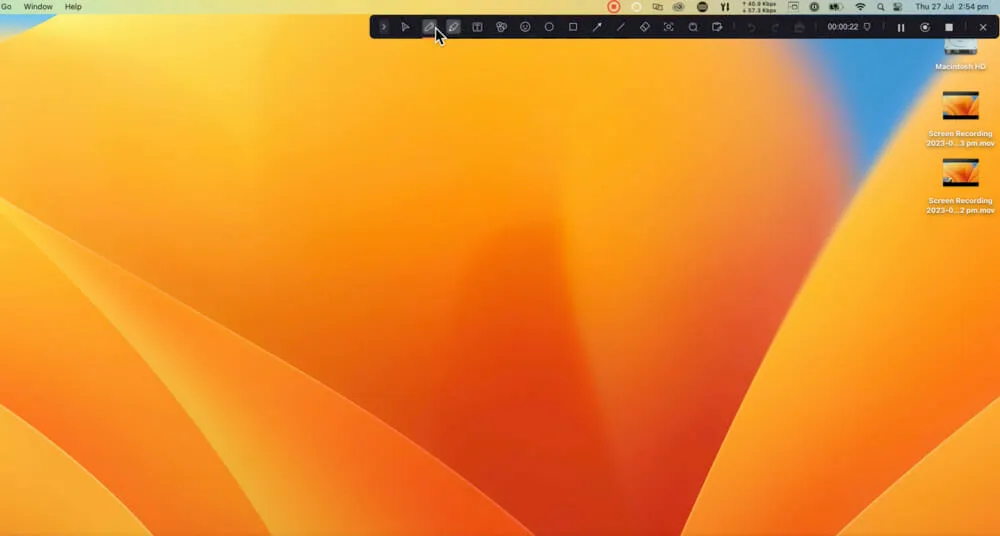
Once you’ve set all the settings to suit your video, press the Record button and it will begin to record your screen.
You’ll notice a toolbar in the top right corner. This can be expanded to reveal a lot of tools such as:
- Pen
- Arrows
- Boxes
- Markers
- Pause recording
- Restart recording
- Stop recording
When you’re ready to end the screen recording, press the Stop icon.
Now let’s take a look at the DemoCreator video editing tool.
Wondershare DemoCreator Video Editing Tool
If you set your screen recording to Edit Recordings (as mentioned above), ending your screen recording will open the files inside the DemoCreator video editing tool.
You’ll see each of the different recording elements on separate video layers.
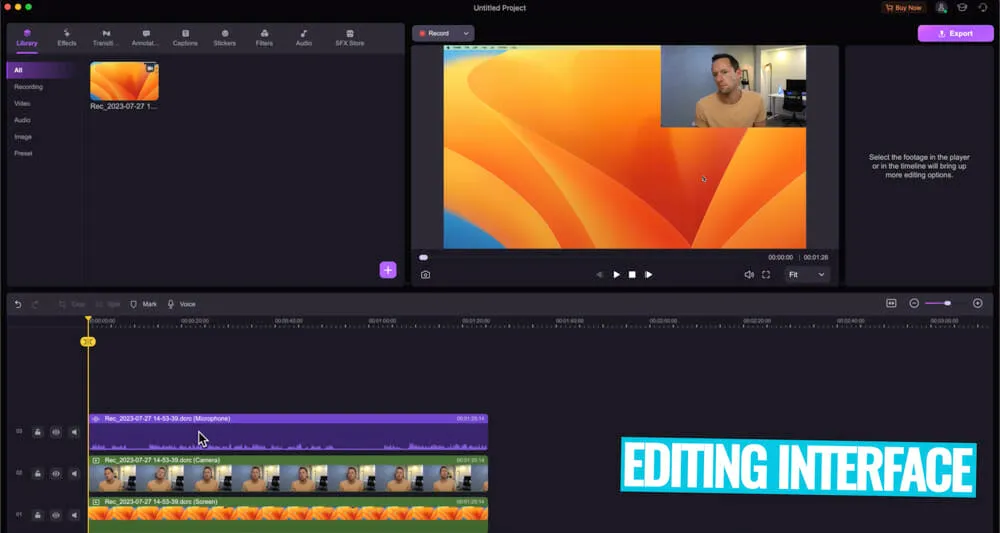
To show you what type of flexibility this gives you, we’ll run through some of the things you could do…
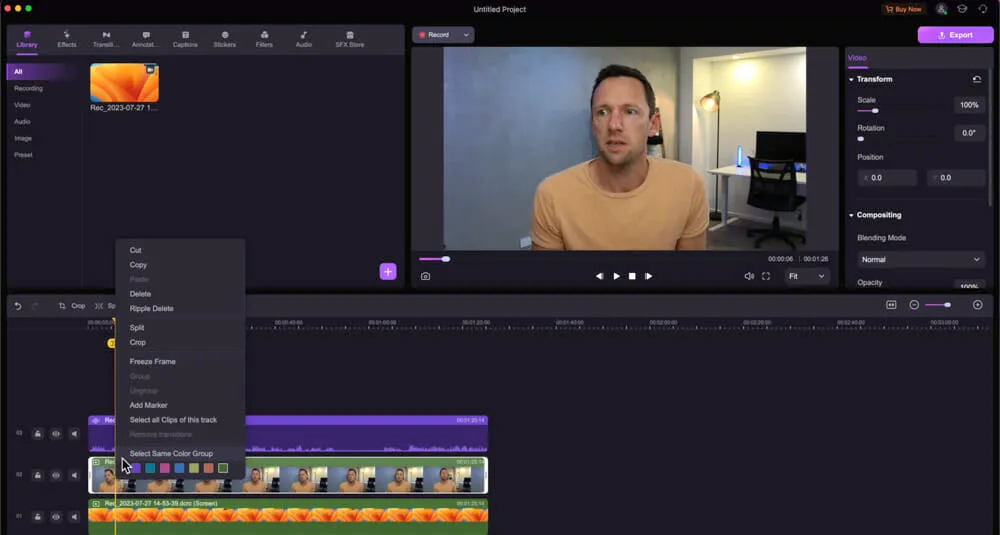
If you decided you no longer wanted to include your webcam in the screen recording, you could select that clip on the video editing timeline and hit Delete.
Or if you wanted to change the position of your webcam on screen, you could select it in the Preview window and move it around.
You could even start your screen recording with your webcam full screen and then after 10 seconds for example, make the webcam a small square in the bottom left corner for the remainder of the video.
To do this, you’d just need to right click on the clip and select Split where you want webcam size to change. Then select one of the clips and change the webcam image size.
You can also add in text, titles, effects, auto captions, filters - there’s SO many tools in here!
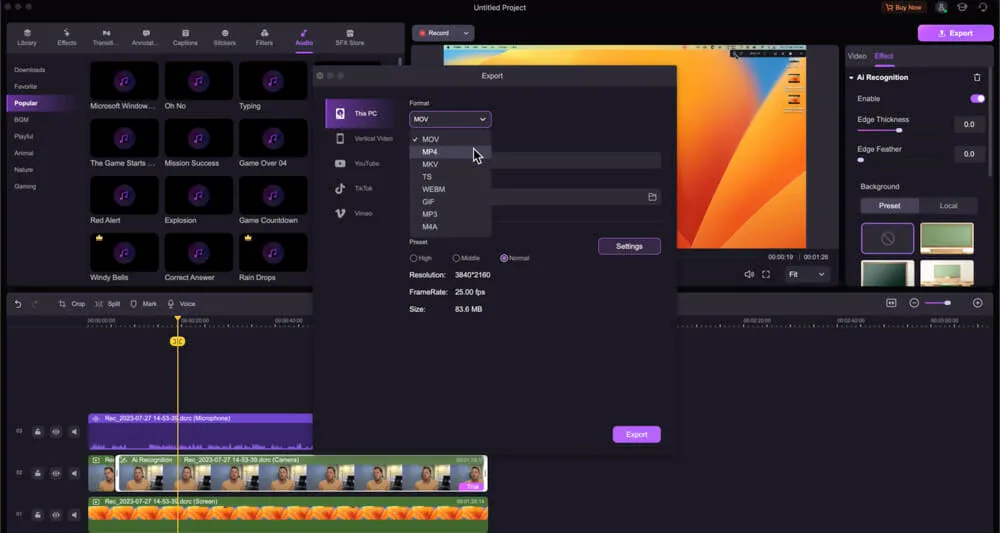
How To Export Screen Recording from Wondershare DemoCreator
When you’re finished editing the video, go to Export in the top right corner.
You can select the file type, quality and there are some more advanced settings available if you click on Settings.
Then you just need to press Export again and your video will save out.
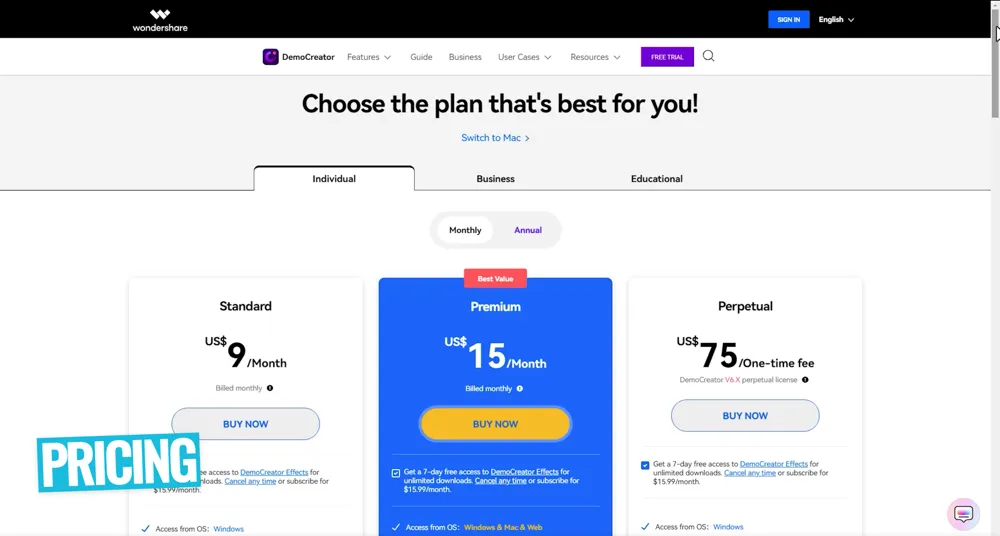
Wondershare DemoCreator Pricing
There is a free version available but we wouldn’t recommend it because of how limited and restricted it is.
There are three paid plans you can choose from:
- Standard - $9/month
- Premium - $15/month
- Perpetual - $75/one time fee
The Standard plan will likely suit most people’s needs but if you’d like to access more of the advanced editing functionality, the ability to move between Mac & PC, live streaming support and more - that’s where the Premium plan comes in.
It’s awesome to see a one time fee available for those who aren’t fans of the subscription model.
Screen Recording Software #3: Tella
Tella is another really powerful, really easy to use screen recording tool.
You can either use it in the browser or you can download the Mac app. But for the best results and highest quality recordings, we highly recommend installing the app.
Tella has a big focus on helping you create content fast. So while there are a lot of more advanced features in Tella, the way it’s laid out is really intuitive and easy to access.
In some regards you could think of this like Loom, but on steroids.
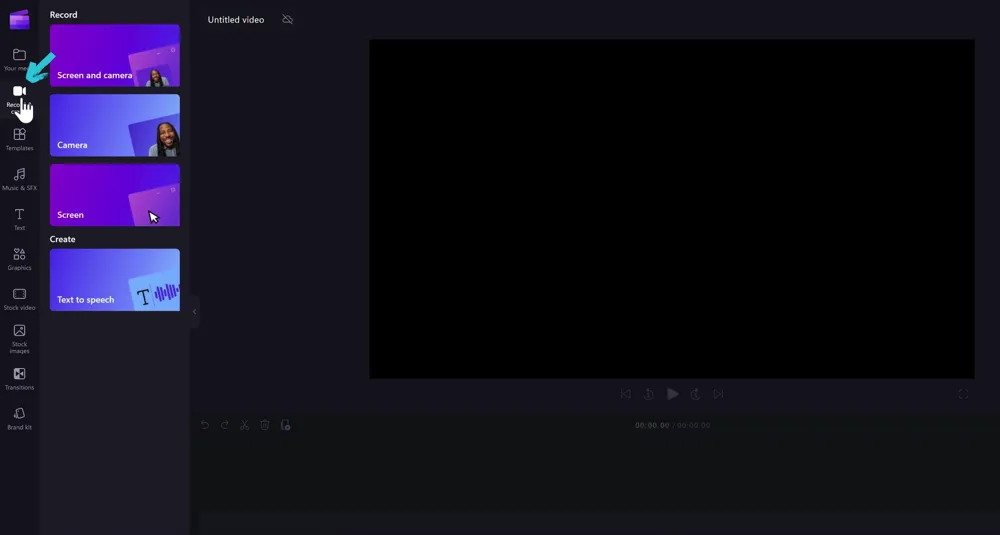
Once you’ve downloaded and installed the app, go ahead and open it on your Mac.
You’ll see a small window appear.
Then click on the Preferences icon. This is where you can customize your screen recording settings.
Tella Settings
You can access lots of settings in here such as:
- Screen recording quality
- Whether your cursor will be visible
- Whether computer audio will be recorded
- Camera recording quality
- Preview orientation
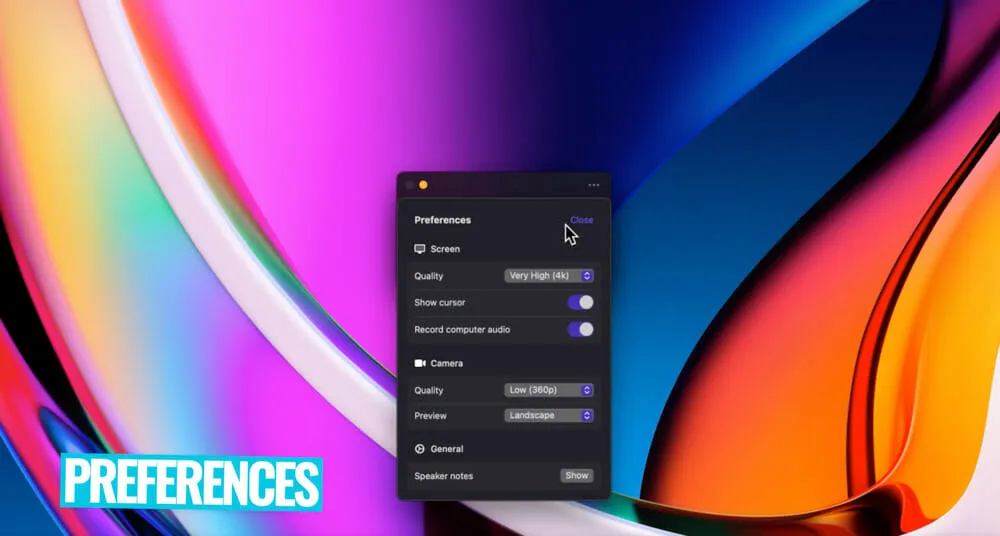
Once you’re happy with those settings you can click Done.
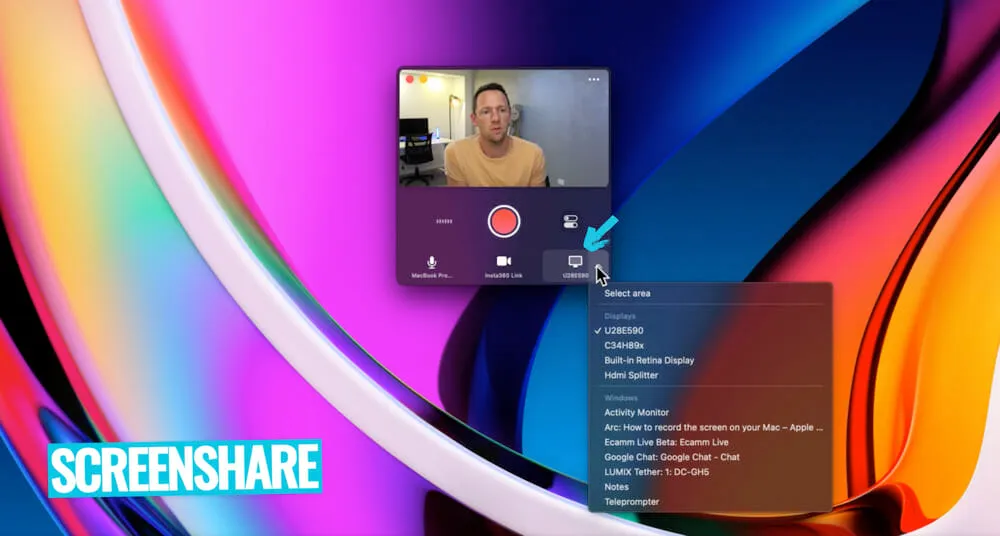
Then you can enable your camera and microphone. After they’re enabled, you can select which camera and microphone you want to use for the recording.
Click on the Screen icon to choose what screen area you want to record. You can choose from particular displays, windows or you can select an area.
Now that all your settings are ready to go, we’re ready to start recording.
How To Screen Record With Tella
When you’re ready to start the recording, press the Record button. There’ll be a countdown timer and then the recording will begin.
Once you’re recording, you can minimize the Tella window if you like. To bring back the window you can click the Tella icon in the top menu bar.
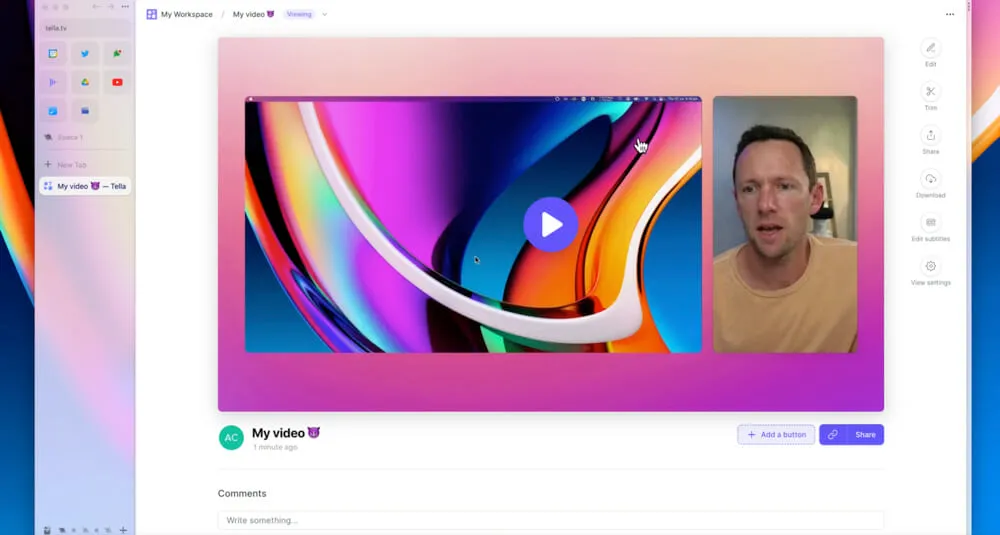
Inside that window you can cancel, restart or stop the recording. You can also hit Preview and this will preview the recording in Tella’s web interface.
From there you can access a bunch of tools including:
- Edit
- Trim
- Share
- Download
- Edit subtitles
- View settings
Let’s go ahead and hit Edit to see the built-in Tella video editing tool in action.
Tella Video Editing Tool
After you press Edit you’ll be taken to the video editing interface.
There are so many awesome features here.
The first place we’d recommend going is to the Layout section.
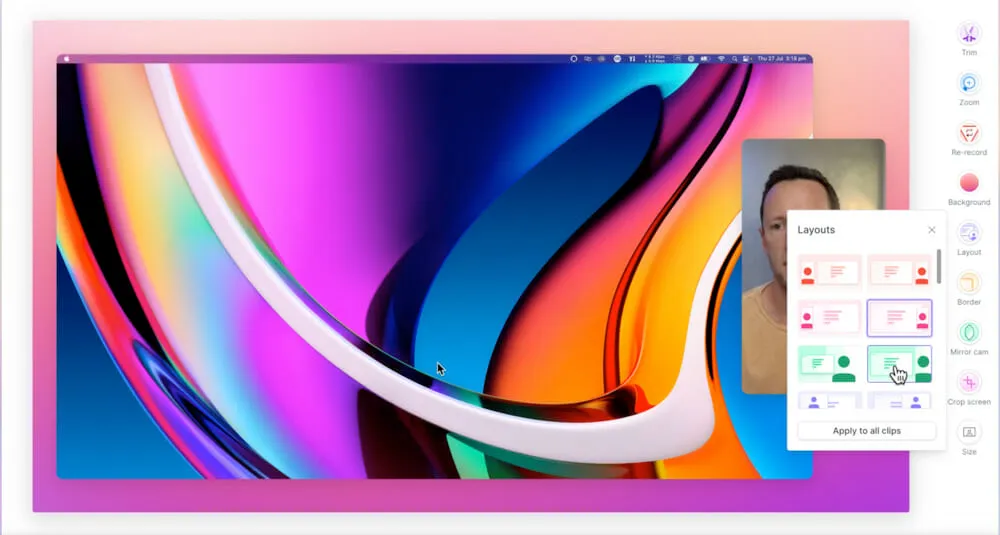
This is where you’ll find customizable preset layouts. You can really change up the look and feel of your screen recording with these different layouts.
You can adjust the size, shape and position of each of the elements.
Say you wanted to remove the top menu bar from your screen recording, you could go to Crop screen and then crop the recording to remove that menu bar.
Under Border, you can adjust the shape and style of the video border.
You can also change the background, zoom in on certain sections of the recording and add in extra files.
So you can see how quick and easy it is to customize up your recording.
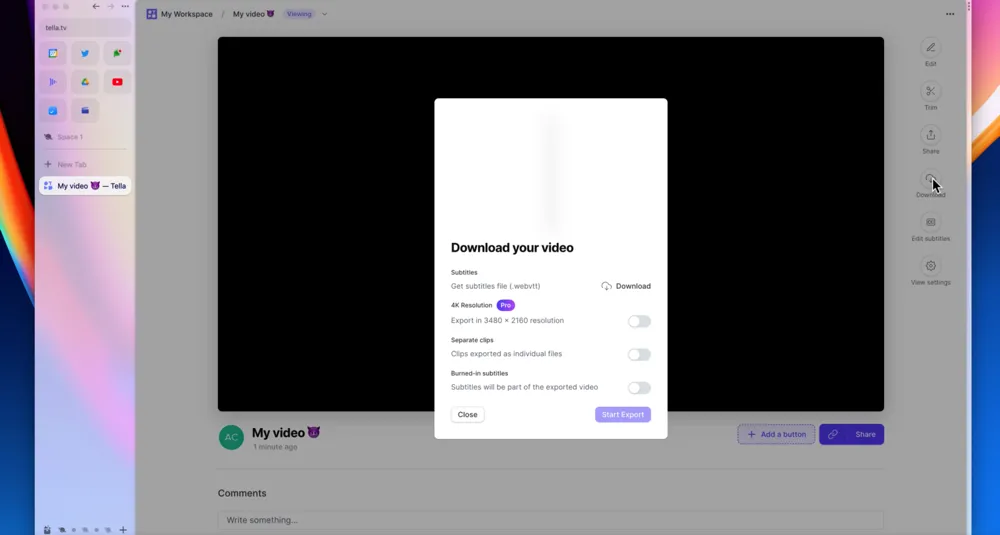
How To Export Screen Recording From Tella
After you’ve finished editing your screen recording, press Finish in the bottom right corner.
From here you have a range of options:
- Download the subtitles file
- Export in 4K resolution
- Download clips as separate files
- Download recording with subtitles burned into export
Toggle on whichever options you like and click Start Export.
We love this workflow. Some people might see it as a negative that your files are uploaded to the cloud, but you don’t need to do that step if you don’t want to.
Plus, in a lot of cases by the time we’ve finished recording the file is already on the cloud!
This also means that you don’t need to have a really powerful computer to get access to these tools. And you can have team members easily log in and edit the video recording for you.
So it has a lot of upsides. We’re such big fans that this is now how we’re creating a lot of the content for our Primal Video Accelerator program as well as for any screen recordings used in our YouTube videos.
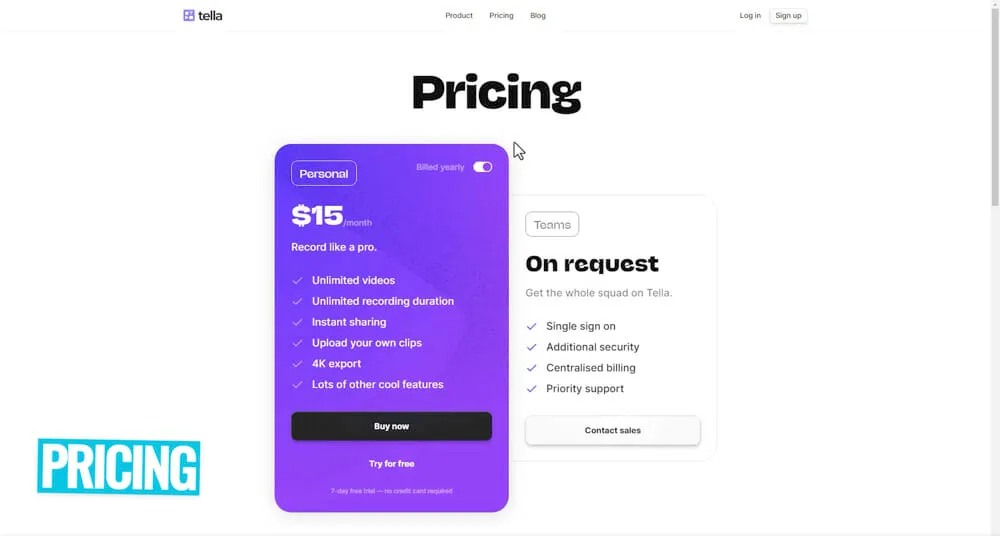
Tella Pricing Plan
There’s a 7 day free trial available for Tella. We highly recommend jumping on the trial version to make sure it’s a fit for you.
From there, you can jump on the Personal plan for $15/month.
There’s also a Teams plan available and this pricing is available on request.
How To Screen Record on Mac (Best Software)
So, what’s the best screen recording tool to help you screen record on Mac?
If you’re after something super simple, the QuickTime Player app is a solid option (especially if you want a free screen recorder).
If you want more advanced features, controls and customization, that’s where DemoCreator or Tella comes in.
But if we had to pick a standout right now, it’d be Tella.
Now that you know how to screen record on Mac, if you want to learn how to level up your video editing workflow check out the Primal Video Method. It’s our complete guide that will help you speed up your video editing process.
FAQ
How do I record my screen with sound on Mac?
You can use QuickTime, DemoCreator or Tella to record audio with your screen recordings on Mac.
How do you record video on Mac?
There are lots of tools that will allow you to record video on Mac. Our top picks are QuickTime, DemoCreator and Tella depending on specific needs.
How do I record with QuickTime on my Mac?
You can record with QuickTime by pressing Command, Shift and 5 on your keyboard. From there, press either Record Entire Screen or Record Selected Portion and click anywhere on the screen to begin recording.