iMovie is an easy to use video editing software that can quickly be downloaded for free onto your Mac or iOS device.
It’s a great option for beginners who are just getting started with video editing. In the past few years, Apple has released some big updates for iMovie. So now it’s not just great for beginners but also for more advanced video editors as well!
In this iMovie tutorial, we’ll cover everything you need to know from how to create a project right through to how to export your final video. Plus we’ll include some more advanced iMovie tips along the way to help you create better videos faster!
Here’s everything we’ll cover in our complete iMovie video editing tutorial:
- How To Create A Project in iMovie
- iMovie on Mac Interface
- How To Import Footage in iMovie
- How To Edit and Trim Footage With iMovie
- How To Add B-Roll in iMovie
- How To Add Titles & Text in iMovie
- How To Add Effects in iMovie
- How To Add Music in iMovie
- How To Adjust Audio in iMovie
- How To Color Correct in iMovie
- How To Add Filters in iMovie
- How To Add Save & Export Your Videos from iMovie
Let’s dive in.
How To Create A Project In iMovie
Getting started in iMovie is super easy and straightforward. Open iMovie and you’ll see any existing projects if you have them. To create a new project select Create New (with a huge plus icon) and then select Movie.
Before we get started with editing, let’s get accustomed with the iMovie interface. It’ll be much easier to begin the editing process if you have a handle on where everything is located first!
iMovie on Mac Interface
The iMovie interface is pretty intuitive and great for beginners to get used to. On the left menu bar you can access all of your files, photos and video assets.
Above Project Media is the Projects button which is how you can switch between different projects.
Along the top menu bar is where you will find My Media (your project files), Audio & Video, Titles, Backgrounds and Transitions.
On the right you’ll see the playback window. This is where you can preview your masterpiece as you edit. There are a few tools and controls above the playback window such as crop, audio and filters.
In the top right is the Export button which will allow you to export and share.
Below the playback window is the play button and skip forward & skip back buttons. In the bottom right you can Maximize your playback window to full screen. In the bottom left is the Record Voiceover button.
Below the Maximize button is the Settings button which is where you can adjust the project settings.
Right along the bottom is the editing timeline. This is where the magic happens.
Now that we’ve covered the interface, let’s import our footage.
How To Import Footage In iMovie
The first step of creating your video in iMovie is to import footage. Simply click Import Media (arrow down icon) under My Media and select your files. From here, you can individually select your files or you can hold down Shift to select multiple files..
Once you have your files selected, press Import Selected and your files will be brought in. To access the imported files at any time, go to the My Media tab.
Once you have imported files, if you want to add more you can find the Import Media button in the top left corner or simply go to File, then Import Media…
The next step is to click and drag your primary footage into the timeline.
Before we get into editing, it’s a good idea to adjust the project settings now that you have a video clip in the timeline. To do this, go to the Settings button under the playback window.
Under Settings, the main things you may want to change are:
- The clip size
- Turn Show Waveforms on or off
If you want to zoom in and out on your timeline at any time, there’s a slide bar next to the Settings button that will allow you to do this. Or you can use these keyboard shortcuts:
- Command + to zoom in
- Command - to zoom out
Now that your footage is imported, it’s time to cover exactly how to edit videos with iMovie.
How To Edit And Trim Footage In iMovie
To start trimming down your footage, go to the start of your video clip. Let’s say you want to remove the first section of your footage.
There are a couple of ways to do this:
- Blade Tool: Drag the playback bar (the yellow vertical line in the editing timeline) to where you want your clip to state. Press Command B on the keyboard and you’ll then have two clips. Select the one you want to remove and press Delete on the keyboard.
- Handle: Select the clip and use the handle to adjust the clip length. Drag it until you reach the point where you want your clip to start.
You can then go to the end of your footage and use the blade tool or handle to trim your footage there as well.
It’s not just the beginning and end of your clip that you can do this. You can use these tools to remove unnecessary footage at any point throughout your clip.
First use the blade tool to cut the footage. Then either cut the footage again so that you can delete the middle section. Or use the handle to trim your footage from where you cut it.
So now use these techniques for splitting clips and trimming your footage to remove any mistakes or any footage that you don’t need. You want to be left with only the good footage that you’re actually going to use in your video.
Once that’s done, you’ll be left with lots of little video clips on your timeline. If you need to change the order of these, just click the individual clips and drag them to wherever you want it to go on the timeline.
Now that your primary footage is sorted, let’s bring in any overlay footage or B-roll.
How To Add B-Roll In iMovie
It’s super easy to add B-roll to your video.
Drag the B-roll footage from the My Media section onto your timeline. But instead of dropping it in next to your primary footage, drop it in the section above your primary footage.
Once you’ve dragged the B-roll footage, it will automatically play instead of the primary footage. You can preview this in the playback window.
Just like with the primary footage clips, you can click and drag the handles to adjust the length of the clip. Or you can use the blade tool to cut them. You can drag them around to different locations.
Add in all of the B-roll you want in your video at this stage and make sure you’re happy with the location of each of the B-roll clips.
Now let’s add in any titles and graphics to the video.
How To Add Titles & Text In iMovie
Go to Titles in the top menu and this will open all of the different title presets.
If you hover your mouse over each of the title options you’ll see a preview in the playback window. Some are animated, some are static - there are lots of options.
Once you’ve decided on a title, click and drop it into the timeline. You’ll see it appears on the timeline as its own clip. You might need to zoom in on the section you placed it so that it’s easier to make any adjustments.
Just like the other clips, you can move it around and adjust the length by dragging the handles.
To customize the text, double click on the title clip in your timeline. Then you can change the text using the Text Editor in the playback window. You can adjust the color, size, font and alignment.
If you’re looking for something a bit fancier in terms of your titles, Placeit is an awesome tool for this.
So for example, you could create an epic video intro in Placeit and then upload it to iMovie. Then it’s as simple as dragging the intro onto your timeline.
Now let’s go over how to add in transitions and effects.
How To Add Effects In iMovie
Go to Transitions in the top menu. There are lots of transitions in here like Wipe Up, Circle Open, and Mosaic.
But try not to go overboard with the transitions. It’s really easy to cheapen your video with some of these. Usually we would only use Cross Dissolve, Fade To Black or Fade To White.
Once you’ve chosen a transition, all you need to do is click and drag it to your timeline. Make sure you drop it in between two clips. Then you’ll see a little Transition icon in between the clips.
Now, if you want a transition between two clips that are both of you talking, it’s best not to include one of these preset transitions. The better option is to use a zoom cut.
“What’s a zoom cut?”, you might be wondering. A zoom cut is where you zoom in on one of your shots to make the shots look a bit different. It gives the appearance of a second, closer camera angle which helps break up your content.
How to Add Zoom Cuts
Select the second clip of yourself talking to the camera. Press the Crop button in the top menu and select Crop to Fill. This will enable the crop handles in the corners of your video.
Click and drag one of the corners of the box in and then you can move the box so that it’s centered.
Don’t crop the video too much as you may lose quality depending on how your footage was shot. Once you’ve cropped the shot a little bit, simply click off the shot and it will save.
Click on the first clip and hit play so you can preview the zoom cut transition from clip one to clip two. You’ll see there’s just a slight zoom in on the second shot that gives a really nice effect.
PRO TIP: To make this transition really effective, make sure you line up your eyes in both shots. This will allow for a seamless transition that’s easy and enjoyable to watch.
Other iMovie Effects
There are a few other useful effects in iMovie.
If you’ve got shaky footage, there’s a pretty cool feature that can fix it. Select a clip and press the Video Stabilizer icon. Then tick the Stabilize Shaky Videos box.
Or if you want to speed up or slow down a clip, you can do this by hitting the Speed Controller icon.
Now let’s add music to our iMovie project.
How To Add Music In iMovie
Slide back to the beginning of your timeline. In the top menu press Audio & Video. You might already have some music imported under Music (from iTunes), Sound Effects or GarageBand.
If not, you can import audio files into the My Media tab just like you did when importing your video files. Go to File, then Import Media… and select your audio tracks.
Once you’ve got your track uploaded, click and drag it onto the start of your timeline. Audio files come in as green clips rather than blue - this makes it really easy to differentiate which clips are which.
Just like with the other clips, you can move your clip around by dragging it and you can adjust the start and end times by dragging the handles.
Move your mouse cursor over the end of the clip and you will see a little circle appear. Click and drag this backwards to make the music fade out until it ends. You can also do this at the beginning if you want the music to fade in slightly.
Again, if you want to remove a chunk of audio simply use the blade tool to cut it and then adjust your clip that way.
It’s a good idea to preview your video now and make any tweaks so that your video footage flows with the audio track.
Now that your music has been added, this is the perfect time to adjust your overall audio levels.
How To Adjust Audio In iMovie
First up, hover your mouse over the volume adjustment bar on your background music and drag the music volume down to 0%. This is so you can ensure your primary audio is set to the right volume first.
Select the first primary footage clip. Hover over the clip again for the volume adjustment bar. If you drag the bar up very high, parts of the audio will reach the yellow, orange or red sections.
As a general rule, you never want your audio to go into the orange or red sections. This means it’s too loud and that the audio is distorting.
You want to find the point where the volume is as high as it can be without entering the orange or red zones. If it touches the yellow zone occasionally - that’s okay.
If you’ve filmed all of your footage at the same time, same location with the same camera and microphone, you’ll know that you probably don’t need to adjust every individual clip manually.
Of course you can go through and do this manually if some are a bit louder than others. But you can save time by applying the volume level of the first clip to all of your clips.
To do this, select the first clip and copy it by pressing Command C. Then zoom out so you can see all of the remaining clips.
Select them all by clicking and dragging a box over all of them. Go to Edit, then Paste Adjustments and select Volume.
Once those volume levels have been applied to all clips, make sure you go through the entire video just to make sure none of the audio goes into the orange or red sections and your b-roll clips are muted.
How To Add Audio Effects In iMovie
There are a few audio effects that you can add to your clips in iMovie as well. One that’s really useful is the noise removal tool.
Select the clip you want to make adjustments to, go to the little Audio icon in the top menu. Tick the Reduce background noise box.
This is also where the Equalizer settings are located. Click the Equalizer drop down menu and you’ll see a few options to choose from. You can select Voice Enhance, Bass Boost, Treble Reduce - things like that to adjust your audio.
Now that your primary audio is sorted, it’s time to bring the background music back in.
The volume of your background music is really up to you. As a general guide, we start at 20 to 30% for background music in our videos. But obviously this depends on the specific audio track, some might be louder than others.
Once you’ve set your background music volume level, listen through your video to see if it sounds too quiet or if it’s too loud and distracting. Adjust the levels until it reaches a happy medium.
PRO TIP: Go through this process using headphones as this gives the best representation of the actual volume levels.
How To Color Correct In iMovie
The next step is to color grade or color correct your video footage.
Select the first clip - once again, we’ll adjust the settings on the first clip and then apply it to the remaining clips.
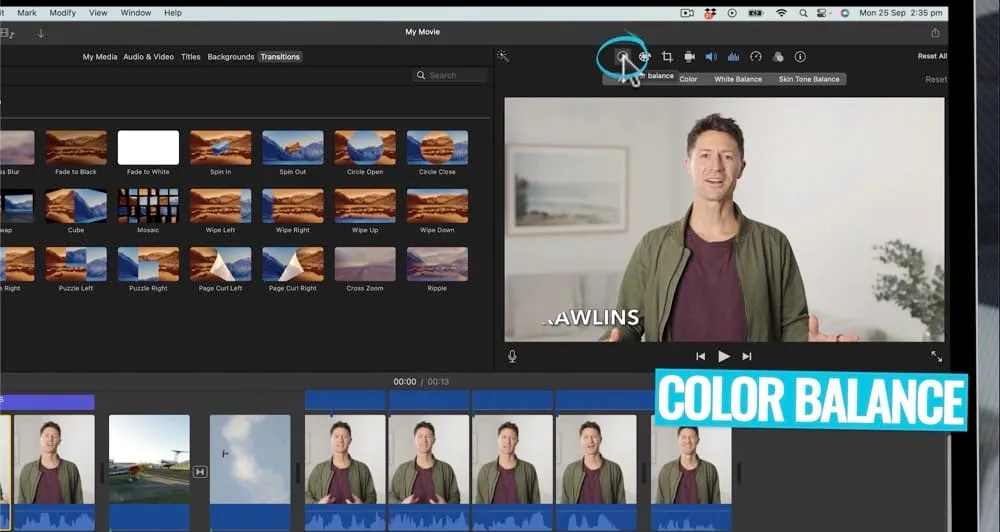
There are a couple of options from here:
- Color Balance: This setting does some automatic adjustments (we personally like to use White Balance but feel free to play around with the different options here)
- Color Correction: There are three different sliders you can adjust to make your shot look really great (this is our recommended way of color correcting in iMovie)
In the Color Correction tab, the first slider controls the overall shot brightness and contrast. If you slide the white circle to the right, it will increase the bright areas of your shot. If you slide the white circle to the left, it will darken the bright areas of your shot.
On the other end of the brightness & contrast slider is the black circle. If you drag this circle around, it will adjust the dark areas of your shot. And if you move the circle in the middle, it will adjust the mid-tones or the overall appearance of your shot.
There are another two slide bars in the Color Correction tab that can adjust the:
- Temperature (slider on the right): To make your shot warmer, slide the circle to the right. To make your shot cooler, slide the circle to the left.
- Hue & Saturation (slider in the middle): To emphasize the colors, slide the circle to the right. To tone down the colors, slide the circle to the left.
If you’d prefer to go for a different effect, you could try one of built-in clip filters. These are pretty much like Instagram filters. Go to the Filters icon. Click on the None button next to Clip Filter. A pop up box will appear with all of the different filters.
You can experiment with these but it’s usually something we steer clear from in our videos as we prefer a more natural tone.
Once again, you can apply all of these adjustments to all clips by selecting the clip you made those adjustments on and pressing Command C to copy. Select the remaining clips and go to Edit, then Paste Adjustments and then press Color Correction.
After you’ve finished the color correction process, your video is complete. It’s now time to export.
PRO TIP: If you have shots that are in different settings like if they’re indoors, outdoors or different day, we recommend color correcting those individually!
How To Save & Export Your Videos from iMovie
To export your completed video, go to the Export button in the top right corner. Then you have a few options.
You can:
- Create an email friendly version of your video
- Save out the current frame that’s on your screen at that point
- Direct export your video to YouTube and Facebook
- Export file that save the file onto your computer
In our process, we export the file onto the computer, check that everything looks good and then manually upload it onto YouTube and Facebook. But if one of the other options works better for you, go for it!
If you’re going with our process, select Export File. Give the video a name. Under Format make sure Video and Audio is selected. You can adjust the Resolution and Quality. We recommend selecting High under Quality as you’ll still have good quality but the file size won’t be too large.
Under Compress we recommend selecting Faster rather than Better Quality. This is because in our experience, when exporting with Better Quality the video isn’t actually that higher quality. So it works out better for it to be downloaded Faster.
Then select Next and choose where you want the file to be saved. Press Save.
In the top right corner you’ll see a Progress circle so you can see the estimated time remaining until the export is complete.
Once your export is finished and the video is saved onto your computer, don’t forget to watch through the entire video to make sure everything looks and sounds good.
PRO TIP: It’s a good idea to watch the playback on multiple devices so you know for certain it will look good no matter what your viewers are watching on!
Now You Know How To Use iMovie on Mac
There you have it - the complete guide to iMovie video editing on your Mac computer. This Apple iMovie tutorial covered everything you need to know from how to edit video in iMovie to our best iMovie Mac tips and tricks.
Now that you know exactly how to use iMovie on Mac, check out the Primal Video Method. It’s our complete playbook with everything you need to know on how to edit videos faster!
FAQ
Is iMovie good for beginners?
iMovie is an awesome video editor for beginners. It’s really intuitive and easy to use, making it a great option if you’re just starting out.
How do you make an iMovie on Mac?
You can create a video in iMovie by following the step-by-step process above in our iMovie tutorial.
Is iMovie good for video editing?
iMovie is a fairly basic video editing tool, making it great for beginners. If you’re looking for a more advanced video editing platform, check out our Best Video Editing Software For Mac roundup to find the right option for you.