OpenShot Video Editor is a FREE video editing software that works on Mac, Windows and Linux. It has some awesome features to help you edit videos quickly & easily, whether you’re a complete beginner or more advanced user.
Best of all, there’s no watermark! So if you’re looking for the best video editing software but don’t have the budget to splurge on more expensive applications - this open source software is a great option.
So today we’ll show you exactly how to use OpenShot Video Editor in this complete step-by-step tutorial for beginners. Plus we’ll cover some useful OpenShot video editing tips along the way!
Here’s exactly what we’ll cover:
- OpenShot Interface
- How To Set Up A Project in OpenShot
- How To Import Footage
- How To Edit In OpenShot
- How To Add B-Roll In OpenShot
- How To Add Titles In OpenShot
- How To Add Transitions & Effects In OpenShot
- How To Add Music In OpenShot
- How To Adjust Audio Levels In OpenShot
- How To Color Grade In OpenShot
- How To Export Videos In OpenShot
We’ll be running through this OpenShot tutorial on Mac but the process is pretty much the same on Windows and Linux. So feel free to follow along using whichever device you have.
Let’s start by getting familiar with the OpenShot interface.
OpenShot Interface
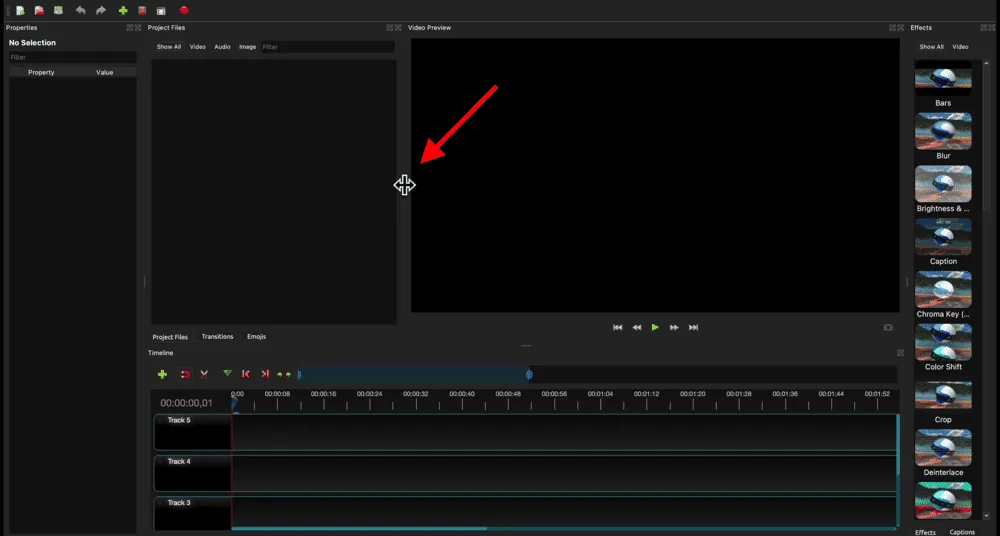
Here’s a quick rundown of the OpenShot interface:
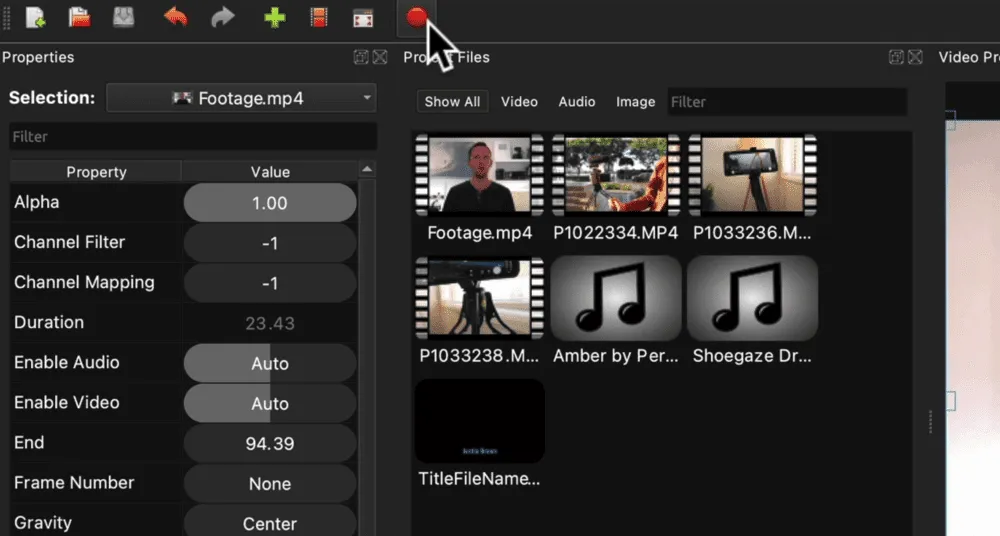
- Project Files Area: Where all your files will be (you can change this to show transitions, effects and emojis)
- Playback Window: This is where you can see everything that you’re editing
- Playback Controls: These allow you to skip back, rewind, play, fast forward and skip forward
- Editing Timeline: This is where the magic (editing) happens!
- Top Menu Bar: Where you can create a new project, open new files, undo, redo, import files and export.
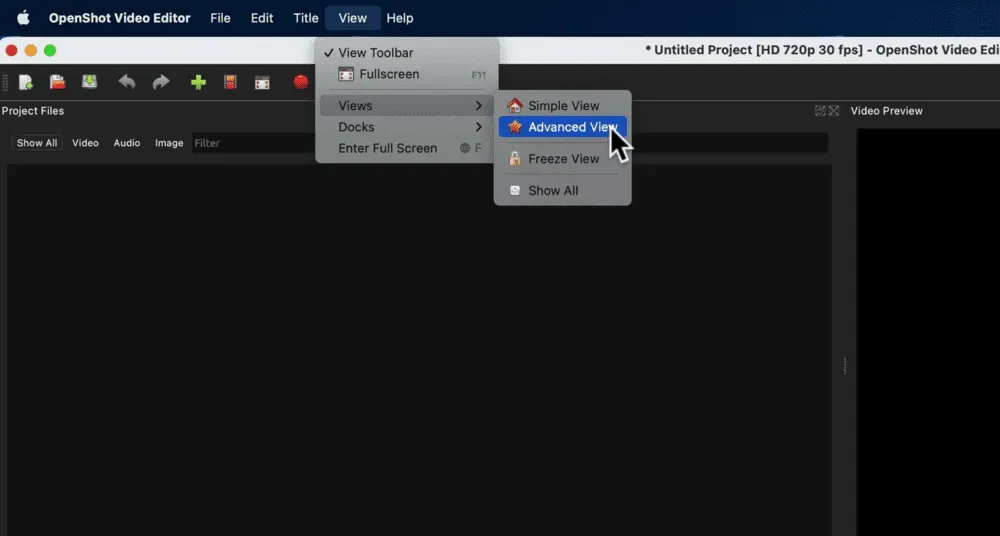
Now before we get started with editing, one thing we like to do in OpenShot is change the interface view.
To do this, go to View in the top menu bar. Then go to Views and select Advanced View.
Once you’ve enabled Advanced View, the Properties area will always be visible on the left and the Effects will always be visible on the right. You can close them by hitting the X button.
You can also pick up and resize the different windows. So we like to make the preview window bigger. But you can customize the interface to suit your computer screen.
Once you’ve got the interface sorted, the next step is to set up the project.
How To Set Up a Project in OpenShot
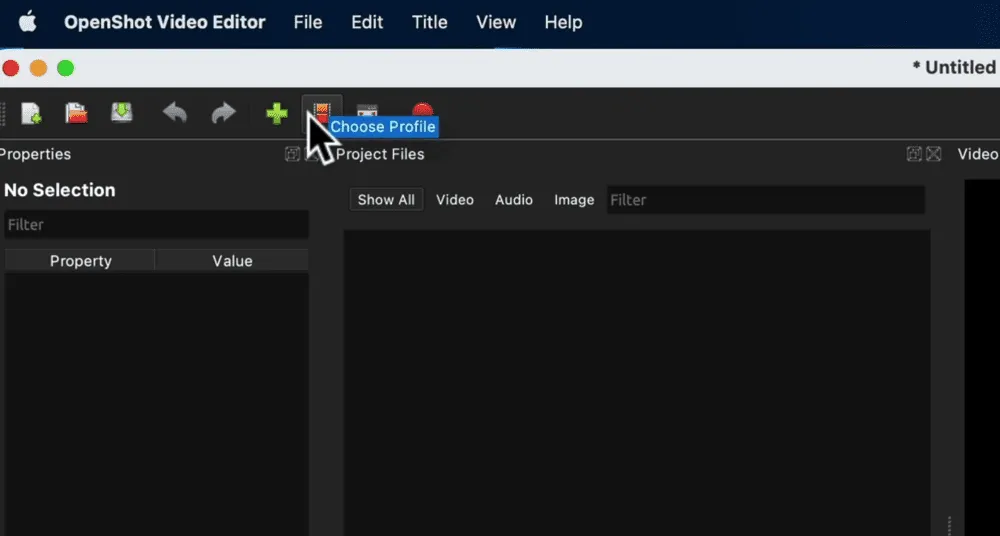
At the top of your screen, you’ll see the default on a new project is 720p 30 frames per second.

Unless those are the settings you’re after, you’ll need to change it. To do this, go to the Choose Profile icon in the top menu bar. Alternatively you can go to File and then Choose Profile.
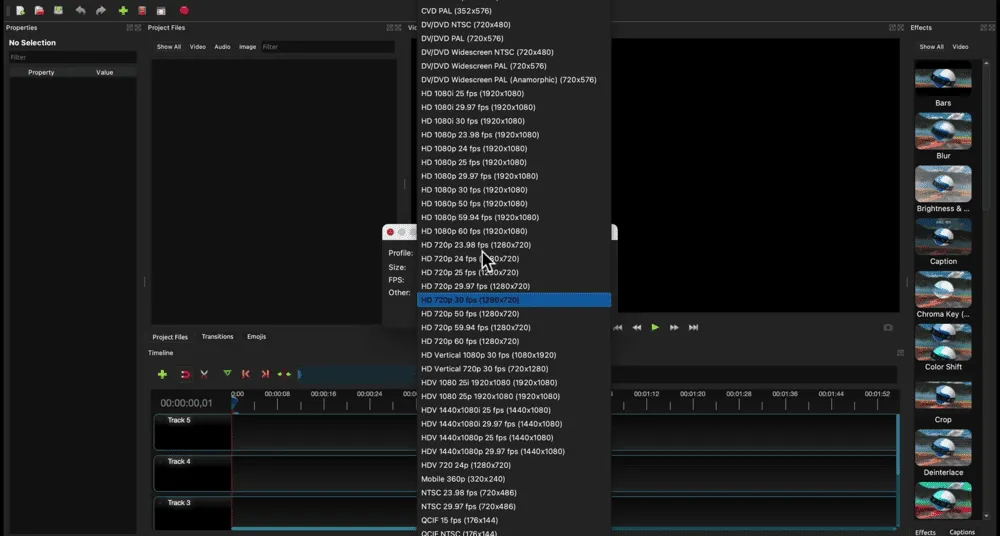
A pop up window will appear. You can select the video settings you want in the drop down menu. For this video, the footage that we’ve got is HD 1080p at 25 fps.
If you don’t know which one to pick, just match whatever settings your primary camera footage was filmed at. So if it was filmed at 24 fps, you want to pick that here.
Once you’ve selected the profile, hit Close.
Then go ahead and save your project. To do this, go to File and then Save Project. Give the project a name and choose where you want it to be saved. Then press Save.
Now that you’ve set up your project, it’s time to import footage.
How To Import Footage
There are a couple of ways you can import footage in OpenShot:
- Go to the Import Files button in the top menu that looks like a green + button
- Right click in the Project Files window and press Import Files…
- Drag and drop your footage in the Project Files window from an Explorer or Finder window

Using one of those methods, bring in your primary footage, b-roll footage and music.
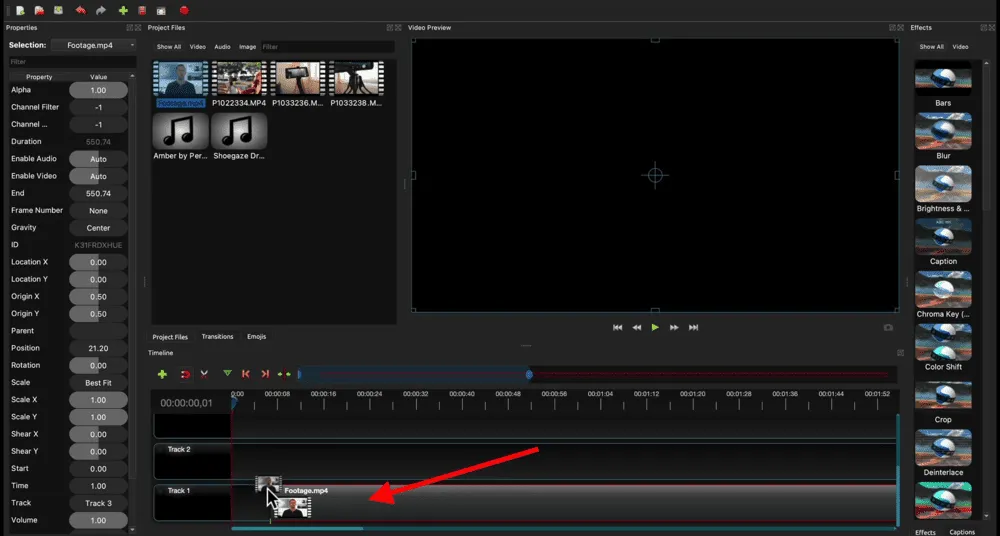
It’s always a good idea to place your primary footage on Track 1. Then you can build up with your b-roll or overlay footage.
So click and drag your primary footage to Track 1 on the editing timeline.
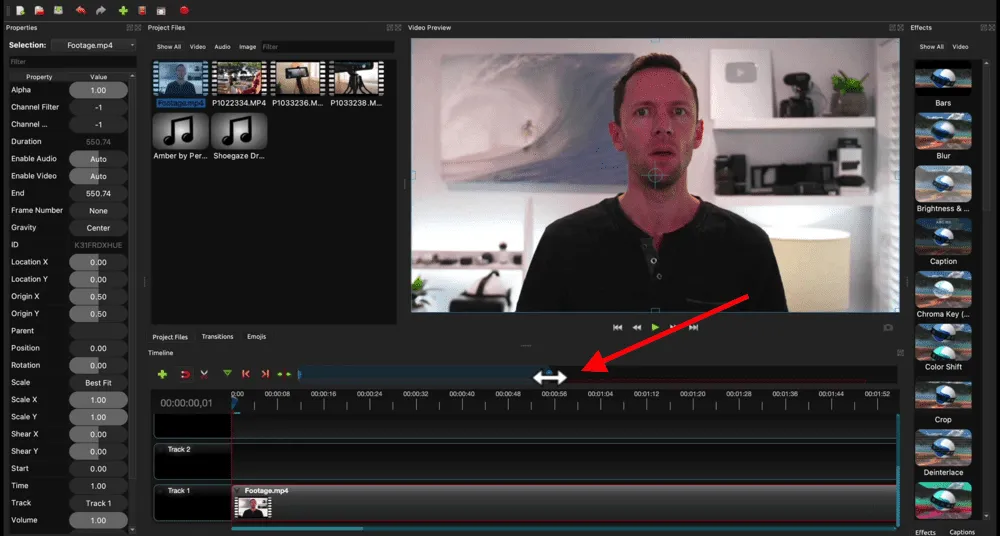
Now while editing you can zoom in on the timeline using the slider area above the timeline.
If you want to zoom out, stretch the blue slider bar to the right so that you can see the entire footage clip. If you want to zoom in, take it back to the beginning and it’ll zoom in on the start of the clip.
Another thing we like to turn on is the audio waveforms. To do this, click the drop down arrow in the top left corner of your primary footage clip. Then go to Display and press Show Waveform.
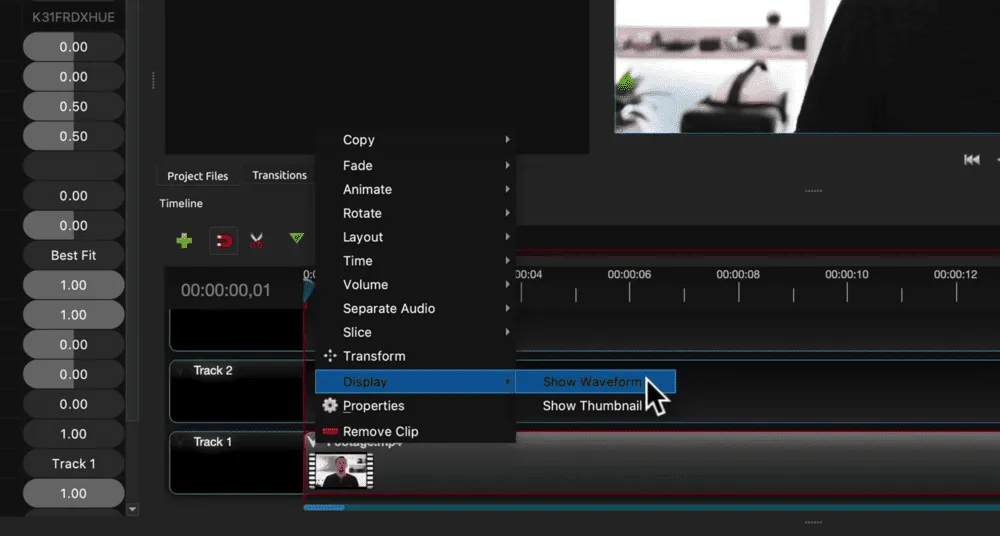
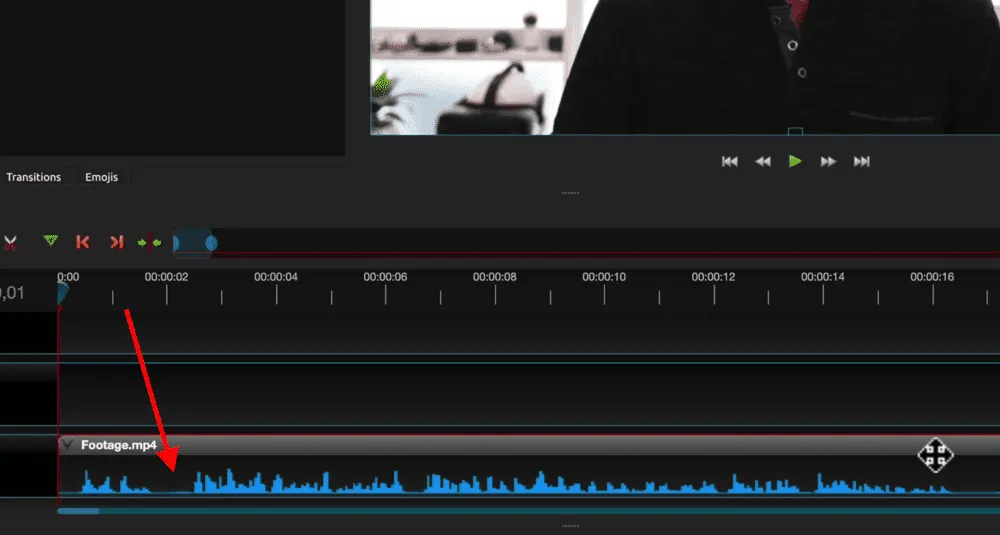
Then OpenShot analyzes the audio in that clip and will display a visual representation of the audio on-screen.
This makes it really simple to tell where you might have stopped talking or done a bad take. Then you can easily go through and remove those sections.
So now let’s go over how to trim down your footage in Open Shot.
How To Edit In OpenShot
There are a few different ways you can remove footage in OpenShot. Let’s say you want to remove a bad take at the very beginning of your footage.
Using The Two Arrows
- Move the playback head (the red vertical line on your timeline) to the point where you want the footage to begin
- Hover your mouse over the beginning of the clip and you’ll notice that the cursor changes to two arrows
- Click and drag the beginning of the clip, then release it at the point where the playback head is (this is the new starting point of that clip)
- Click and drag the entire clip to the beginning of the timeline to remove the empty space where the bad footage was

Using The Splice Tool
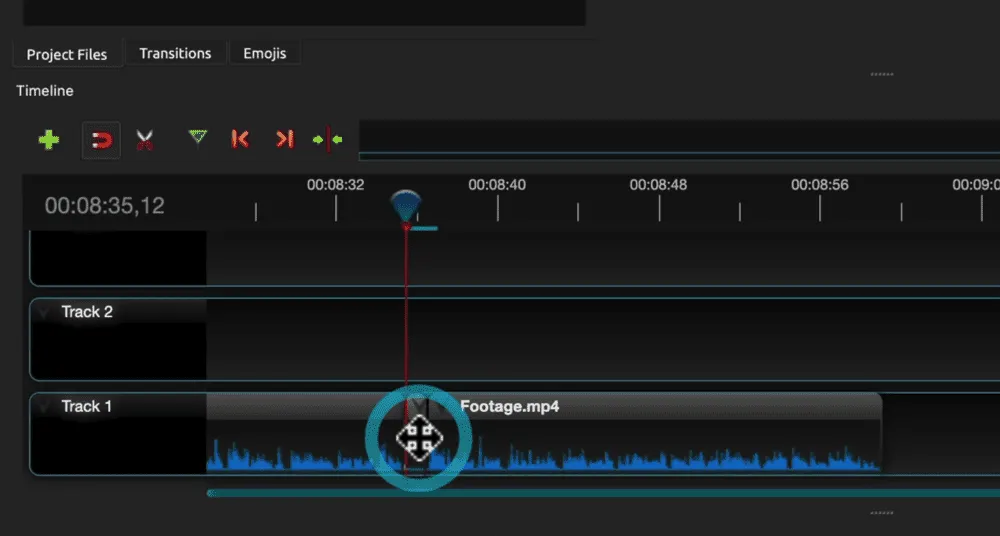
- Click on the clip to make sure it’s selected
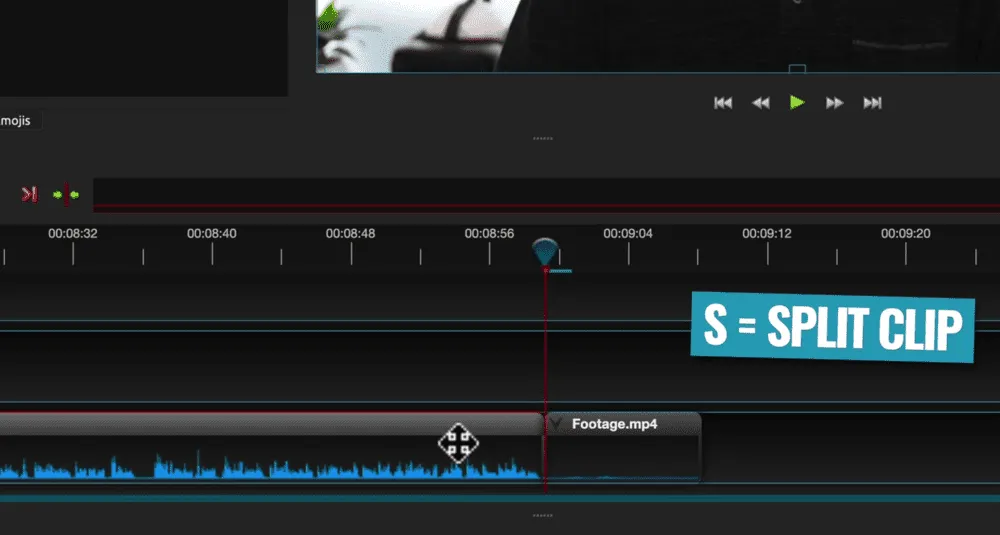
- Align the playback head at the point you want the footage to begin
- Press S on the keyboard to splice or split the clip (you’ll then have two clips)
- Select the clip with the bad footage and press Delete on the keyboard (if you’re using Mac you’ll need to press Function and Delete)
You can use the Splice tool to remove a chunk of footage in the middle of a clip too. Simply press S on either side of the bad footage and delete the middle section. Then drag the clip to close the gap.
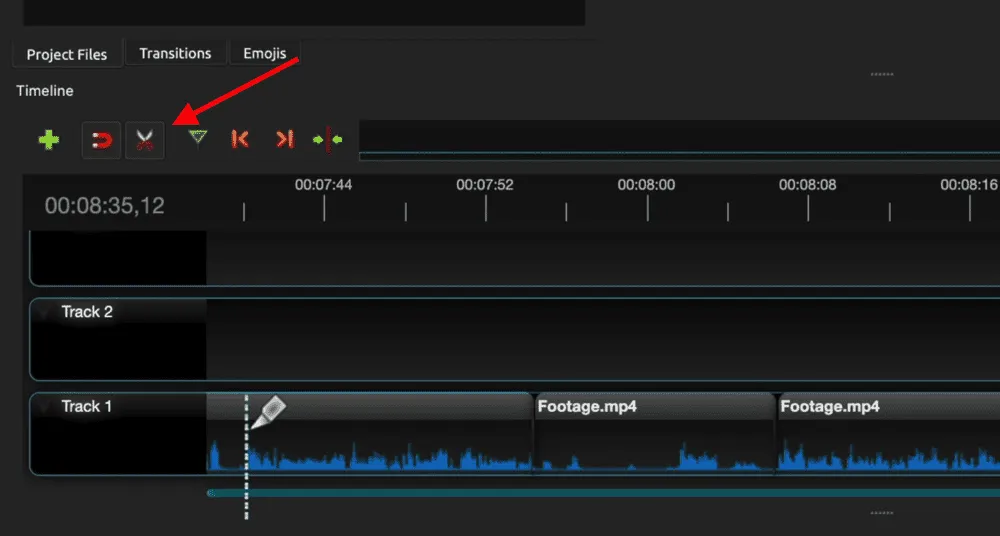
Using the Razor Tool
- Select the scissors icon above the timeline - this is the Razor tool
- Once that’s selected, you don’t need to select a clip and press S - simply click anywhere you want to make a cut
- Make as many cuts as you like, then disable the Razor tool by clicking the scissors icon again
- Then you can delete any clips and move them around on the timeline
This is a great tool for making cuts in bulk. It allows you to trim down the footage really quickly.
Using Ripple Edit
This tool cuts and deletes a clip in one go. Let’s say you want to remove the right side of a clip and leave the left.
- Align the playback head where the good footage ends
- Right click on the clip, go to Slice and select Keep Left Side
- This will cut the clip and remove all footage on right side of the playback head
- Click and drag the clip to close the gap on the timeline
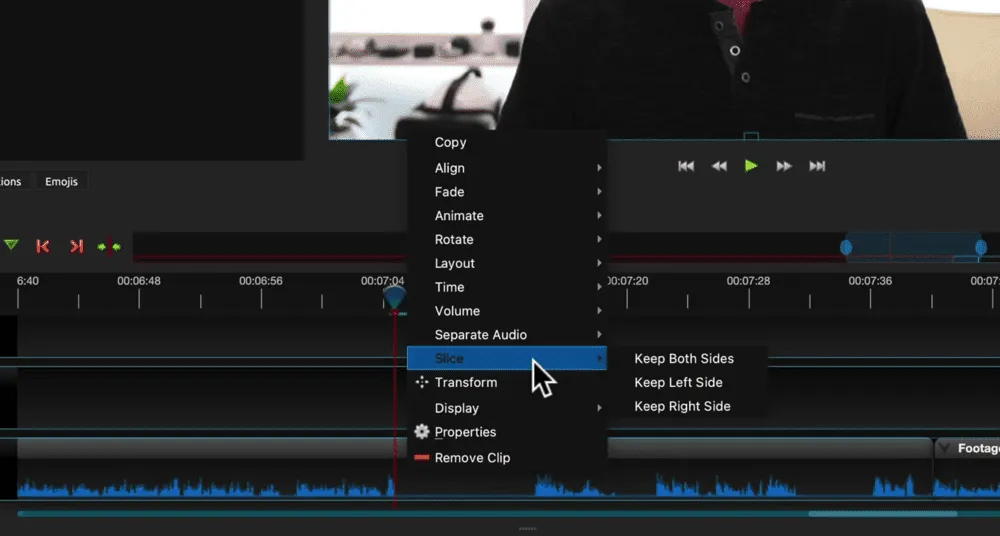
You can use this tool to remove footage on the left side of a clip as well. Simply go to Slice and select Keep Right Side.
This is our favorite way to remove footage in OpenShot. It makes it really quick to go through and edit down all your footage.
Now that you know all of the tools that are available to you, go through and remove any footage you don’t want in your final video using whichever tools suit you.
Once you’ve done that, the next step is to add b-roll or overlay footage.
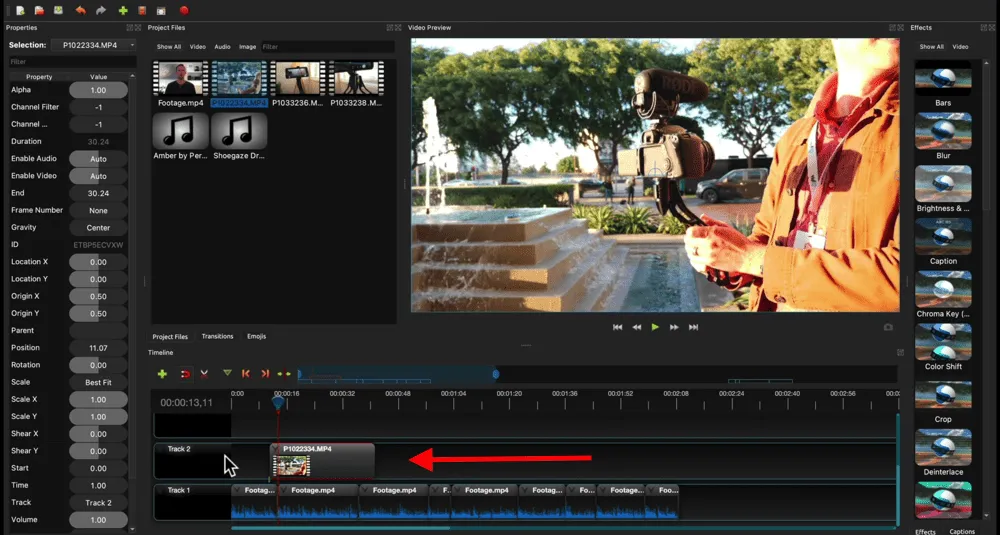
How To Add B-Roll In OpenShot
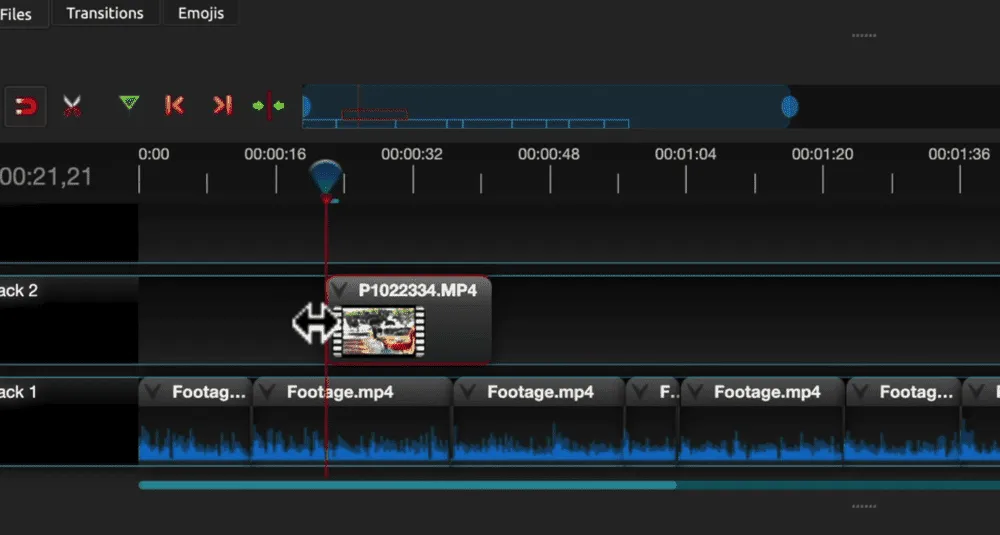
Click and drag a b-roll footage clip from the Project Files window onto the layer above the primary footage.
Just like with the primary footage, you can use all the same methods and tools to trim this down.
You can also pick up b-roll footage clips and move them wherever you want them to be placed along the timeline.
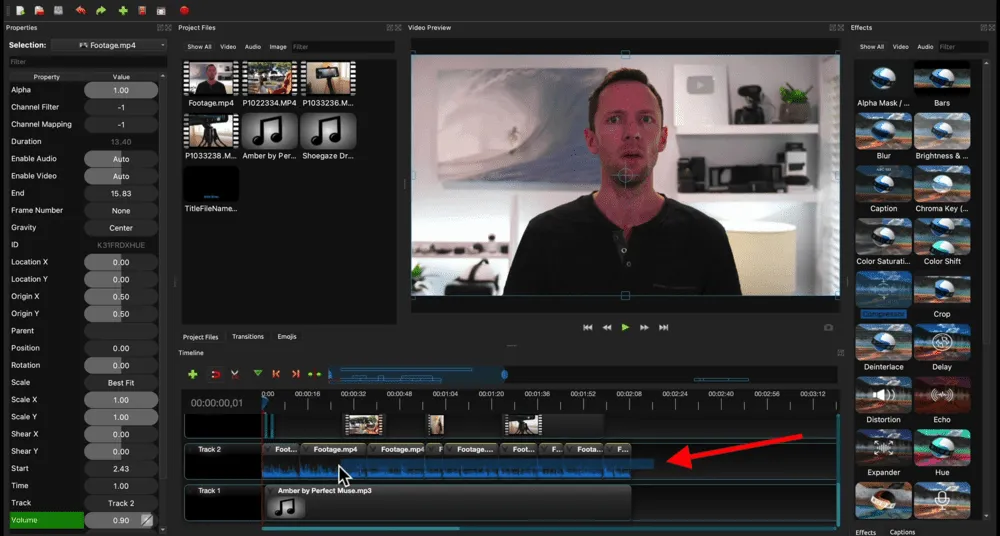
Depending on the type of video you’re creating, you’ll likely want to remove the audio from your b-roll footage.
To do this, select the clip and go to the Properties window on the left side. Scroll down to Volume and drag the slider all the way down to zero.
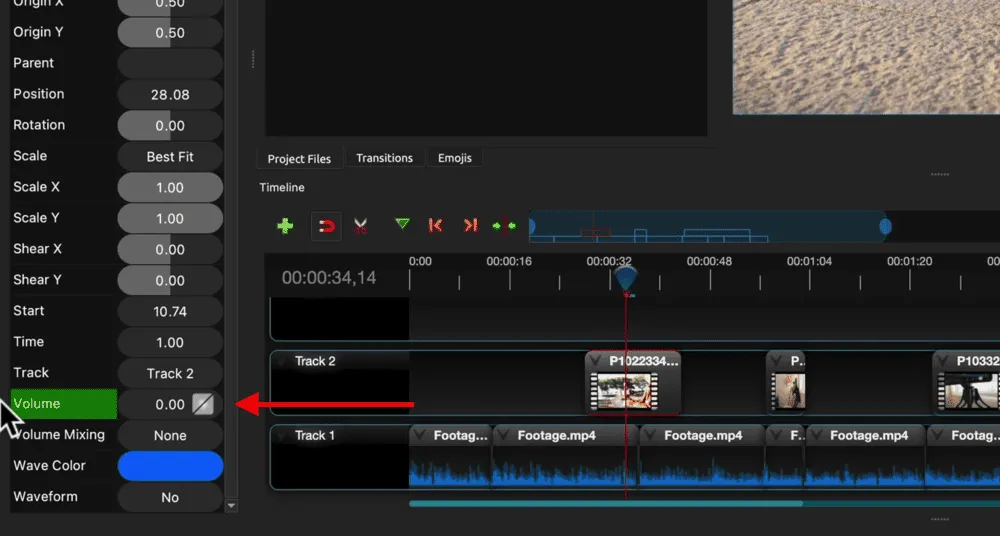
Even if you do want to keep the b-roll audio, we recommend muting it for now so that it doesn’t interfere with the shaping of your primary content.
Now let’s add in any titles or text to the video.
How To Add Titles In OpenShot
Go to the start of your project on the editing timeline and zoom in so you have more control over the area.
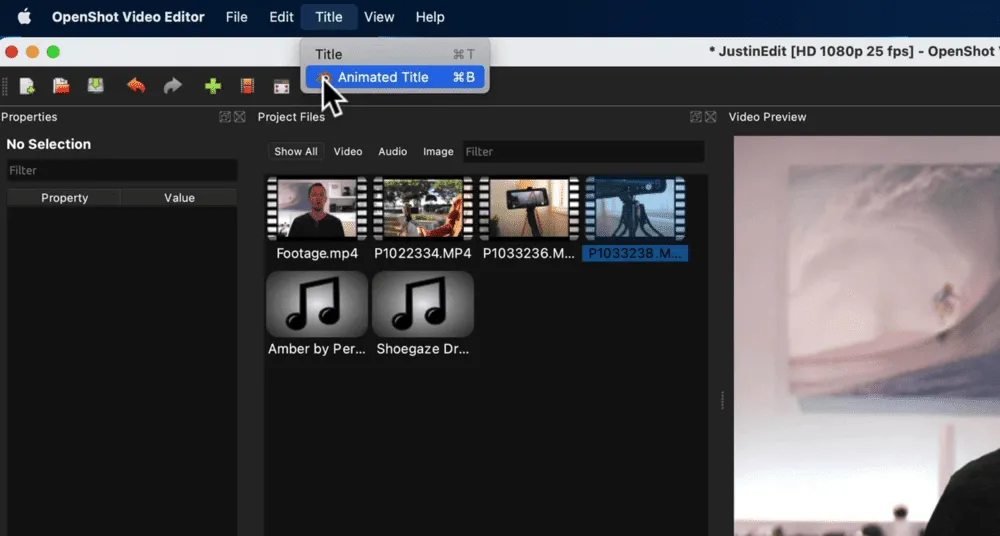
Then go to Title in the top menu. Here you have two options: Title and Animated Title.
Under Animated Title is where you have direct integration with Blender which is a free, open source 3D modeling and animation tool.
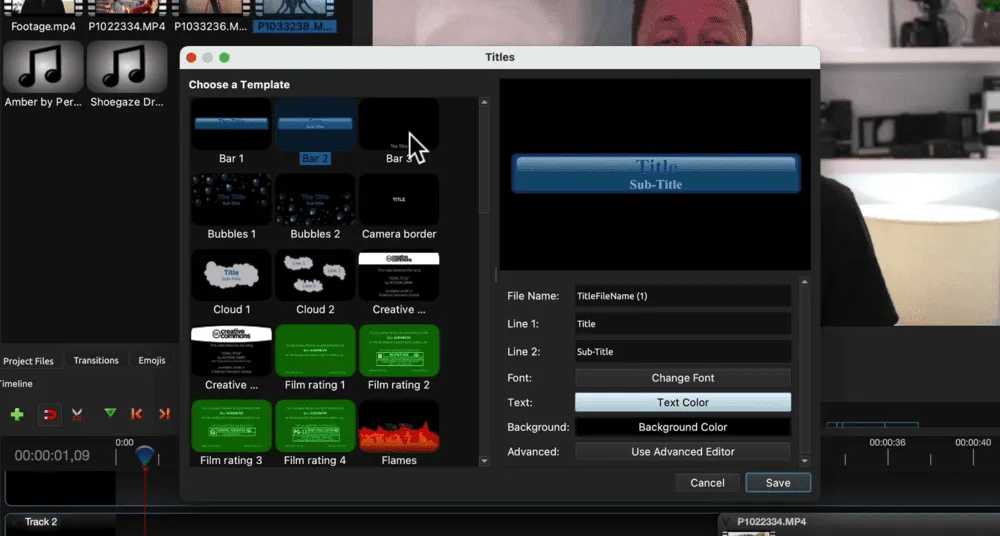
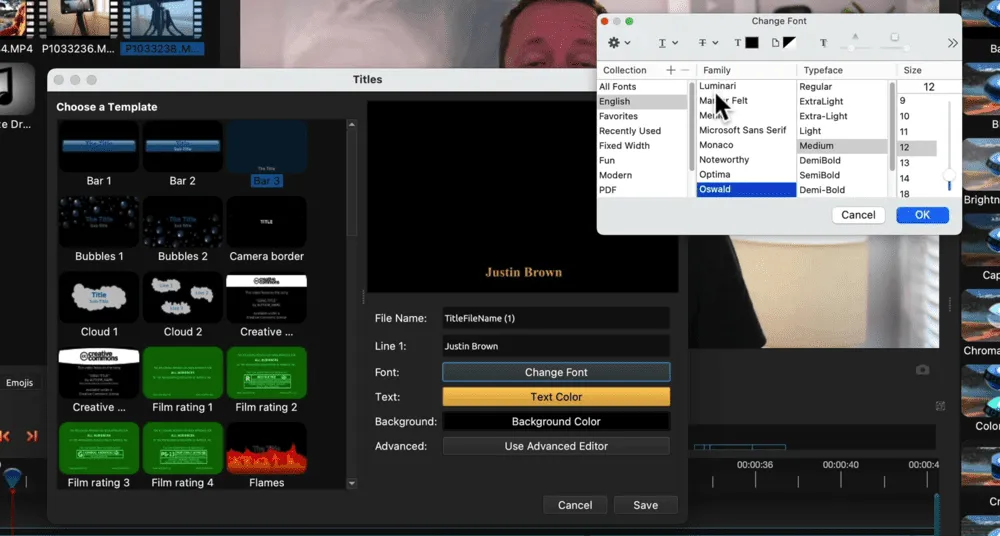
This is quite advanced so for this tutorial, we’ll stick with a basic title. Select Title and a pop up window will appear with a ton of different text templates.
Once you’ve selected a title template, insert the text you want in the Line 1 field. You can change the font, text color and background color.
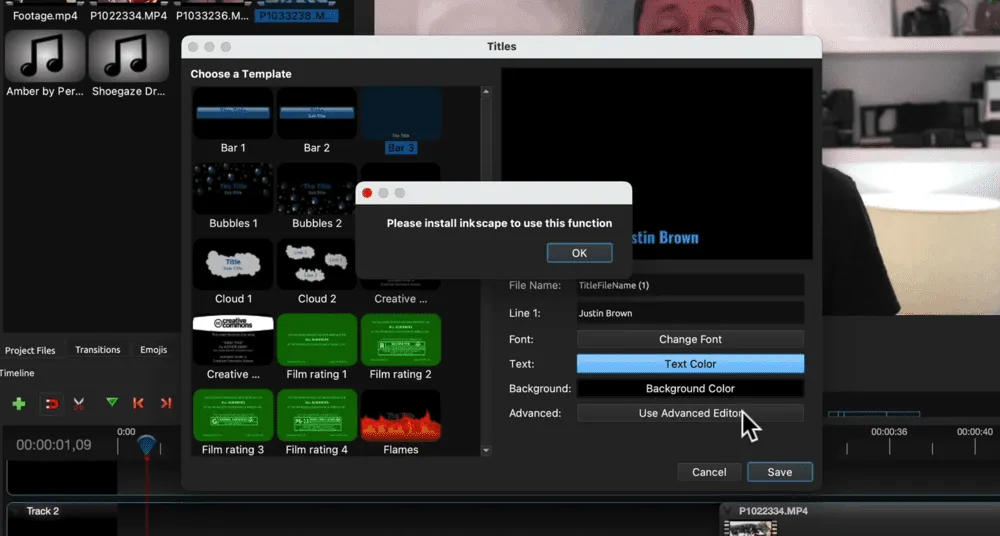
You have the option here to Use Advanced Editor. This directly links to another free program called Inkscape.
This is a great graphic designer tool. If you want more control over your titles, Inkscape will help you achieve that.
PRO TIP: Our number one go-to tool for animated titles and graphics is Placeit.
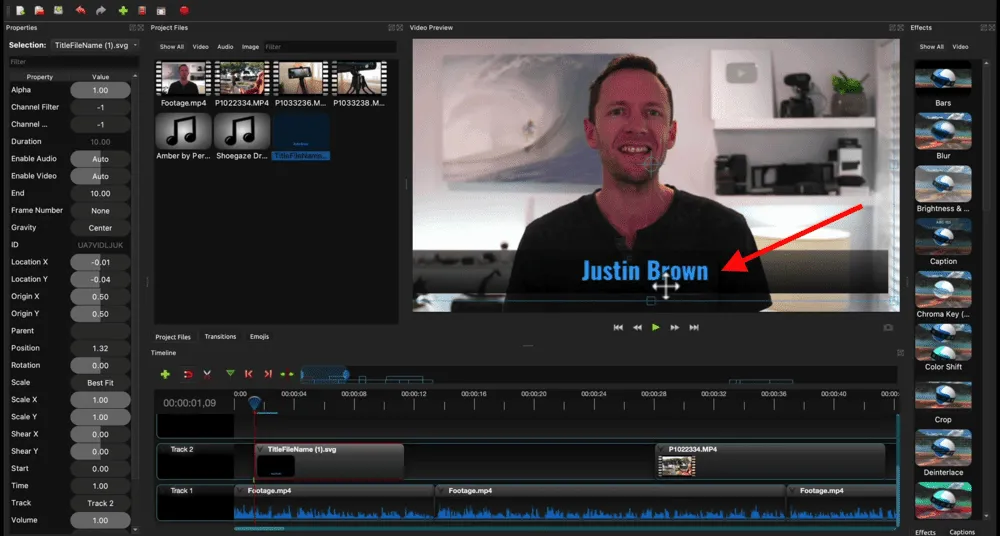
After you’ve made those adjustments to the text, press Save. You’ll see that in your Project Files window, there’s a new graphic that’s been created with the title.
Then you can click and drag the title clip down onto the timeline.
If you want to adjust the position of the text on-screen, simply drag it to the position that you want it.
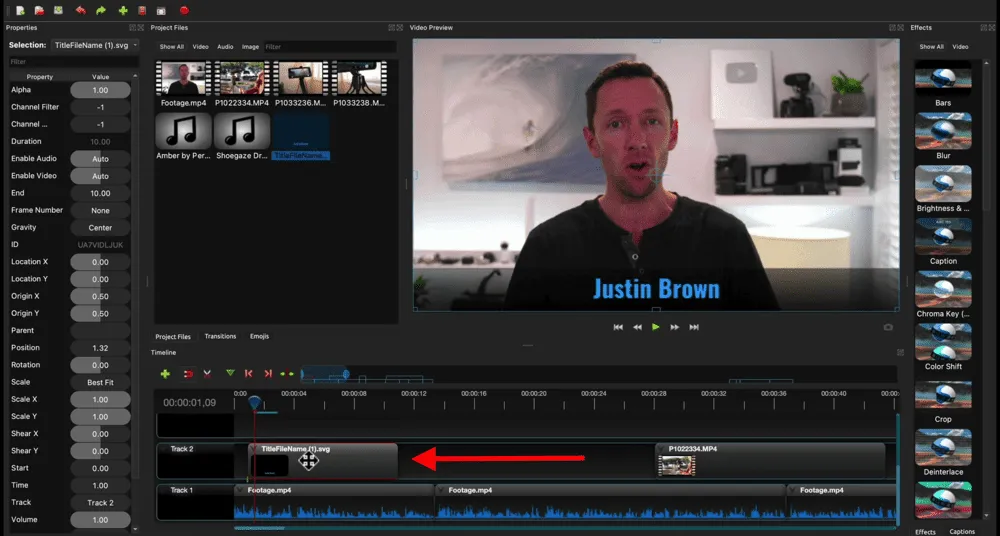
Similarly, if you want to change the position of the text in the video you can pick up and move the text clip. You can also adjust the length by dragging the sides of the clip.
Now go through and add all the text and titles you want in your video.
Then the next step is to add any transitions or effects.
How To Add Transitions & Effects In OpenShot
If you play through the title we just added, you’ll notice it suddenly appears and then suddenly disappears.
This is an example of somewhere we could add a transition. You can make the title fade in or slide in from one side for example. Doing this is a great way to make your video more polished.
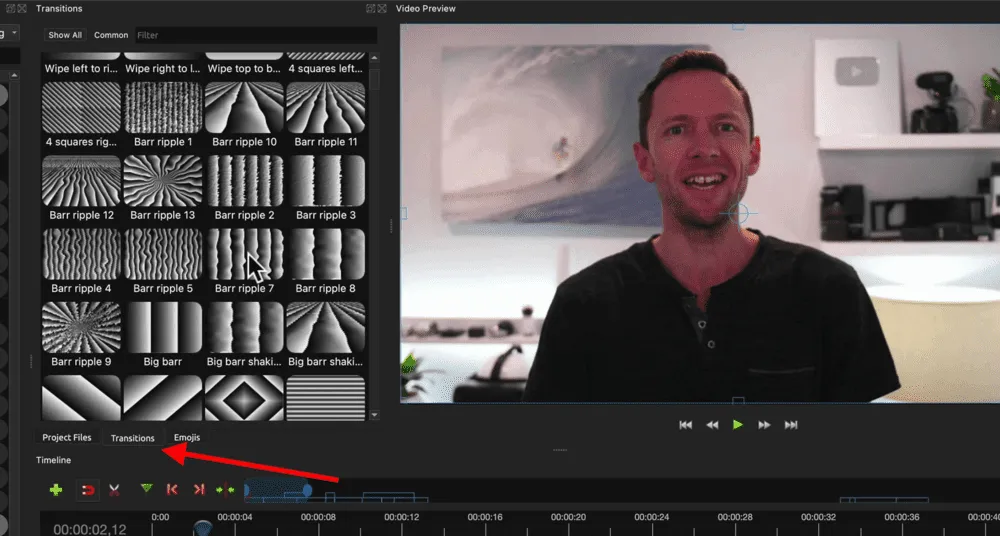
To add a transition, go to Transitions in the Project Files window. There are a ton of different options you can choose from.
Try not to go overboard with these - transitions are one of the easiest ways to make your video look cheap and unprofessional. We always stick to the basic ones like a fade or a swipe.
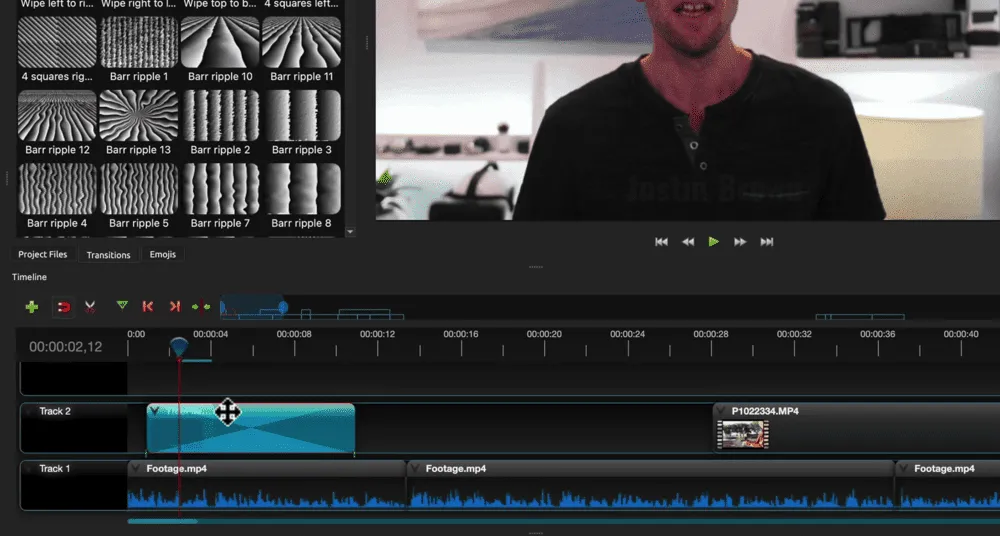
Once you’ve chosen a transition, click and drag it down on top of the text clip. You’ll see it defaults as being really long. Just adjust it down so it fits at the beginning of the clip.
Do the same for the end of the text clip - drag and drop the transition on top and adjust the length.
Right click on the transition at the end of the text clip and select Reverse Transition.
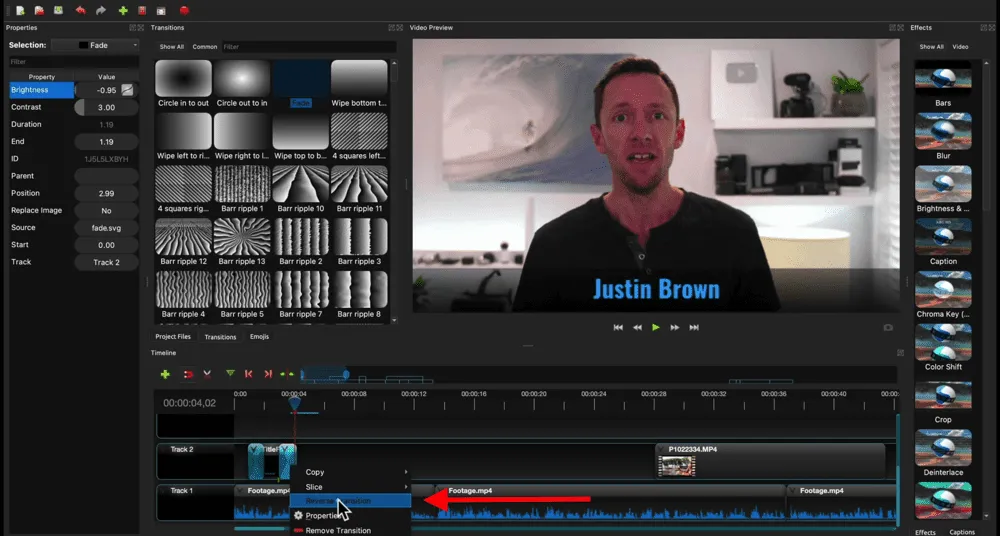
Then press play and you’ll see the text fades in and then since you’ve reversed the second one, it will fade out at the end.
You can add these transitions to b-roll and primary footage as well.
When we’re creating a video where all the primary footage shots look similar, we usually won’t add a transition between shots.
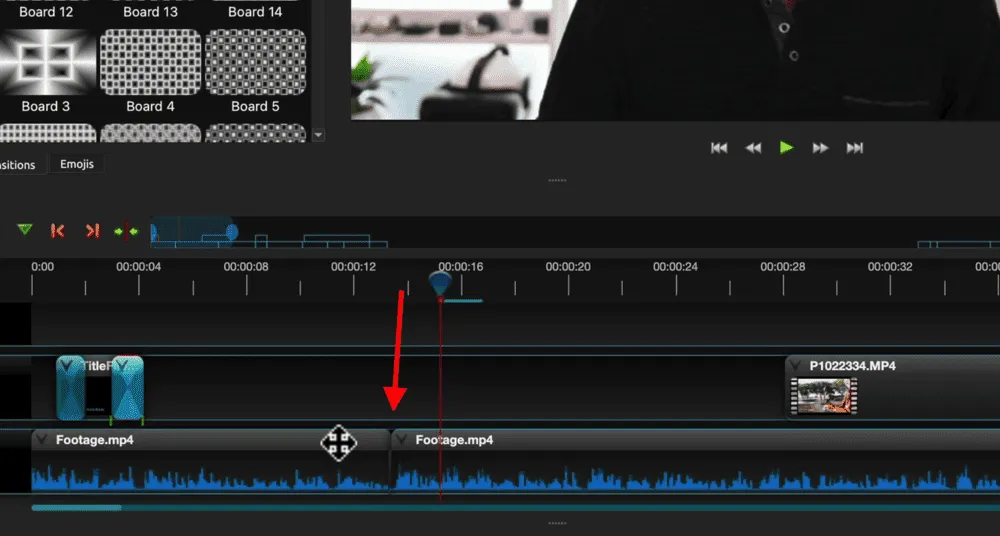
Instead, we zoom in on one of the clips. This makes it look like there’s a second camera angle and is a great way to break up your content. It also helps to cover up any harsh cuts or mistakes.
How To Add Zoom Effect
To create a zoom effect, select one of the clips and go to the Properties area. Under Scale you can adjust the size of the clip. The clip defaults to 1.00 which is standard or 100%.
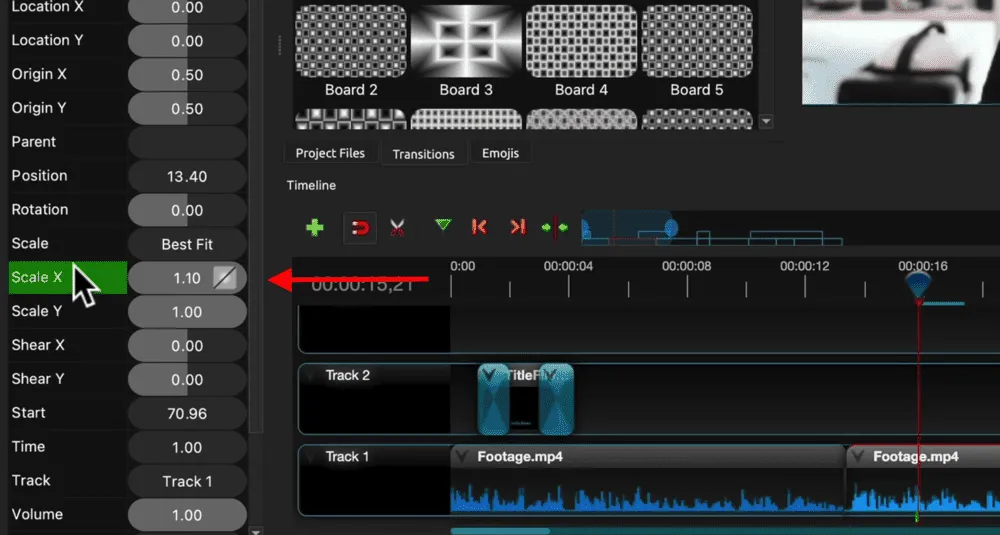
To zoom in a little bit, change the size to 1.10. This will zoom in 10% on the clip. Make sure you adjust both the X and Y values. So enter 1.10 for Y as well.
You also need to make sure the eyes are lined up in both shots. This makes the transition look more seamless.
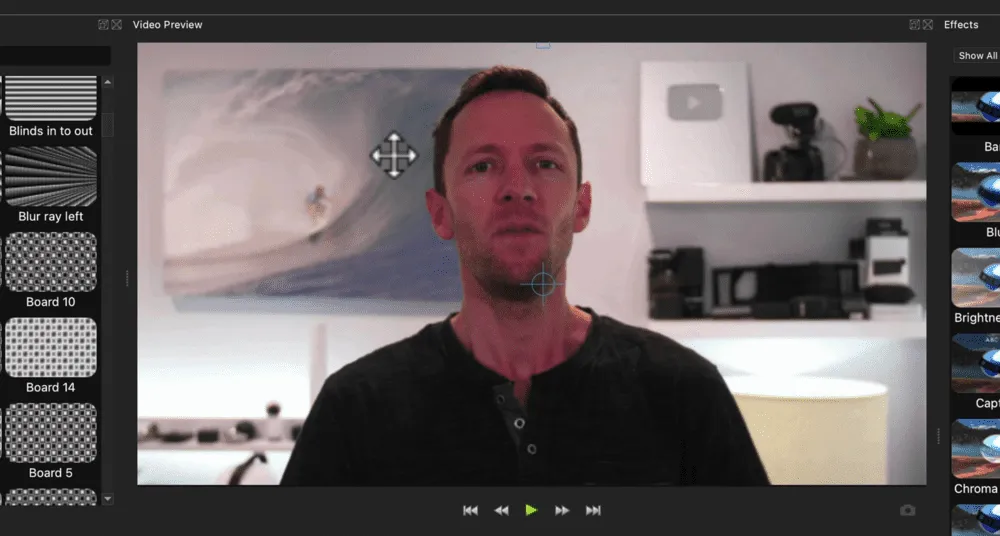
You can do this using the Location sliders in the Properties window. Or you can go to the preview window and simply drag the shot to the right position.
Other Effects
There are other effects you can add to your clips under the Effects window on the right hand side. If you can’t see the Effects window, go to View in the menu bar, then Docks and make sure Effects has a tick next to it.
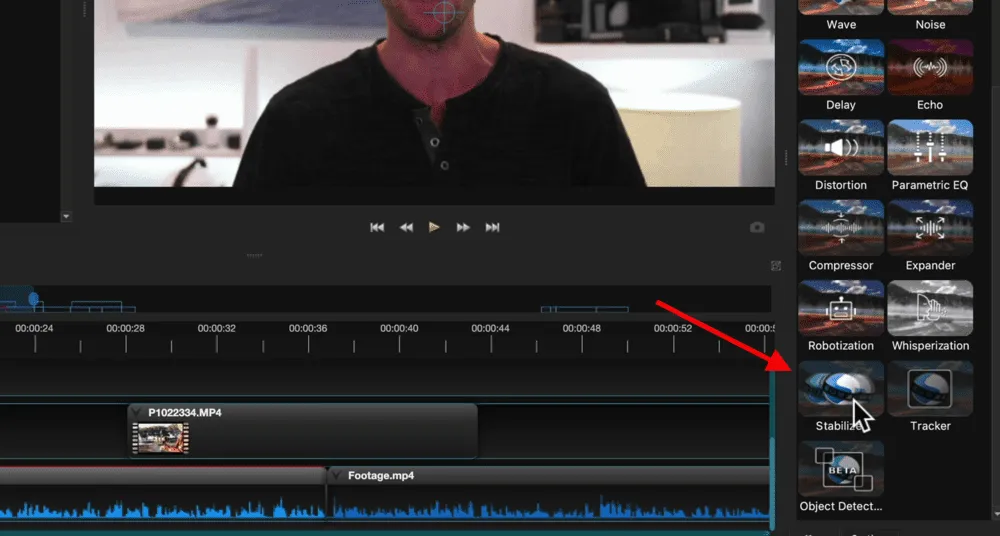
This is where you can add a green screen effect, blur effect, image stabilizer, object tracking and there are even some color grading tools which we’ll cover soon.
Now go through and add any transitions, zooms or effects to your video project. Next, we’ll add music.
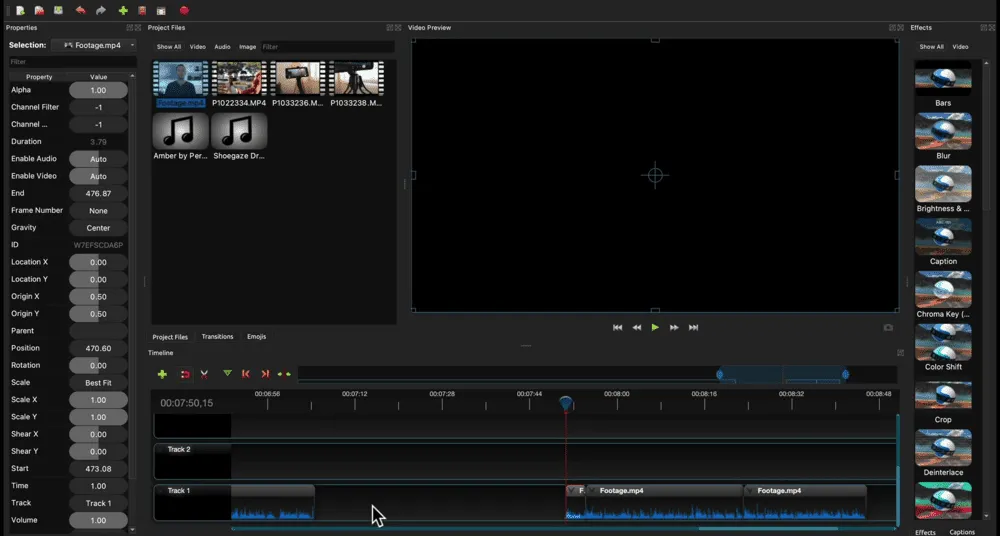
How To Add Music In OpenShot
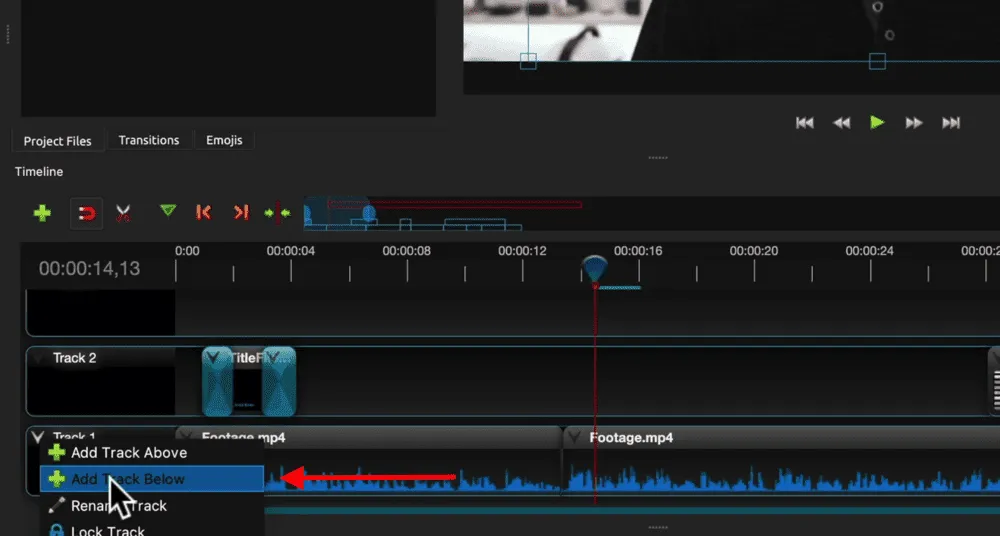
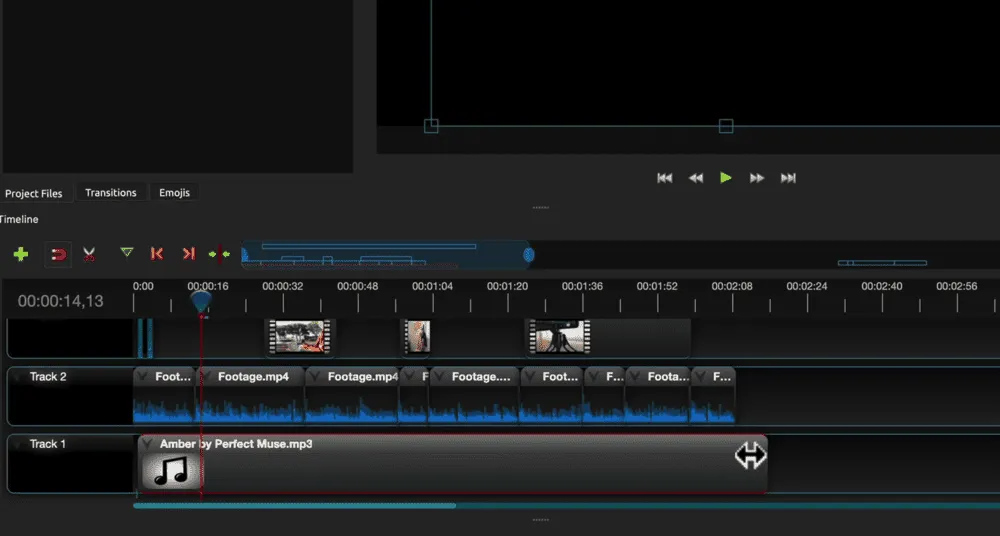
Usually you want to add your music to the very bottom layer. But since the primary footage is on Track 1, we’ll need to add a track.
Select the white down arrow on Track 1 and press Add Track Below. This essentially just moves everything up a track.
Then go to Project Files and locate the music that you imported earlier. You can drag the audio file onto Track 1 just below the primary footage.
Just like any other clip, you can pick it up, move it around, adjust the start time and end time.
You can use all the same editing tools to do this and you can even remove sections throughout the audio clip if you want to.
The next step is to adjust volume levels.
How To Adjust Audio Levels In OpenShot
The audio that’s most important (for most videos!) is the spoken piece.
So whoever is speaking on camera, you need to make sure the viewer can hear and understand them first and foremost. Music and sound effects come as a secondary.
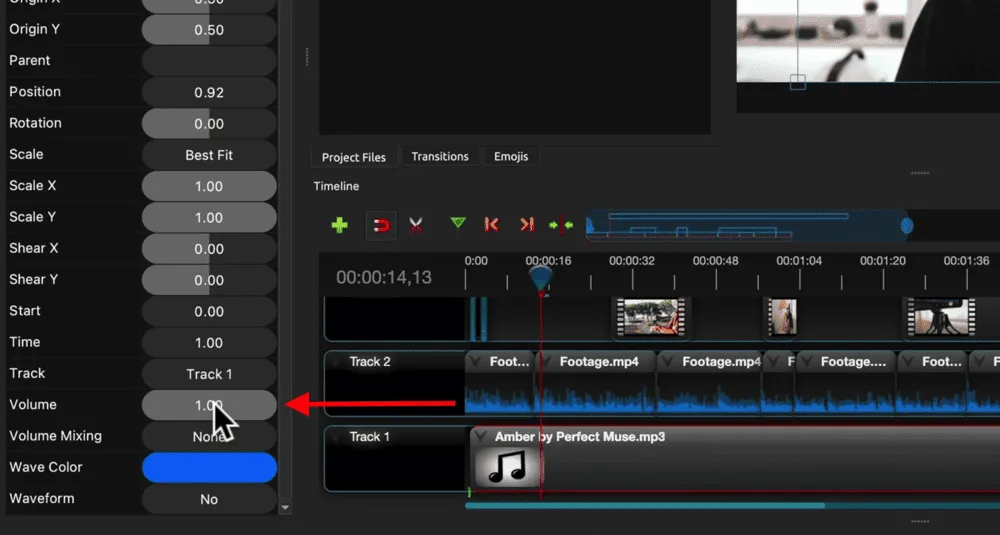
Let’s begin by muting the music track so we can focus solely on the primary audio. To do this, select the music clip and go to the Properties window. Go down to Volume and turn this down to zero.
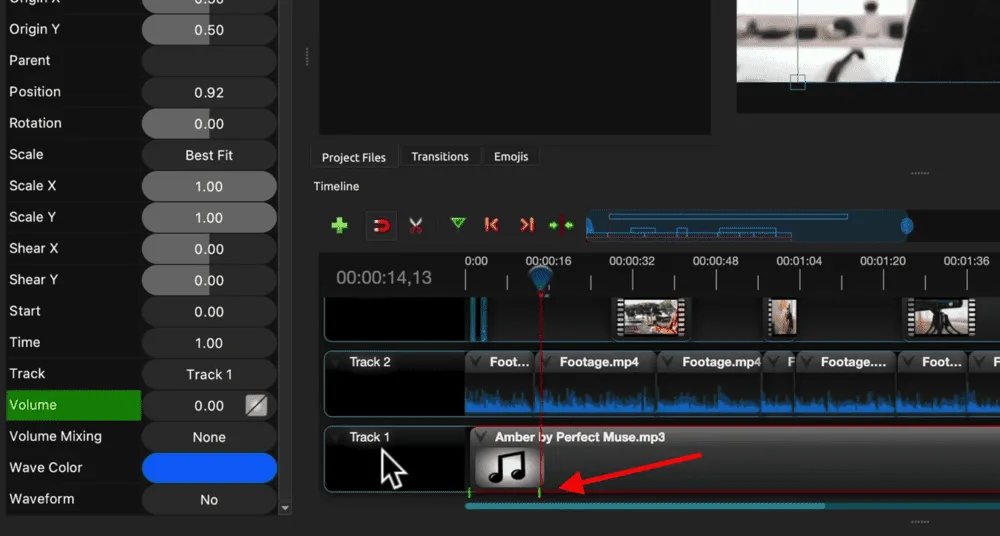
After doing that, you might notice on the audio track that two little green markers have appeared. These are key frame marks. What this means is that the volume still begins at 1.00 and fades to zero to the point of the second marker.
This is an awesome tool to have but it’s not something we want to use right now. To remove it, right click on the Volume level and select Remove Keyframe. Then move the playback head to the start of the clip and turn the volume down to 0 once again.
Now let’s adjust the volume levels of the first primary footage clip and then we can apply those settings to the rest of the clips on the timeline.
Unfortunately OpenShot doesn’t currently show audio bars. So it’s a good idea to have headphones on while you adjust the audio levels. This gives you a better idea of where the audio levels are at.

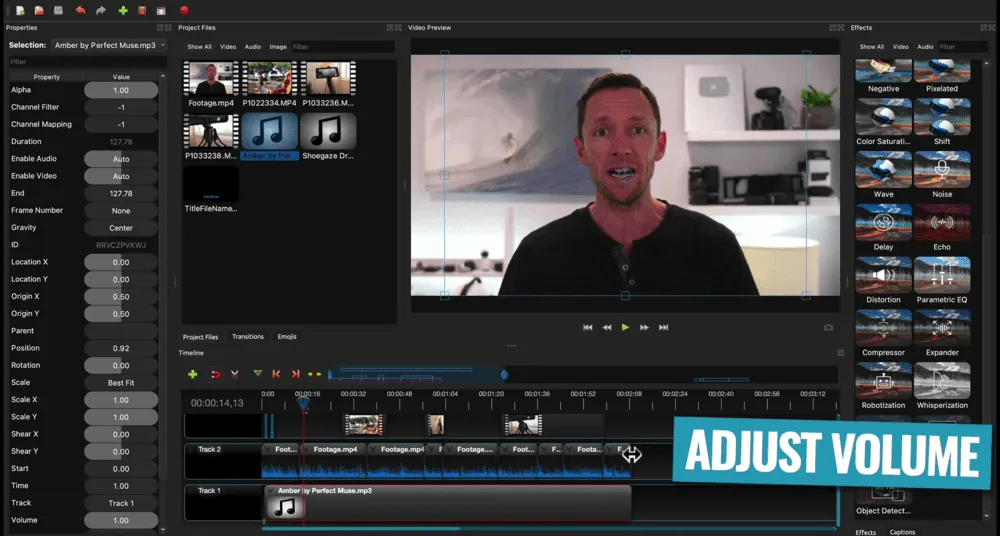
Make sure the first clip is selected and listen to the audio. Then go to Volume in the Properties window and increase or decrease the levels as necessary.
There are two ways you can apply this volume level to all clips:
- Press the drop down arrow on the first clip, go to Copy then Keyframes and select Volume. Draw a box over the remaining clips to select them all. Press the dropdown arrow of the second clip and select Paste. Then all clips will be set to 90%.
- Draw a box over all clips to select them. Click on the dropdown arrow, go to Volume, select Entire Clip and press Level 90%. This will make all your clips at 90% volume as well.
Now that the primary audio levels are set, we can bring the music levels back in.
The music levels are really up to personal preference. Depending on the music track, we usually set out background music to around 20 - 30%.
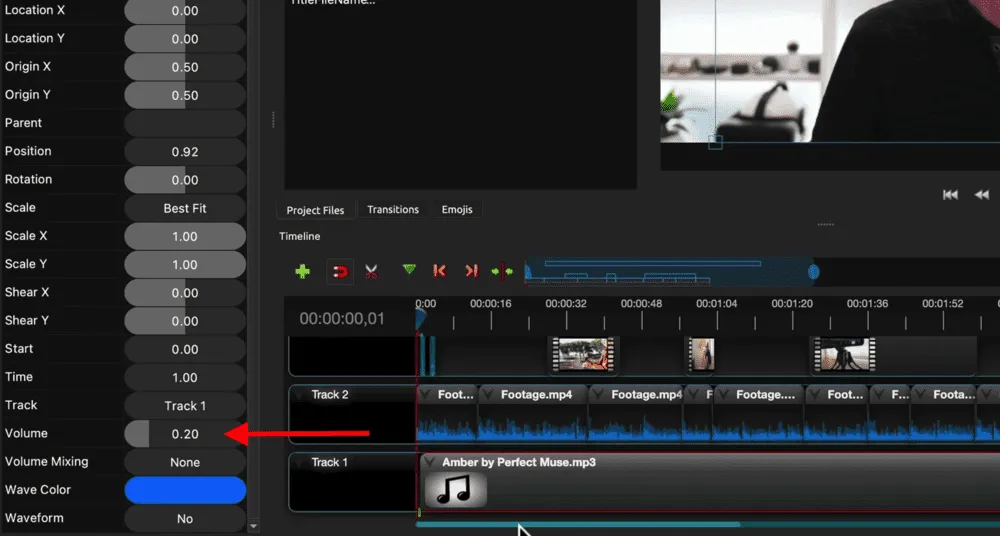
Select the clip, go to Volume in the Properties window and adjust the music levels. Make sure you listen through to ensure it’s loud enough for people to hear but not too overpowering.
Now let’s color grade the video project.
How To Color Grade In OpenShot
This is one area where OpenShot doesn’t have a lot of tools. So you don’t have a ton of control over the color grading but there is enough to be able to make adjustments and fix up most shots.
Once again, let’s start with the first clip. Make sure it’s selected and go to the Effects window on the right hand side. Select Video so you only see the video effects.
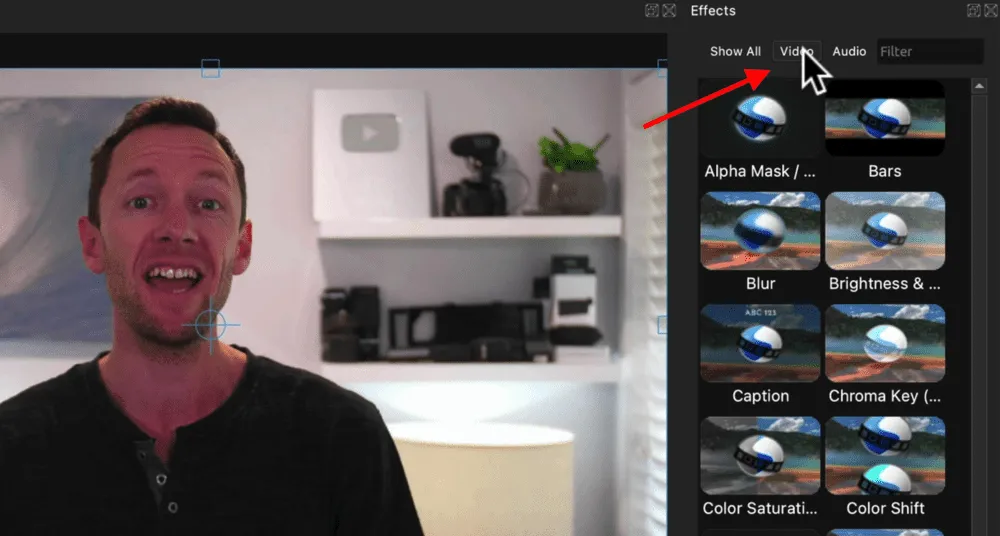
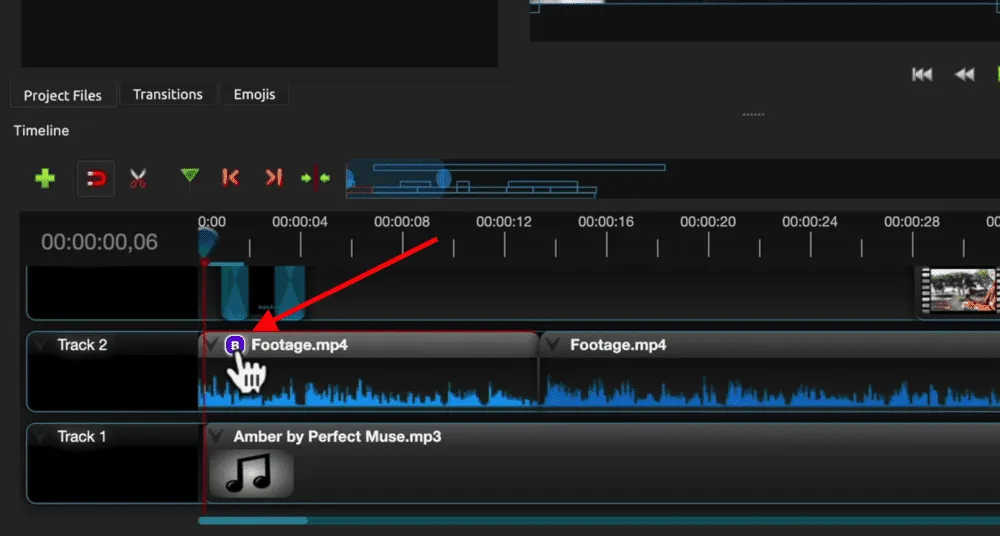
To add an effect, simply click and drag it onto the clip. Then press the lettered icon on the clip and will be able to make adjustments in the Properties window.
The main color settings we usually adjust are:
- Brightness & Contrast
- Hue
- Saturation
Once you’re happy with the color grading, hit the down arrow on the first clip, go to Copy and select Effects. Then select the remaining clips, press the down arrow and select Paste. Now all the color effects will be applied to all clips.
The final step is to export your video project.
How To Export Videos In OpenShot
To export your project, press the Export button in the top menu (it’s a red circle icon). Give your file a name, choose where you want it to be saved and then you can select the export settings.
By default, the export settings are set to match the project settings that we set up at the start. So the only thing you might want to change is the quality level.
But if you do want to make any other changes to the file format, video resolution or anything else - this is where you can dial those settings in.
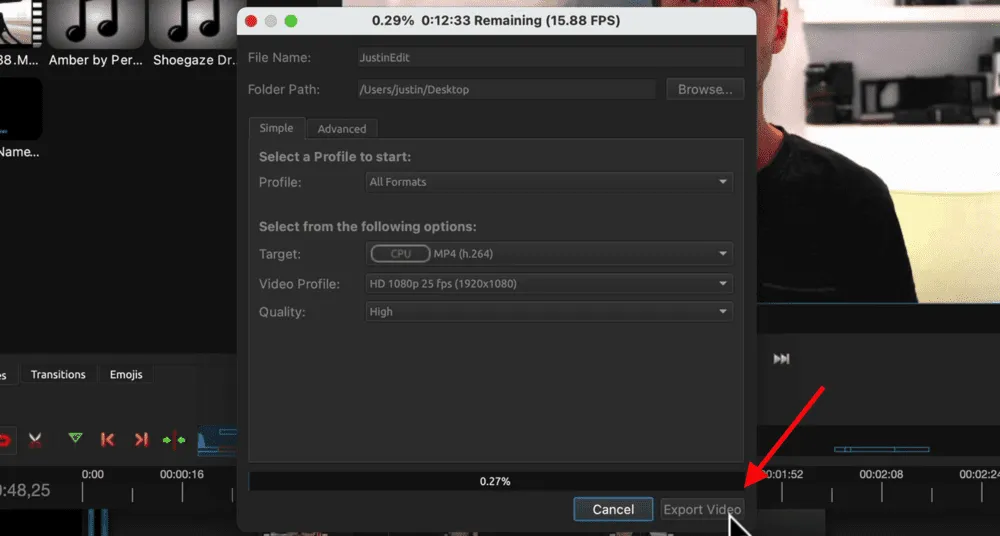
You can also go to the Advanced tab if you want to adjust more specific things like the bit rate.
Once it’s all good to go, just hit the Export button and your file will save out.
Now You Know How to Use OpenShot Editor
There you have it - our complete OpenShot tutorial for beginners.
Want your own copy of the step-by-step editing process we went through in this tutorial? Download a free PDF of the Primal Video Method here!
If you’re interested in checking out some other free video editors, here’s our complete guide to the Best Free Video Editing Software (Mac & Windows).