If you have a new YouTube channel and you’re wondering how to post your first YouTube video OR if you want to know how to post a video on YouTube the BEST way possible so you’re set up for success, you’re in the right place!
Uploading to YouTube doesn’t have to be a hard or complicated task. When it comes to the YouTube video upload process, there are some simple tips & tricks you can use to make sure your video is uploaded the RIGHT way.
In this guide, we’ll share a step-by-step tutorial on how to upload videos on YouTube. If you want to know how to upload YouTube Shorts, the process is the same so you can follow along to this video too!
You’ll learn how to set your videos up for success by making sure you’re uploading to YouTube the RIGHT way.
Here’s exactly what we’ll cover:
Let’s get started.
How To Upload Videos On YouTube From Your Computer
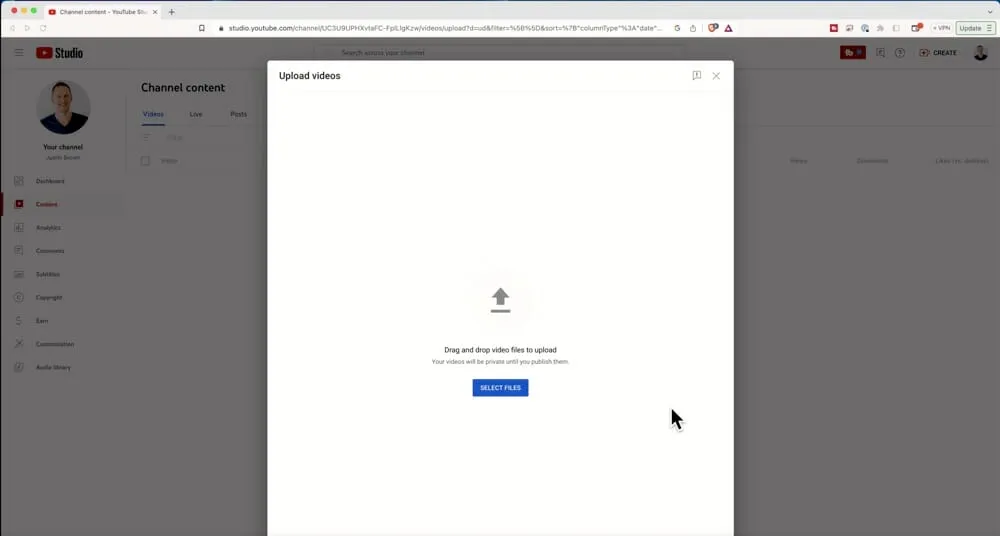
First of all, make sure you’re signed into the correct YouTube account.
Then hit the Video Camera icon in the top right corner and select Upload Video.
![]()
From there you’ll be prompted to select your video file. And then the video will begin uploading.
While the video is uploading, you can start adding in all the necessary information and going through the steps.
There are four steps within this upload process on YouTube: Details, Video elements, Checks and Visibility.
PRO TIP: Haven’t started your YouTube channel yet? Check out this complete guide on How To Create A YouTube Channel!
Details
The first step is to fill in all the relevant details.
Video Title
This will default as your video file name. Make sure you update it to the correct title.

Video Description
We use keyword research tools like Keywords Everywhere and the YouTube Search Bar to help us create a search optimized YouTube video description.
You’ll always be able to see keywords throughout the first few sentences in our descriptions.
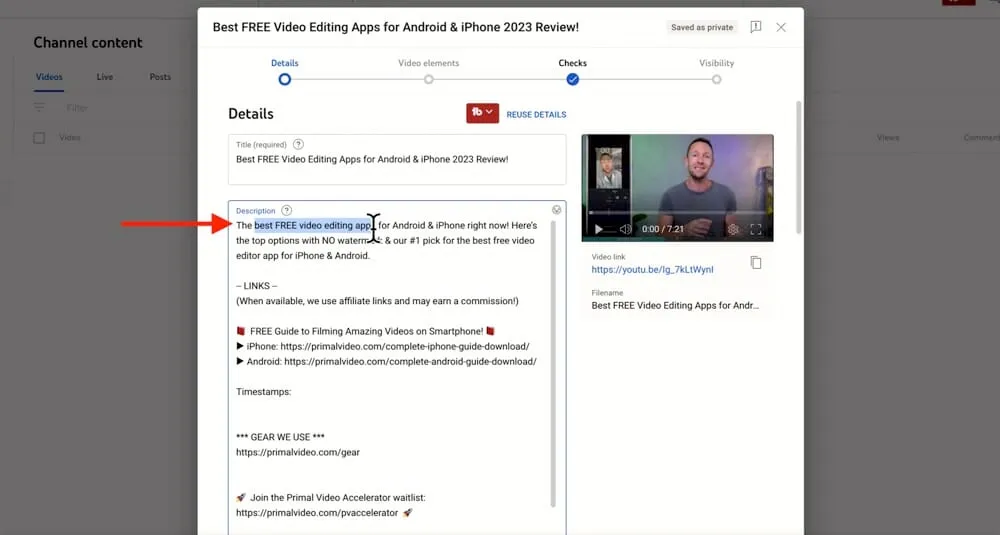
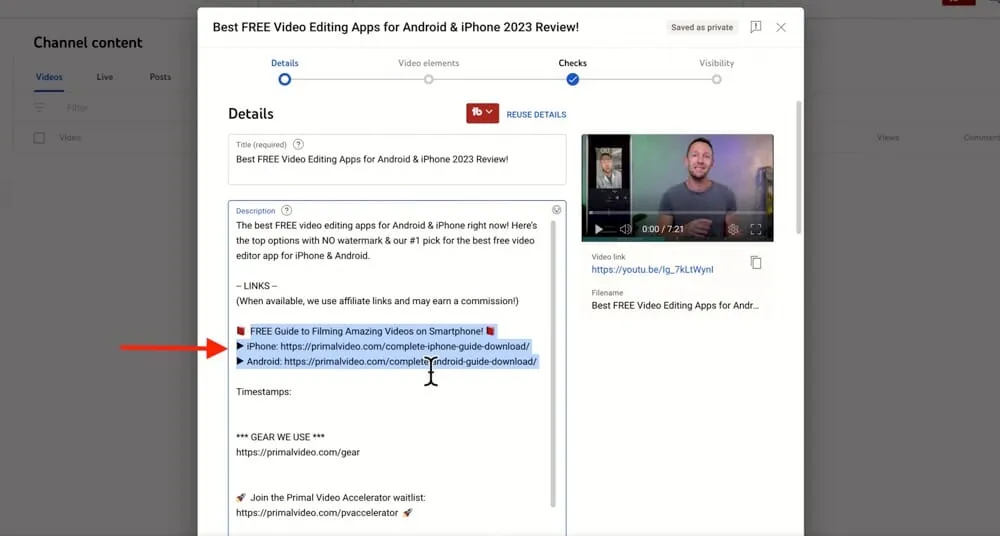
Then we’ll include a number of links - either affiliate links or links to download one of our free PDF guides.
We add a section for Timestamps so people can easily navigate our video and jump to whatever section they find most relevant.
You’ll also see mentions to the Gear & Resources page on our website.
We include links to other related content that our viewers might be interested in.
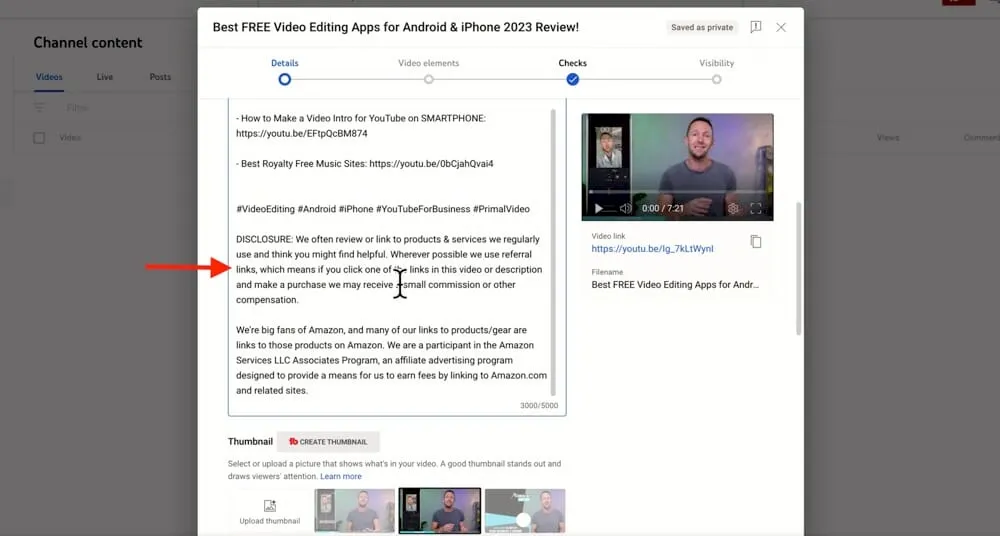
Lastly, we have a disclosure about the use of affiliate links and a disclaimer about linking to Amazon.
The types of things you include in your YouTube video description might be different but you can use this as a starting point and add in anything else you find necessary.
We always write our descriptions beforehand, so when it comes time to upload we can simply copy and paste it in.
If you don’t have your video description ready to go, you can always skip forward in the process and add it in once the video is uploaded.
PRO TIP: Learn more about how to do keyword research for YouTube here.
Thumbnail
YouTube will automatically display three freeze frames from your video that you can select as your YouTube video thumbnail.
However, we strongly recommend uploading your own custom thumbnail.
To do this, press Upload Thumbnail and select the image file on your computer.
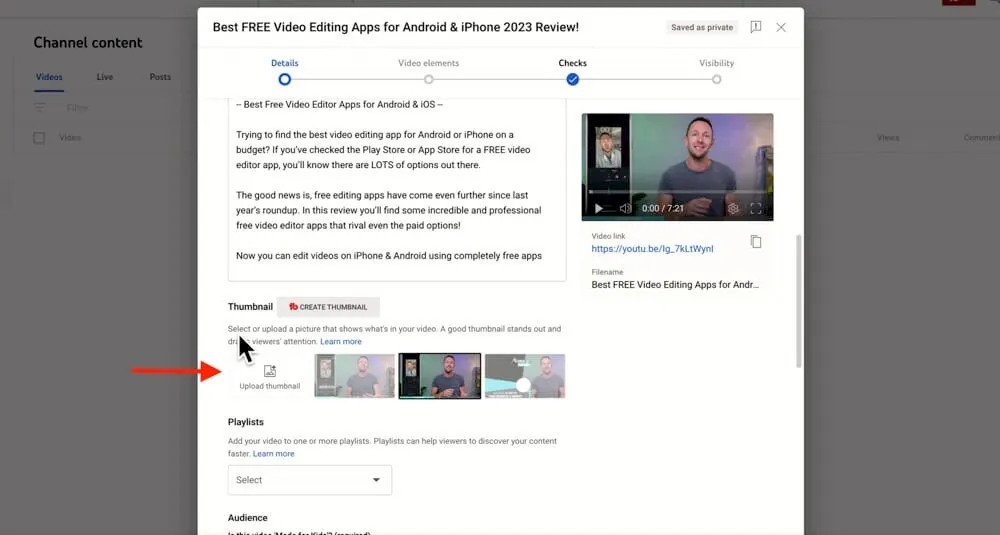
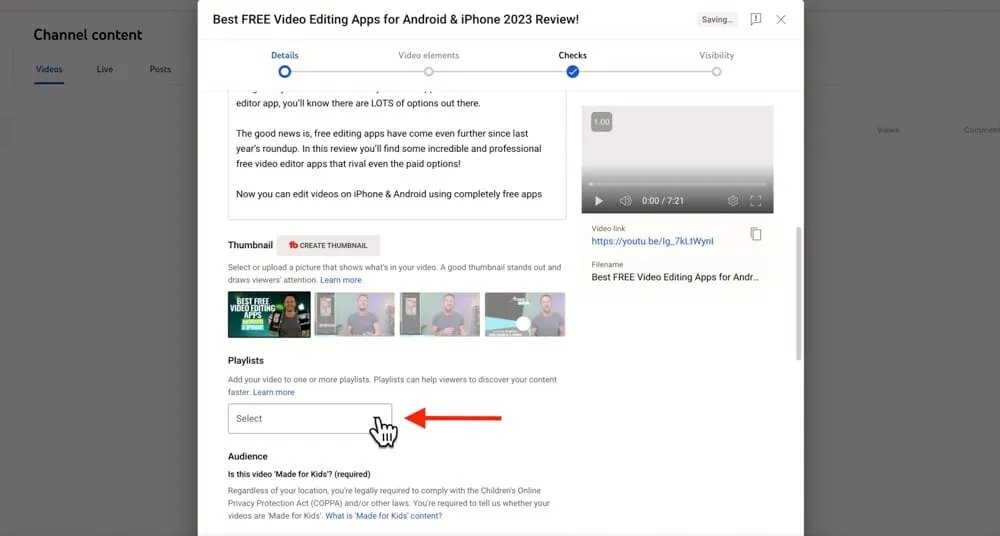
Playlists
Playlists are another awesome feature inside YouTube.
From this upload area you can add the video into an existing playlist or even create a new playlist.
Simply tick the relevant boxes to add the video to existing playlists or hit New Playlist to create a new playlist.
Audience
This setting is required. You need to specify whether your content is made for kids.
For our content, while there are some kids who watch it, we haven’t made it specifically for kids. So we tick ‘No, it’s not ‘Made For Kids’’.
You can also place age restrictions on your content here if required.
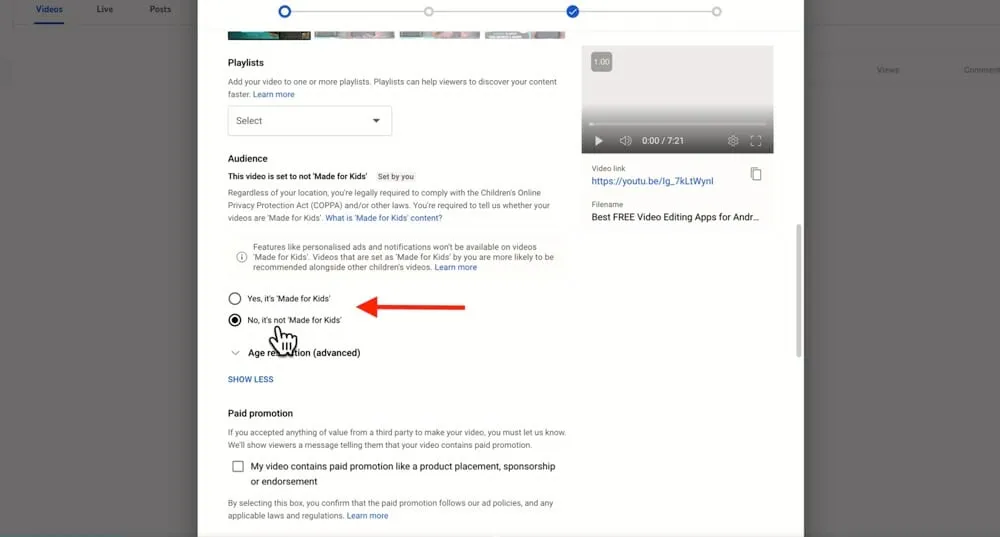
Paid Promotion
If you’re publishing content that includes a paid promotion for a brand or company, you’ll need to tick the box in this section.
Automatic Chapters
This is where you can specify if you want to have automatic video chapters added to your video by YouTube.
As we mentioned earlier, we manually add timestamps into our video descriptions but we still leave this one checked anyway.
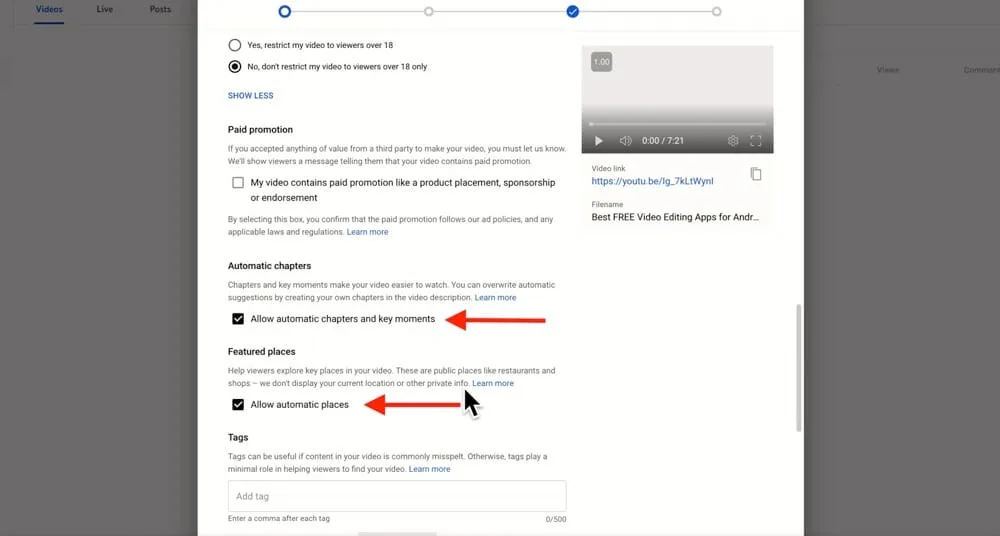
Featured Places
This setting allows YouTube to automatically detect any featured places in your YouTube video.
We don’t generally visit any featured places in our videos but we leave it ticked anyway.
Tags
You’ll notice it says here that tags play a minimal role in helping viewers find your video.
But if you ask us, this is another area where you can provide information/keywords/tags to YouTube as to what your content is about. So while this box is still here, we still recommend that you use it.
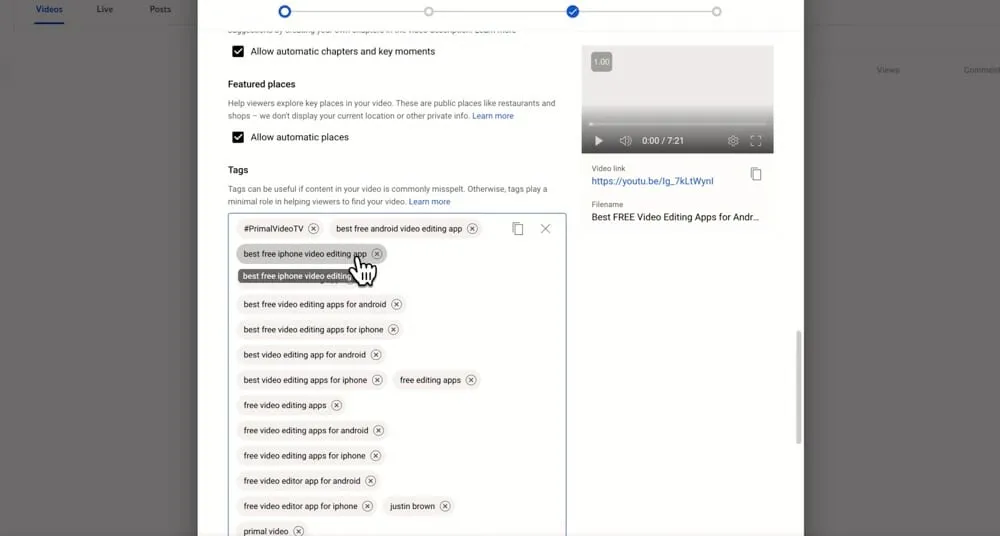
We’ll definitely continue adding tags for as long as the feature is available.
This is another thing that we have completed already (during our keyword research process) so we just copy and paste the tags in there.
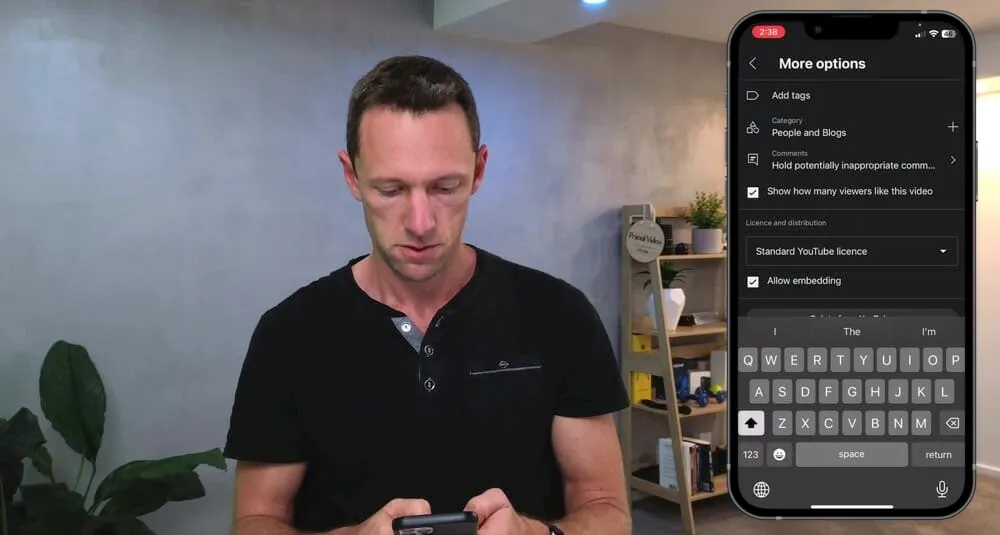
Other Settings
At the bottom of the page you’ll find some other areas where you can specify more information about your video content.
This includes:
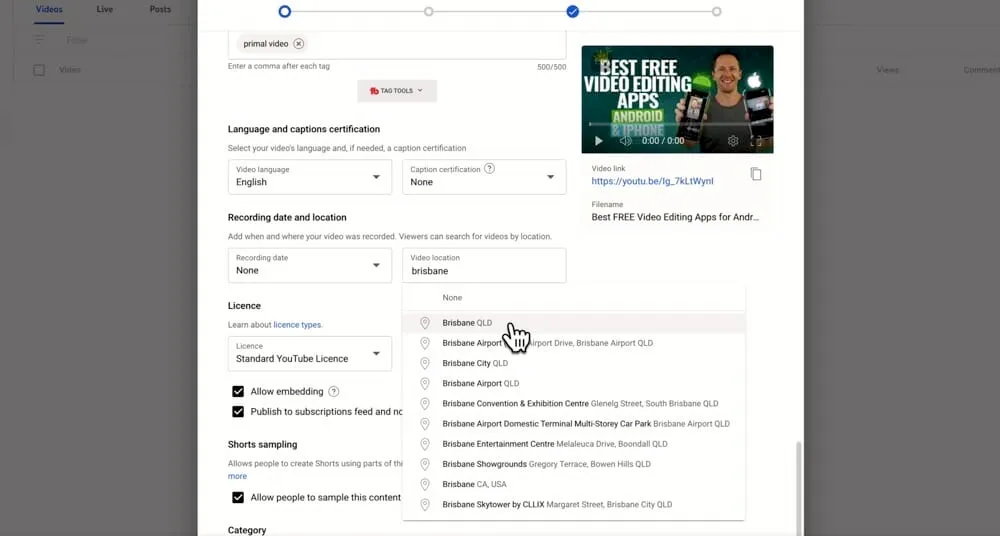
- Language and caption certificate: YouTube automatically detects your language but you have the option to select your specific language anyway.
- Recording date and location: If your video is about a specific location or you want your video to show up in search results about a particular location, you can specify that here along with the recording date.
- License: Generally we leave this at the default Standard YouTube License but if you want to allow other people to use your video you can select Creative Commons - Attribution. This is also where you can allow people to embed your video and specify whether your subscribers should be notified when the video goes live (we leave both of those selected).
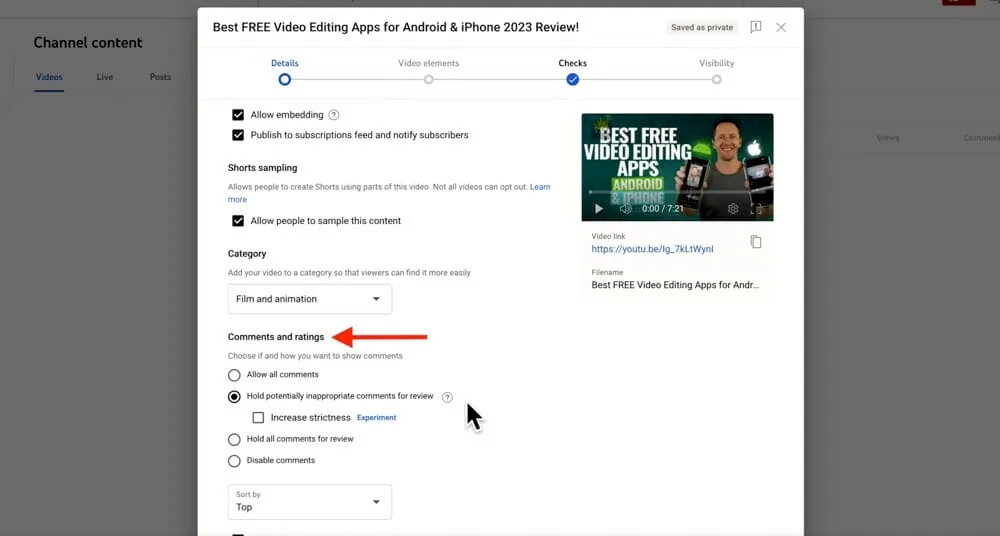
- Shorts sampling: This allows other people to sample sections of your videos and use them in their Shorts. We leave this enabled because it can mean that more people see your content.
- Category: You can also specify a category for your content. If there isn’t one that’s an exact fit, just choose the one that’s the closest.
- Comments and ratings: Here we recommend selecting ‘Hold potentially inappropriate comments for review’. This will help remove some spam and other bad comments from your YouTube videos.
Once you’ve added all that information and set all the relevant settings, hit Next. Then you’ll be taken to the Video Elements section.
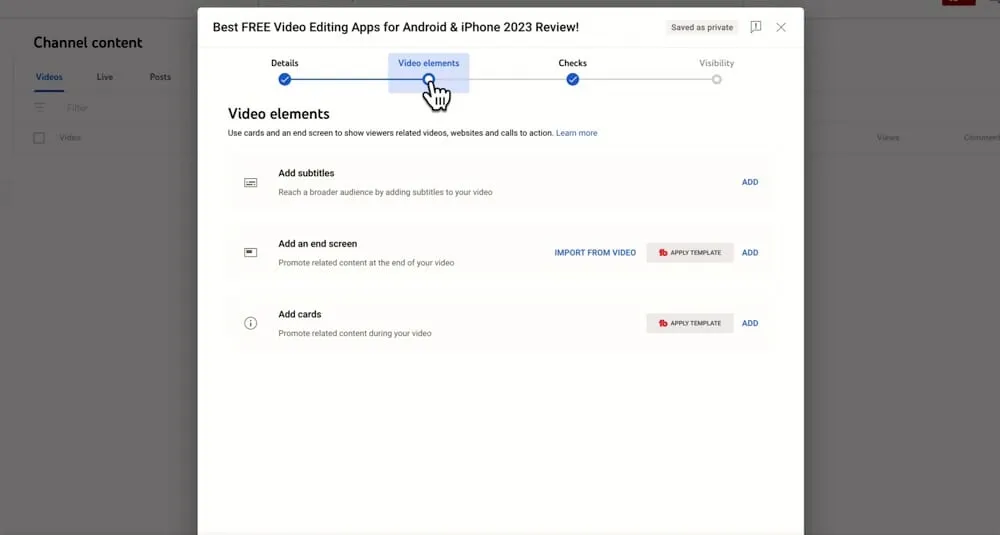
Video Elements
This is where you can add video elements such as subtitles, end screens and cards to your YouTube video.
- Subtitles: If you want to upload a subtitle file to replace YouTube’s automatically generated subtitles, you can do that here
- End screens: These are the clickable links that appear onscreen in the last 20 seconds of your video
- Cards: These are clickable links that appear in the top right hand corner during your video
To add an end screen, go to Add and a new window will appear. This will automatically go to the last 20 seconds of your video.
You can add in a link to your website, link to other videos, playlists, or a subscribe button for your channel.
There are a range of different templates you can choose from. There’s also a great feature which allows you to import the end screen template used in a previous video.
Or you can create your end screens from scratch.
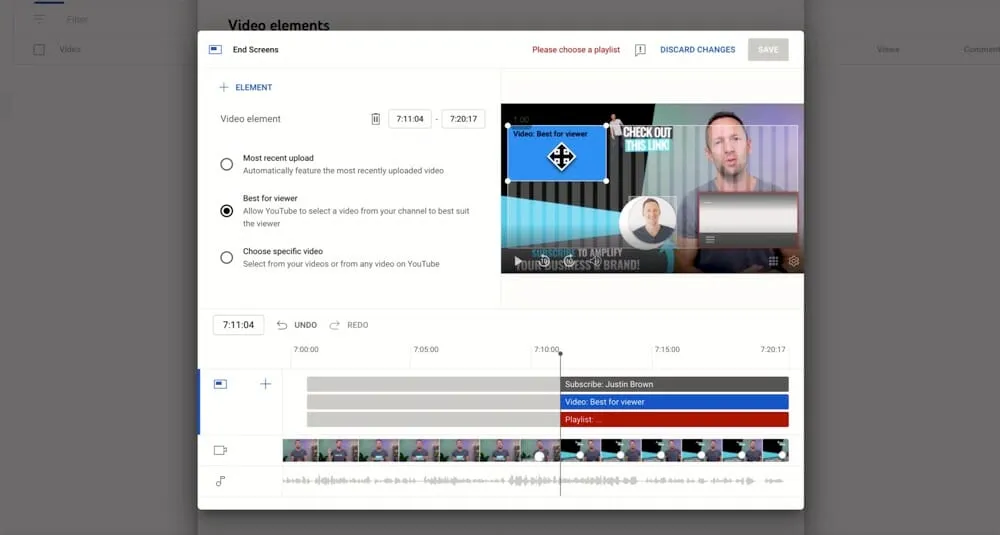
Then you can adjust the length of time that the end screens will appear by dragging the clips on the timeline.
You can also drag the elements on screen so they’re placed exactly where you want them to be.
PRO TIP: We add an end screen template at the end of each of our videos during the video editing process. Learn more about how to create end screen templates here.
Once you’ve added in any subtitles, end screens and cards you can hit Next. This will take you to the Checks section.
Checks
This is where YouTube checks your content for duplicate content or copyright infringements.
If any duplicate content or copyright infringements is found, YouTube will restrict your video.
This checking process happens in the background while the video is uploading and it’s pretty quick!
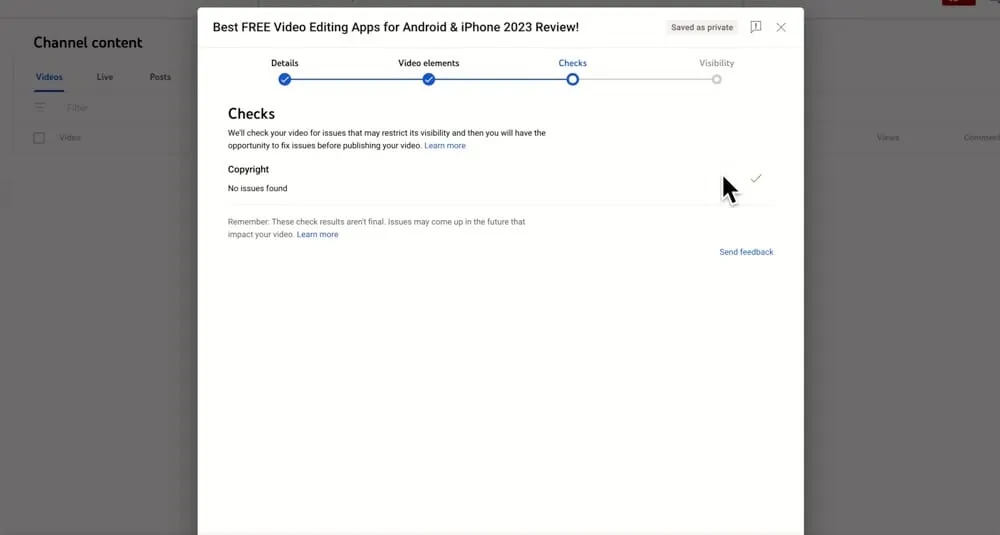
So you might find by the time you get to that step, the process is already complete. Hopefully at this point you don’t have any issues, but if you do - check out our guide on How To Remove Copyright Claims On YouTube Videos.
Once this is complete, you can hit Next to go to the final step which is Visibility.
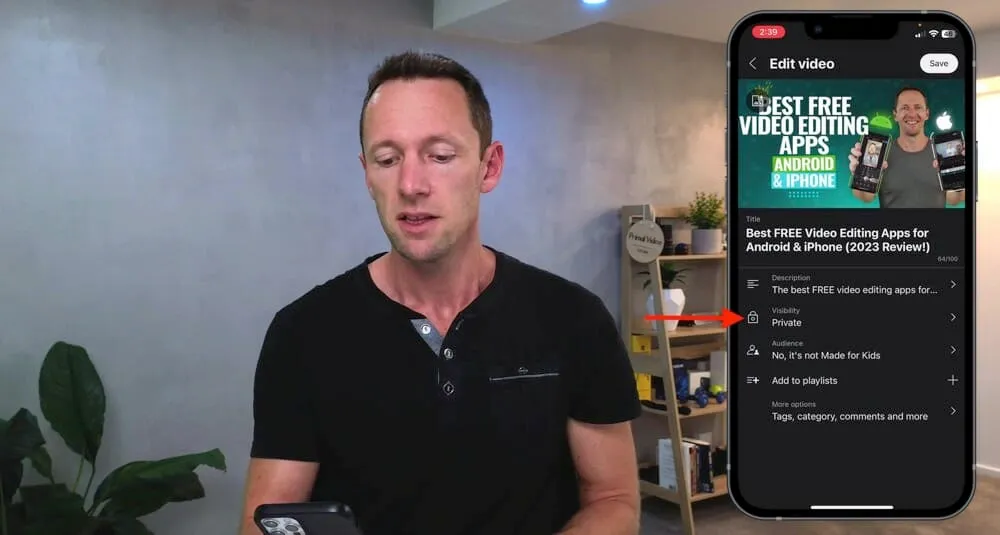
Visibility
This section is where you can specify how your content will be visible on YouTube. You can either Save Or Publish or you can Schedule.
Under Save Or Publish you have a few options:
- Private: Only you and other people you choose can view the video
- Unlisted: Anyone with the URL can view the video
- Public: The video is released so that everyone can view it
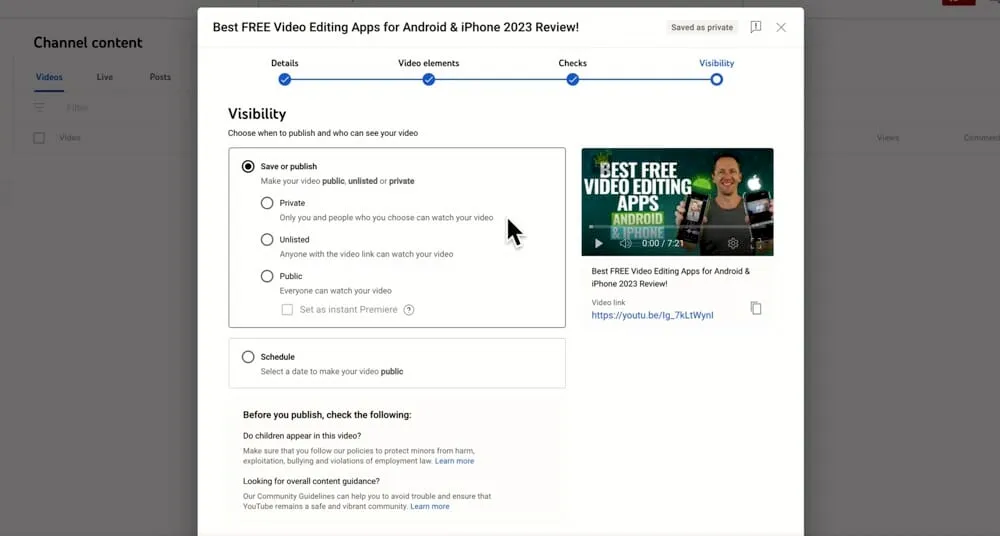
We recommend always setting the video as Private. Then we can go in and make sure everything is ready to go and then schedule it for release.
Alternatively, you can schedule the video directly from the upload section.
Select Schedule and enter the date and time you want the video to be automatically published.
After you’ve selected the Visibility settings, hit Save.
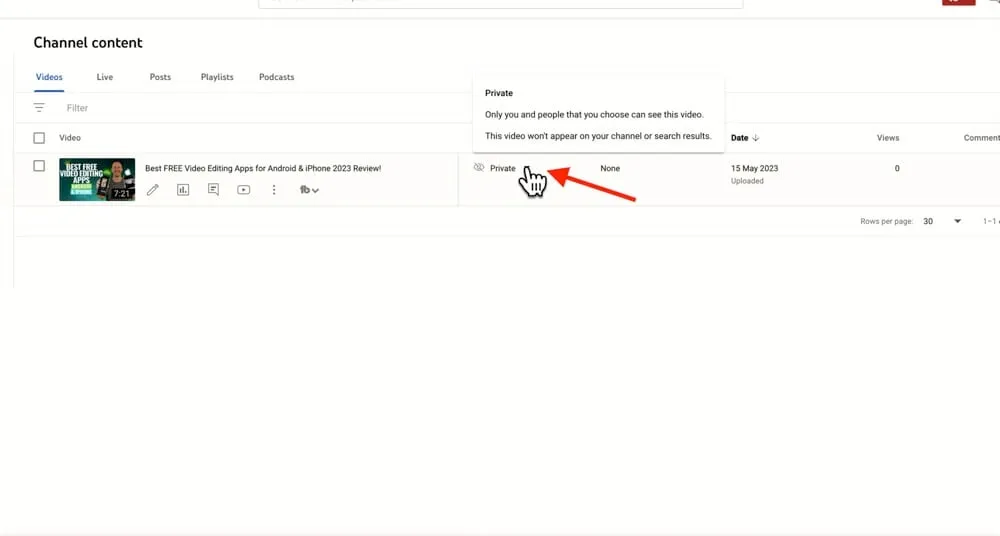
Then in your YouTube Studio when you go to Content, your uploaded video will be there.
If you saved the video as Private and you want to set it to Public, hit the Private button and tick the Public box. Press Publish and your video will now be live.
How To Upload YouTube Videos From Mobile
Now let’s run through uploading videos on a mobile device. You’ll notice this process using the YouTube app is a lot quicker and more condensed!
Open the YouTube mobile app. Make sure you have the correct YouTube account or channel selected.

Tap the + button in the bottom menu. Press Upload a video.
Select the video file you want to upload and hit Next.
Add Details
The first step is to add in all the video details.
Thumbnail
You can upload a video thumbnail by tapping the Thumbnail icon in the top left corner.
Select the image on your camera roll and it will be added to the video.
![]()
Video Title
Just like in the upload process for computer, you can add in your video title.
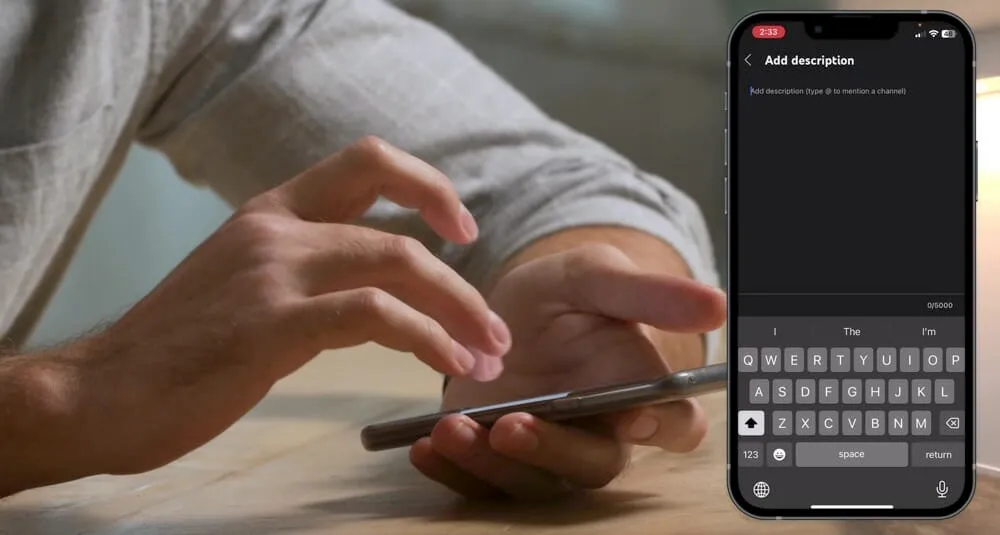
Video Description
Tap the Description button and you’ll see you can either copy and paste text into there or you can type out your YouTube video description.
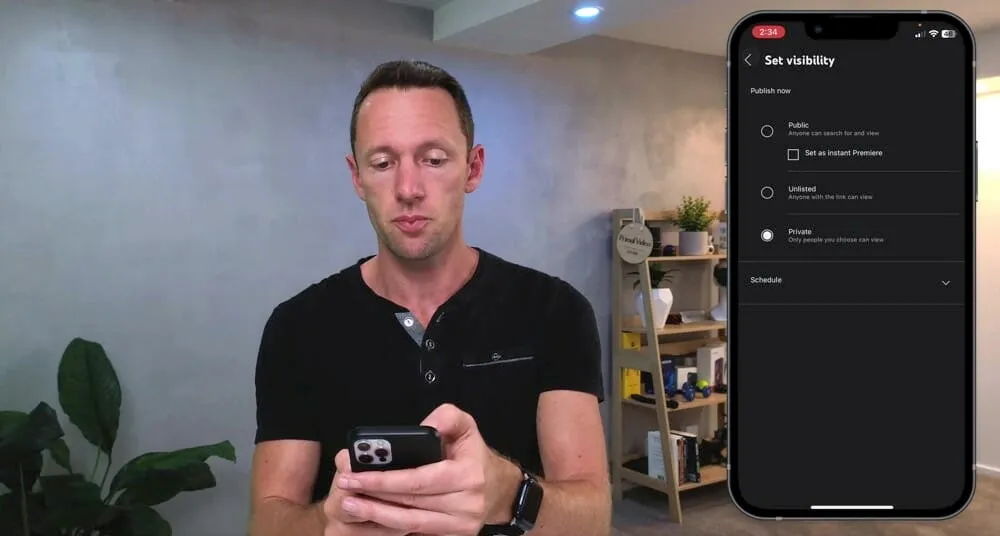
Visibility
As mentioned above, this is where you can specify how the video will appear on your channel. You have a few different options.
Under Save Or Publish you can select private, public or unlisted video.
Or you can hit Schedule and enter the date and time you want the video to be automatically published.
Location
You can add a location here. We usually leave this blank but it will come down to the type of videos you’re creating.
Playlists
Here you can add the video to any existing playlists. Just keep in mind that you can’t add it to a new playlist when uploading via the app.

Comments
You have the same options when it comes to comments. We always recommend leaving it on the default option - ‘Hold potentially inappropriate comments for review’.
But there are other options for allowing all comments or disabling comments depending on your preferences.
Hit Next in the top right corner and you’ll be taken to the next step.
Select Audience
This is where you can specify whether or not your content was ‘Made For Kids’. Select the appropriate box and enter any age restrictions if required.
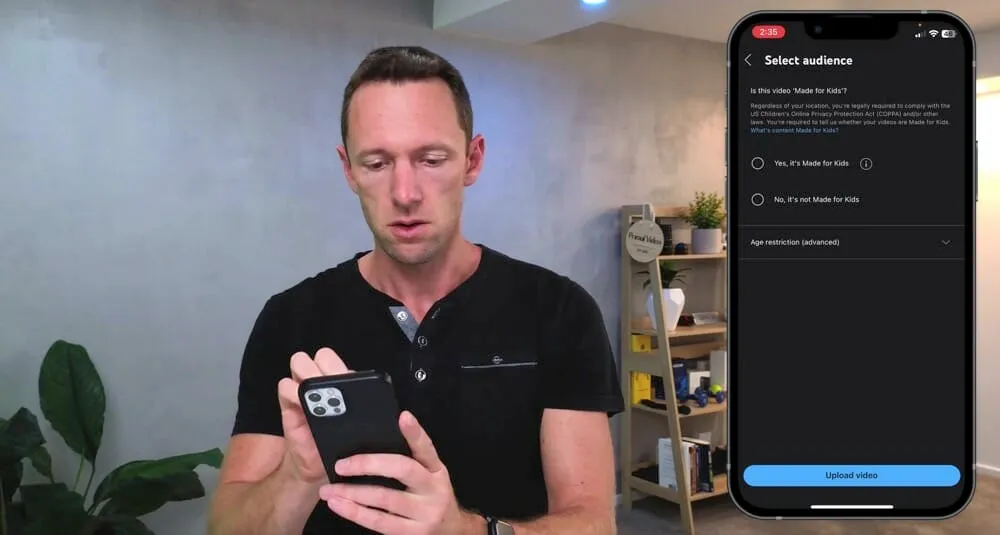
Upload Video
After you’ve selected the audience, then press Upload Video.
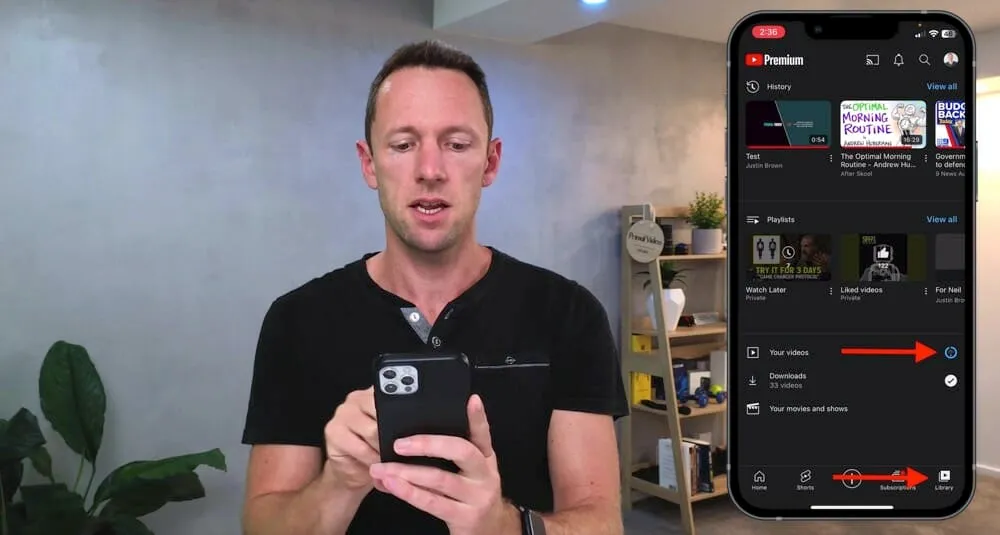
Go to Library in the bottom menu.
Under Your Videos you’ll see the video that’s currently uploading to YouTube.
More Options
Once the video upload has completed, you can press the Three Dots icon to access some more settings:
- Save to a playlist
- Share the video (you’ll get a shareable video link)
- Edit (this will take you back to the previous settings)
- Edit advanced settings in Studio (this is a separate app you’ll need to download and it’s how you can access tags, video category, YouTube licensing and video embedding)
If you set the video as private, to make it public all you need to do is go to Visibility again, tap Public and go to Publish.
Alternatively you can schedule it from that area as well.
Now you know how to upload YouTube videos from desktop and from mobile.
If you want to learn about how to grow on YouTube, check out our guide From 0 to 1000 Subscribers: 9 Tips To Grow A New YouTube Channel.
FAQ
Is it free to upload a video on YouTube?
Yes, it’s completely free to start a YouTube channel and upload videos to that channel.
How do I upload a video from my phone to YouTube?
The process to upload a video to YouTube from your phone is really quick and easy. You can do it directly from the YouTube app. Follow the exact steps above.
How do I upload a short video to YouTube?
You can upload a YouTube Shorts video in the exact same way you’d upload a regular YouTube video. YouTube will automatically detect Shorts videos by their length (less than 60 seconds).