This is our complete Evmux live streaming tutorial! Evmux recently took out first place in our Best Live Streaming Software For Windows roundup and ranked highly in the Mac version too.
It’s an awesome cloud based live streaming platform which means you don’t need to download or install anything. You literally just open it in your web browser.
Important: When available, we use affiliate links and may earn a commission!
Evmux has a ton of great features including multistreaming, ISO video recording, multiple guests and a dedicated green room for speakers.
Whether you want live stream software for Facebook Live, YouTube Live, LinkedIn Live or Twitch – Evmux has you covered. There’s even a workaround so you can go live on TikTok too.
This live streaming platform is a match for the other top software like StreamYard, OBS Studio and Ecamm Live. If you’re looking to grow your audience with live streams, Evmux is definitely worth checking out!
In this tutorial, we’ll run through exactly how to use Evmux. You’ll find out why we think Evmux is one of the best streaming software options right now!
Here’s what we’ll cover:
- Getting Started With Evmux
- Evmux Interface
- How To Screen Share In Evmux
- How To Video Share In Evmux
- How To Add Guests In Evmux
- How To Use Pro Scenes In Evmux
- How To Go Live In Evmux
We’ll be running through this tutorial using Mac but the process is the same no matter what computer you’re using.
Let’s get started.
Getting Started With Evmux
Go to the Evmux website and log in or sign up.
The first time you log in on a brand new account, you’ll be asked whether you want to create a single broadcast or a multiple session event. If you’re running a product launch or a live launch, you could pick the latter option.

For this live streaming tutorial, we’ll select a single broadcast.
Give your broadcast a name and press To Studio.
Then you’ll be taken straight into the live stream studio area.

If you already have an active account that you’ve logged into previously, when you log in you’ll be taken to the dashboard area instead of the live streaming studio. This is where you can see recent sessions and access recordings for past sessions.
You can also add any guests in the Speakers area and assign them to a particular session before you start live streaming. But it’s usually easier just to add them once you’re inside the studio.
From the dashboard area, to enter the studio just press Studio.

PRO TIP: For this tutorial, we’re using the free to use version of Evmux. This means there’s a watermark in the top right corner. If you want to remove the logo you’ll need to upgrade to a paid account. You can still do everything we’re doing here on the free account, but there are a few features you’ll miss out on.
Curious about the different pricing options that will remove the watermark? You can check them out here.
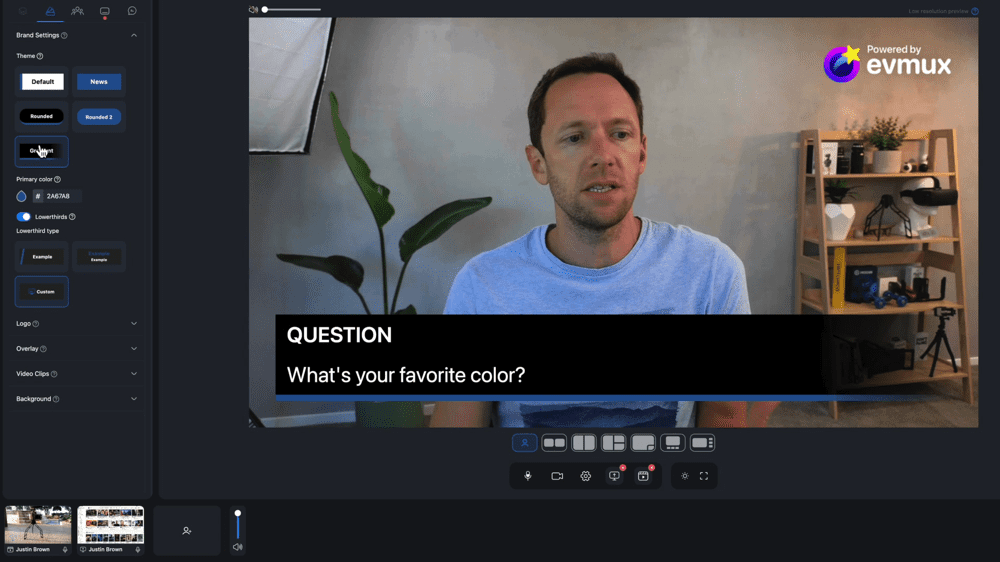
Evmux User Interface
Let’s start with a quick rundown of the interface. It’s really intuitive and user friendly which is surprising given how advanced some of the live streaming features are!
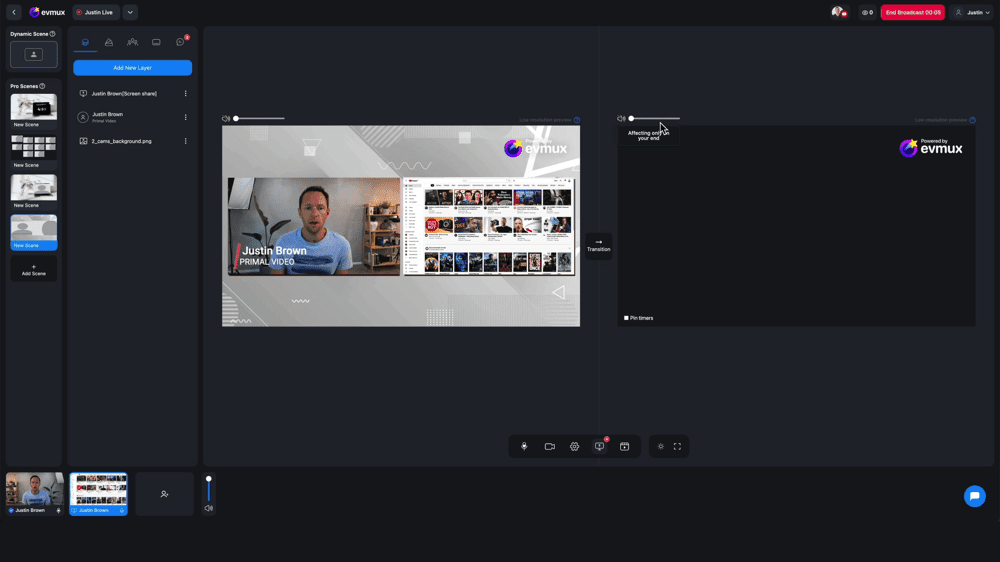
Inside the gray area is a preview of your live stream.

Along the bottom of your live preview you’ll see buttons for:
- Different templates you can use to customize the look of your stream
- Muting and unmuting your audio
- Turning your camera on or off
- Accessing camera & microphone settings
- Adding screen shares and video shares
- Switching between light and dark mode
In the bottom left corner are your video sources. You’ll see a video preview with the camera you’re using. This is where you can switch between cameras and screen shares or video files.
To add a video source to the live preview, hover over the preview and press Add to Dynamic.

In the top left is where you can switch between Dynamic Scenes and Pro Scenes (this will make more sense soon!).
Next to that is where you have access to a ton of settings & features including:
- Layers (only available when using Pro Scenes – we’ll cover that shortly)
- Graphics/Styling
- Comments
- Banners
- Chat
Let’s dive into a bit more about each of those tabs.
Graphics/Styling
This is where you can customize your scenes. You can:
- Adjust the brand settings (pick a theme for the styling of your banners, select a primary color for your banners and customize lower thirds)
- Add a logo
- Add a graphic overlay
- Add video clips (once you’ve added these to your gallery, all you need to do is click and they will appear on your live)
- Change the background (just make sure your live isn’t full screen, otherwise you won’t see the background)
PRO TIP: You can make your lower third come on and off screen at specific times throughout your live. To do this, go to Brand Settings, Custom and toggle off Show Always. Then you can adjust the Delay Before Start, Hide After and Repeat Every slider bars to suit your needs.
If you’re looking for some great overlay and graphic templates to use in your livestream, our top recommendations are Placeit, StreamerTemplates and Envato Elements.

Comments
This is an aggregate feed of all the comments from all the places you’re live.
Since Evmux allows you to simulcast (or cast to multiple platforms at once), if you’re live on two platforms at once it will bring in all comments from both those platforms.
You can feature any comments on screen just by clicking on them. They will appear in the theme you selected in the Brand Settings. To stop featuring a comment, click on it again or select Hide current comment.

Banners
If you want to add any titles or a ticker to your stream, this is where you do it. You can configure these while you’re live or you can do it beforehand so it’s all ready for you to just click on.
Again, all your banners will appear in the same theme you select in Brand Settings.

Live Chat
When you have guests on your live stream, you can talk to them in an individual or group chat that’s not visible to your viewers.
There’s also a push to talk feature available meaning you can send private voice messages to your guests.

How To Screen Share In Evmux
To add a screen share, press the Share Screen button below the live preview. You can decide whether to share your entire screen or a particular window.
Once you select one, it will appear down the bottom in your video sources. Select Add to Dynamic to add it onto your live.

Then you’ll have two elements on screen: the camera and the screen share. You can switch the layout using the template buttons below the live preview.
If you hover your mouse over each of the elements, you can click and drag to move them. This works for any of the elements. So when you bring in guests, you can easily swap them around and feature different people just by dragging them with the mouse.
To stop the screen share, simply press the Share Screen button below the live preview again.

How To Share Video In Evmux
To add a video to your live stream, press the Share Video button below the live preview. Select the video you want to share and it will appear in the bottom corner as a video source.
When you’re ready for it to appear on screen, press Add to Dynamic and it will automatically start playing in your stream.
PRO TIP: When a video plays, you will see a low resolution preview. This is so it won’t put too much strain on your computer or internet. Don’t worry, your viewers will see a higher resolution version if their internet supports it.

If you want to share something like a video intro, video outro, countdown timer or something like that – you can upload these into the Graphics/Styling section instead if you find that process easier.
To stop a video share, simply press the Share Video button below the live preview again.
How To Add Guests In Evmux
To invite guests to your live stream, go to the video sources in the bottom corner and select Invite Guest. Copy the link and send it to whoever you want to join the live video.

Once your guests follow the link, they will appear in your video sources. Again, just click Add to Dynamic and they will join the livestream.
You can switch between different layouts and even bring up your guest’s screen share. Don’t forget you can live chat your guests or send them a private voice message inside the Chat tab.

Once you’re ready for the guests to leave the live stream, just hover over the video source down the bottom and press Remove from Dynamic.
You can already see how powerful and easy to use Evmux is. But so far we’ve only covered the Dynamic scenes. We can customize things ever more using Pro Scenes. Let’s check it out.

How To Use Pro Scenes In Evmux
Dynamic Scenes are great for regular content such as adding simple titles, inviting guests and screen sharing. But you can take your livestream to a whole new level with Pro Scenes (if that’s what you want)!
This tool is packed with advanced live streaming features.

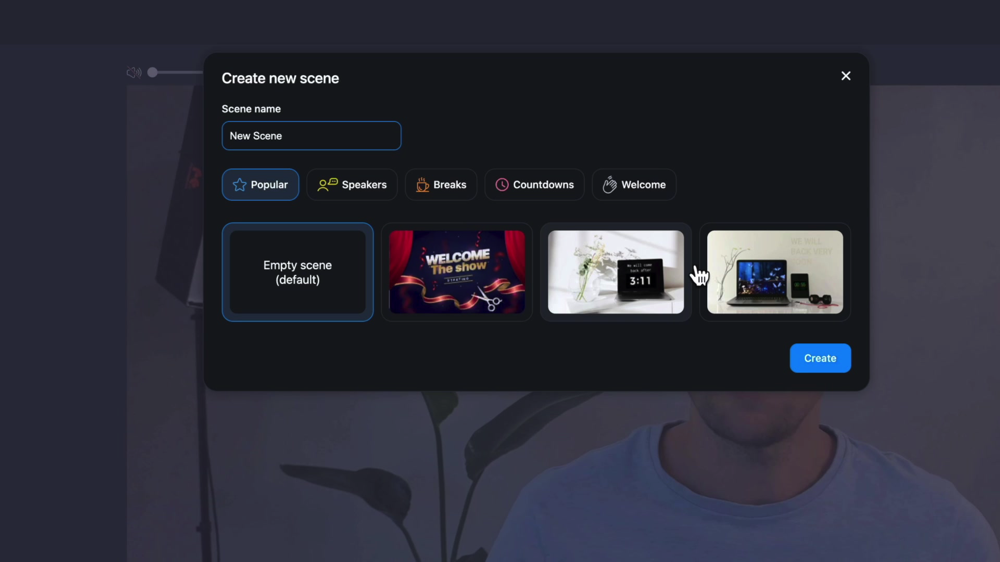
They allow you to completely customize your scenes and build out some really cool stuff. To do this, in the left menu go to Pro Scenes and select Add Scene.
There are some presets and templates for things like welcomes, countdowns, breaks and speakers. You can even achieve things like green screen effects. Again, these are fully customizable.
You could start by selecting one of the Countdown templates. Select the scene and then go to Layers. You can edit the text, font and color as well as the video files.
Or if you select a Speaker template, you can input the number of speakers you’ll have and select a specific layout. In that layout, each speaker can be resized, cropped, rearranged or made into a different shape.

This functionality is normally something you’d only see in platforms like vMix, Ecamm Live, Wirecast and OBS Studio. It’s incredible that you’ve got this level of customization in here.
You can also create an entire Pro Scene from scratch. Go to Add Scene and select Empty scene (default). Then go to Add New Layer.
Here you have access to a ton of key tools including:
- Text
- Animated captions
- Media files
- Slideshow
- Remote guest
- Speaker
- Screen share
- Media share

Let’s run through an example of how you might use these tools.
You could start by adding some video footage to the scene. Then go down to your video sources. Because you’ve got a Pro Scene selected, when you hover over your camera it will give you the option to Add to Pro Scene instead of Add to Dynamic.

Go ahead and add your camera to the scene. Then you can scale and crop your camera. You can cut it down to portrait and move it wherever you like on the screen. The customization options are endless.
You can see how quickly and easily you can create something completely custom using the different graphic elements.
Don’t forget, you can use a combination of Dynamic and Pro Scenes throughout your live streams.

How To Go Live In Evmux
Once you’re ready to start live streaming, go to Broadcast Channels in the top right corner. Select the social media platforms you want to live stream to.
You’ve got the option to go live on Facebook, LinkedIn, YouTube and Twitch. There’s also RTMP support which means you can do live streams pretty much anywhere.

Then sign in and verify the accounts you’re live streaming to. Enter a title, description, thumbnail, select unlisted or public and you can schedule it for later.
To live stream to multiple platforms simultaneously just click + Add a new destination and follow those same steps to set up that platform.
Then hit Save, go to Go Live and press Start.

PRO TIP: Once you’re live, your Pro Scenes won’t enter the live preview window until you press the Transition button to effectively move it over. The beauty of this is that you can queue up your next scene and seamlessly switch it over when you’re ready.
When you’re finished, press End Broadcast up the top and then press End Broadcast again.
It’s also worth noting that this live streaming software isn’t just great for live events. You can also use Evmux just for video and audio recording too.
Go to the top right menu and make sure no broadcast channels are selected. Go to Go Live and toggle on Recording. Then press Start. This is a great way to create some really awesome and engaging content in Evmux without actually live streaming.
But it’s not only regular recording that you can access in Evmux. There’s also the ability to do ISO recording as well. This means Evmux records your webcams locally onto your computer in the highest quality, and it does the same for anyone of your remote guests.
It then automatically uploads the recordings to Evmux afterwards, giving you the highest video recording quality possible. This is great for high quality video content such as interviews, podcasts and more.

Once you’re finished with your live stream or your recording, you can go back to the dashboard area and all the recordings will be available there.
There you have it – our complete Evmux live streaming tutorial.
All of these professional live streaming features are the reason it’s been a top contender for best live streaming app on Mac & PC. As you can see, it’s super powerful!
You can keep things super simple and stick to the Dynamic Scenes. Or you can take your live stream to the next level and try out some of the more advanced tools by jumping into the Pro Scenes.
The video production tools can be used to create pre recorded content or for virtual events and live videos. It’s great for a wide range of content creators.
Even though there isn’t a free trial, you can jump on the free plan to check it out!
If you want to see how Evmux stacks up against the other top live streaming platforms right now, check out our roundups on the Best Live Streaming Software For PC or Mac right now.
Recommended Gear & Resources
Check out an up-to-date list of all the gear, software & tools we use and recommend right now at Primal Video on our resources page here!