Without a doubt, video editing is often one of the most daunting parts of the video creation process for many people, especially if you’re just starting out and not familiar with the process of taking raw footage and turning it into a video masterpiece
But it doesn’t have to be that way.
Once you learn the basics and start to understand the fundamental process, you’ll soon see that you can get up to speed and edit videos like a pro in no time at all!
In this article, we’re going to walk you through the step-by-step process for video editing for beginners on Mac.
We’re also going to show how to edit FAST too – sharing our pro tips and tricks to help you learn all the shortcuts to save you a ton of time.
And at the end of this article, we’ll also share our free guide with you that’ll show you how to cut your editing time in HALF with our tried and tested Primal Video Method.
So, are you ready?
Important: When available, we use affiliate links and may earn a commission!
How to Edit Videos on Mac
Firstly, the steps we’re about to go through in this tutorial can be done with any video editing software, so if you already have one you’re comfortable with, that’s awesome!
If you haven’t picked one yet and you’re looking for some free software to get started with, we recommend that you try iMovie, which we’ll use in this tutorial to show you how the process works. iMovie is great for beginners right through to intermediate levels because it’s easy to use, intuitive, and has some awesome pro features.
Now it’s time to learn how to edit videos on Mac, with our 8 step process!
Here’s a quick preview of the steps:
Step 1: Set Up your Project
Step 2: Refine your Raw Footage
Step 3: Build Out the Story
Step 4: Add in Titles
Step 5: Add in Effects And Transitions
Step 6: Add in Audio
Step 7: Color Grade your Video
Step 8: Export and Review your Video
Step 1: Set Up your Video Editing Project
Before we dive into the detail of how to edit your video, there are a few things you need to set up to create a solid foundation for your editing project.
So, you’ll need to:
- Create and configure your new project.
- Import your media files.
How to Create A New Project
Creating a new project in iMovie is really simple. Just click the big ‘+’on the left of your screen and then select ‘Movie’.
You’ll then be taken to the iMovie interface where all of your editing work will happen.

Before you start importing your footage into this interface, it’s worth familiarizing yourself with its layout.
This workspace has different sections which are:
- On the left, you’ll see the ‘Import Media’ area where your project files live.
- On the right, you have the ‘Playback’ area where you can preview your video.
- At the bottom, the ‘Timeline’ is where you’ll perform most of the editing work.
How to Import your Media Files
Now you’re ready to bring in the files that you’re going to be working on.
To do this:
- Click on the ‘Import Media’ icon on the left of the screen.
- Alternatively, you can click on File > Import Media and locate the files you need.
- Then click on the file you want and click ‘Import Selected’.
- Starting with your primary footage (main footage), drag this file down onto your timeline in preparation for editing.
Step 2: Refine your Raw Footage
When it comes to editing videos, there are many ways to achieve the same outcome. The key is to decide which method is going to be quickest and easiest for you.
When editing down your video, the first thing you should do is cut out the bad takes or mistakes from your raw footage.
To do this: ‘Zoom In’ on the clip with the slider that is on the far right of your screen (in the center) and follow Method 1 or Method 2 below.
Method #1
- Select the clip you want to remove on your timeline so the yellow box appears.
- Hover over the start of the clip and you’ll see that your cursor changes to two arrow heads.
- Now click and drag your cursor to the right and you’ll notice that it’s moving the timeline along.
- Then all you have to do is keep moving it until you get to the point where you want your video clip to start and release.

Method #2
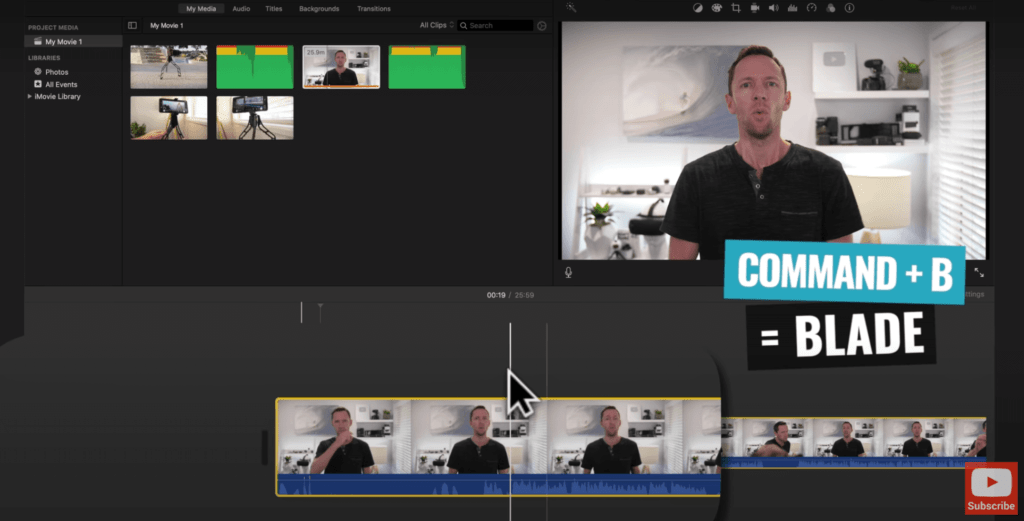
- Select the clip you want to remove on your timeline so the yellow box appears.
- Hover over the point where you want your clip to begin and press ‘Command + B’ (Blade Tool) on your keyboard. This will cut your clip into two.
- Click on the unwanted clip and press ‘Delete’on your keyboard and it’s gone
Using either method, you can also trim off the end of your video and then go through the rest of your footage to remove anything that you know you don’t want to use in your finished video. At this point though, if you’re unsure about any clips, leave them in there for now.
Step 3: Build Out the Story
Once you’ve completed a first pass and removed the footage you don’t want, it’s now time to add in some B-roll or overlay footage to help your viewers stay engaged and better understand your video.
If you’re looking for quality stock footage, check out our review of the top sites for royalty-free footage. Currently, we’re using Artgrid and Storyblocks! (affiliate links).
To add in B-roll footage:
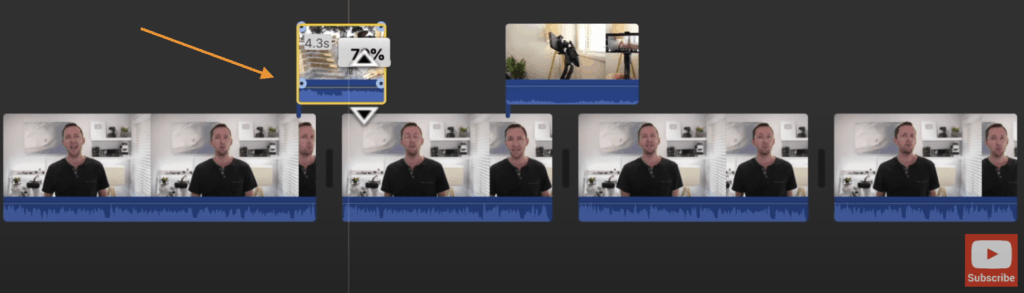
- Click on the B-roll clip in the ‘Media ’area and drag it onto the timeline, above your primary footage.
- Just like your primary footage, you can now trim, cut and delete any parts of your B-roll footage that you don’t want to keep using either method above.
- You can also pick up and move each individual B-roll clip and place it anywhere on the timeline.
Muting the Audio of the B-roll Footage
Often, you may want to mute the audio of your B-roll footage to let your primary footage remain audible and you can do this by:
- Hovering over the line in the dark blue section and so your cursor changes to two arrow heads.
- Then click and drag downwards to decrease the volume.
- Click and drag upwards to increase the volume.
Step 4: Add in Titles
After you’ve built out the story of your video, it’s time to add in any text or titles that you need. These can be really helpful for your viewers as they help to communicate key information.
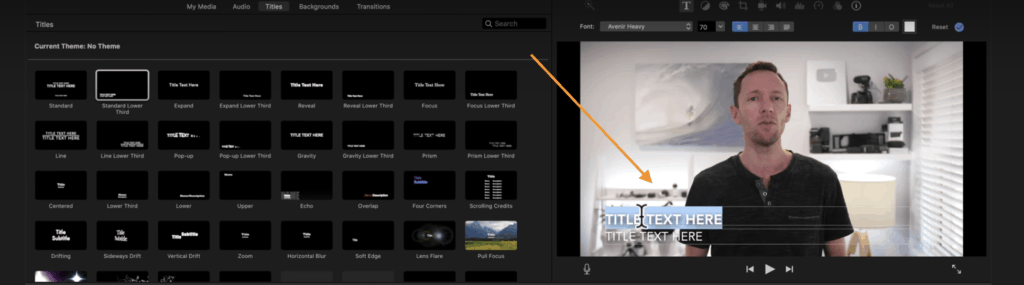
In iMovie, there are lots of inbuilt presets that you can use to create titles, which you can find in the top menu under ‘Titles’. Hover over them to get a preview of what they look like.
Once you’ve found one that you like, simply drag it down onto the timeline where you want it to appear. You can move it around or make it shorter or longer by dragging the ends of it with your mouse.

Editing the Text in your Title
To make adjustments to your title:
- Double click the title on the timeline.
- Come up to the ‘Playback’ area and begin editing the text.
From this point, it’s just a matter of customizing your text by choosing the font type and size that you’d like. You can also add outlines and background colors as well as adjusting the size and position of where your title appears on screen.
If you want to go one step further and make title screens for your videos, check out our step by step training in this tutorial. We use a service called Placeit (affiliate link) to make these as they have an awesome range of templates that you can customize up to suit your needs.
And if you want to learn how to make animated video titles, we also have a tutorial on how to do this which you can watch here.
Step 5: Add in Effects and Transitions
Once that’s done, the next thing to do is add in some transitions or effects into your video.
Transitions can make your video look polished and professional, but the key is to not go overboard and add in too many. Use them sparingly to create a storytelling element in your videos.
In iMovie, there are lots of inbuilt presets that you can use to create transitions, which you can find in the top menu under ‘Transitions’.Hover over them to get a preview of what they look like.
Just like you did with the Titles, find one you like and drag it down onto the timeline where you want to use it.

Generally speaking, transitions work well with B-roll footage, but we tend not to use them with our primary footage because they can be quite distracting. Keep things simple and you can’t go wrong!
Instead, we prefer to ‘Zoom In’ on one of the clips to create a subtle difference between the shots and avoid a hard cut.
The subtle change in the shot helps keep the video engaging and also helps mask any minor lighting changes or movements between the shots, making them less jarring and noticeable than simply using a ‘Hard Cut’.

To Zoom in:
- Select the clip you want to zoom in on.
- Click on the ‘Crop’ icon in the menu above the Playback area – the icon looks like a square.
- Then click ‘Crop to Fill’ in the Style menu on the left of the video.
- You’ll see that a white box appears around your video.
- Drag a corner of the box inwards to make the size of the box a bit smaller.
- You can also reposition the box by picking it up and moving it with your cursor.
- The white box is now your new shot, which is zoomed in on.

Pro Tip: When using this type of zoom transition with piece-to-camera footage, try to ensure that the subject’s eyes are in the same position in both the zoomed in and zoomed out shots. This makes it less jarring for you viewers to watch.
Step 6: Add in Audio
Now it’s time to import any music or sound effects into your edit and you can do this by clicking on ‘My Media’ which you can find in the top menu.
Find the track you want to use and drag it down onto the timeline to the very bottom, below your primary footage.
And just like your other clips, you can pick up your audio track, move it around, shorten or lengthen it etc.
Play through your video and adjust your audio if you want it to sync with specific parts of your video, ensuing that it all flows nicely.

If you’re looking for some quality background music for your video, check out our recommendations for the top royalty-free music sites here.
Adjusting the Audio Levels
Now it’s time to adjust the volume levels in your video. We always start with our primary footage before moving onto the audio clip.
To adjust the volume levels, you can either do it on a clip-by-clip basis or on the entire audio track. If your video has been shot with the same camera and microphone and the audio is fairly consistent, it’ll be easy for you to adjust the audio level on the entire track.
To adjust the audio:
- Mute the music track by dragging down the horizontal line in the center to the very bottom.
- Zoom in on your primary footage with the slider that is on the far right of your screen (in the center).
- Select the first clip and locate the horizontal line running through the dark blue area.
- Drag the horizontal line up or down to adjust the volume.
- Ensure that the volume isn’t too loud by making sure there are no red waves showing.

If you video has been shot with the same camera and microphone, you can then:
- Select the first clip and copy it (Command + C).
- Select all the other clips you want to apply this to and find Edit > Paste Adjustments > Volume in the top menu. This will apply the same volume level to all the clips you have just selected.
Once you’re happy with the volume of your primary footage, go through the same process with your audio track by un-muting it first and following the steps above.
There’s no set volume level to aim for with your music track; just make sure it doesn’t annoy or interfere with your viewers’ listening experience.
Pro Tip: If you want to have different volume levels throughout your audio track, you can press ‘Command + B’ to cut up your track and then adjust each one individually.
Fading In/Out your Audio
If you’d like the volume of your audio track or primary track to fade in at the start, or fade out at the end, this is really easy to do in iMovie.
Look for the little circle at the start and end of a clip and click and drag it inwards to where you want the end of the fade to finish.
Once you’ve done this, your audio will start with no volume and gradually fade in to reach full volume by the end of the fade in/out area.

Step 7: Color Grade your Video
The next step after adjusting the editing process is to color grade your video and you’ll want to start with your primary footage first by selecting the first clip in your timeline.
We recommend color grading at the end of the editing process because it makes the overall editing process much faster and more efficient. That’s because your software has to process and render your color changes each time you preview your video, which is why we recommend doing this step last.
In iMovie there are some automatic settings that you can use to quickly adjust the color of your clips that can be found in the ‘Playback’ area. These include: ‘Match Color’, ‘White Balance’ and ‘Skin Tone Balance’.

There are also some filtersavailable that you can apply if one suits the look and feel of your video. You can find these by clicking on the 3 white circles in the ‘Playback’ area and they will appear on the left.
However, if you want more customizability, click on the ‘Palette’ icon in the same menu to bring up the color correction tab. There are 3 main things to adjust when you’re color grading which are:
- The White Balance: use the slider on the far right to adjust the ‘temperature’ of your shot. Slide it right to increase the warmth (yellow/orange tones), or slide it left to make it cooler (blue tones).
- The Brightness: use the slider on the left to make your shots brighter or darker. Each circle on the slider will adjust different areas of your shot, such as the dark areas, the bright areas or the contrasting areas.
- The Color: use the slider in the middle to adjust the actual color in your shot. Slide it to the left to remove all the color and make it black and white. Slide it to the right to over-saturate your shot.

The color adjustments you make are largely dependent on personal preference – there is no right or wrong per say. Make small tweaks as you go and you can always hit the Reset button if you want to start again.
As you did with your audio settings, you can also copy/paste the changes you have made to your colors from the first clip to the remaining clips by:
- Selecting the first clip and hitting ‘Command + C’ to copy it.
- Selecting the other clips you want to apply these color settings to and going to Edit > Paste Adjustments > Color Correction in the top menu.
If you have B-roll footage, follow the same process above to adjust the colors in these clips if required.
Step 8: Export and Review your Video
At this point, your video is complete and it’s finally time to export it!
To do this:
- Click on the ‘Share’ icon in the top-right of your screen. You’ll see that there are several presets to choose from, but we’d recommend saving it as a ‘File’ and then uploading afterwards to YouTube, Facebook etc.
- Select ‘Video and Audio’ in the format settings.
- Adjust the ‘Resolution’ setting if required. If unsure, go with 1080p.
- Adjust the ‘Quality’setting to suit your needs and required file size.
- Adjust the ‘Compress’settingto‘Better Quality’unless you’re in a hurry.
- Click‘Next’.
- Name your file, choose where to save it and click save.
Your video will then begin exporting and you can track its progress in the top-right corner of your screen with the circle.
When your video is ready, we’d strongly recommend that you preview your video on a few different devices (phone, computer, tablet, etc.) to make sure you’re happy with the overall look and feel of your video on multiple devices.
Now you’re Ready to Edit Videos on Mac!
There you have it – the complete guide to video editing for beginners on Mac.
Our 8 step editing process gives you the tools you need to transform your raw footage into a high-quality, polished video that you’ll be proud to share with your audience.
These steps can be applied to any video editing software, but if you’re still wondering what to use, check out this video on the Best Video Editing Software for Mac.
And, as promised earlier, here’s a copy of The Primal Video Method, our free guide that outlines the step-by-step process to cutting your editing time in HALF.
iMovie Keyboard Shortcuts:
- Play = Space Bar
- Exit Fullscreen = ESC
- Undo = Command + Z
- Blade = Command + B
- Copy = Command + C
- Paste all adjustments = Option + Command + V
- Paste all color adjustments = Option + Command + C
Links
When available, we use affiliate links and may earn a commission!
Recommended Software for Starting Out:
Other Software we’re Using on Mac:
Recommended Stock Footage Sites:
Recommended Stock Music Sites:
Create your own Custom Animated Titles & Effects:
Recommended Gear & Resources
Check out an up-to-date list of all the gear, software & tools we use and recommend right now at Primal Video on our resources page here!