With the right apps, it’s easy to create custom thumbnails for YouTube on your Android phone or tablet. There are apps that enable you to do everything you need to do – shoot, edit, and upload – release complete YouTube videos without ever leaving your Android!
Of course, an important part of that process includes creating an epic thumbnail.
Important: When available, we use affiliate links and may earn a commission!
In this guide, we’ll take a look at the best Android thumbnail app available today in the Google Play Store. We’ll also run through a step-by-step tutorial showing exactly how to make a thumbnail for YouTube videos on your Android – no desktop needed!
How to Make a YouTube Thumbnail on Android
Here at Primal Video, we have tried and tested tons of different thumbnail design apps for Android. After all this trying and testing, we’ve decided that the award for best Android thumbnail app goes to Pixellab.

Pixellab features heaps of features that give you complete control over creating your thumbnail. It’s not too overwhelming, even for absolute beginners, but it’s advanced enough to leave you with an awesome thumbnail. Best of all, you can get great results using the free version of the app.
We’ll be referring to Pixellab throughout this tutorial, covering each of these steps on how to make thumbnails on Android for YouTube:
- How to Capture a YouTube Thumbnail Photo
- How to Make a YouTube Thumbnail on Pixellab
- How to Add Text to a YouTube Thumbnail
- How to Duplicate Text on Pixellab
- How to Add a Photo to a YouTube Thumbnail
- How to Remove a Background for a YouTube Thumbnail
- How to Add an Outline to Photos for a YouTube Thumbnail
- How to Add Color Filters in Pixellab
- How to Add Logos to a YouTube Thumbnail
- How to Add a Colored Background on Pixellab
- How to Save Your Thumbnail on Pixellab
- How to Upload a Thumbnail to YouTube on Android
How to Capture a YouTube Thumbnail Photo
The very first thing you’ll need to create a custom YouTube thumbnail is a photo. The photo used in your thumbnail needs to help your viewers make a snap decision on whether or not the video is for them.

It’s possible to capture captivating photos of yourself (like this one!) while filming from your smartphone
If you are the main attraction of your videos, using images of yourself is a great starting point. For product reviews, the photo could be of you pointing to or holding the product you’ll be reviewing.
It’s best to take several shots with different facial expressions and gestures, so pose for a few quick photos. Another good option is to take snapshots of your video footage. Then you’ll be ready to jump across to the Pixellab app to create a thumbnail.
How to Make a YouTube Thumbnail on Pixellab
Now that you’ve got your photo all figured out, head to the Pixellab app on your Android.
As soon as you open the app, you’ll see a handful of preset thumbnail templates to choose from. If you’re looking for a super quick and easy process, consider using one of these templates as your starting point.

But for now, let’s focus on how to make YouTube thumbnails from scratch. Start by choosing the Default template on Pixellab, which can then be customized to your exact liking.
Sizing Your Thumbnail Image
To properly size your thumbnail, click on the settings icon (the button with 3 vertical dots) in the upper right corner of the app. From the dropdown options, select image size.
There is an option to select the preset size labeled YouTube thumbnail, but the better option is to input a custom size. You can increase the resolution to 1920 x 1080p for a clearer, crisper thumbnail. If you go with the preset, the resolution will be set to a mediocre 1280 x 720p.

Hit the blue checkmark in the bottom right corner of the app once you’ve input the pixel count and you’ll be taken to your blank thumbnail canvas.
How to Add Text to a YouTube Thumbnail
Now it’s time to add your thumbnail text to let your viewers know what your video is all about. There should already be a text box on the Pixellab canvas, so simply click on that box and type in your text.
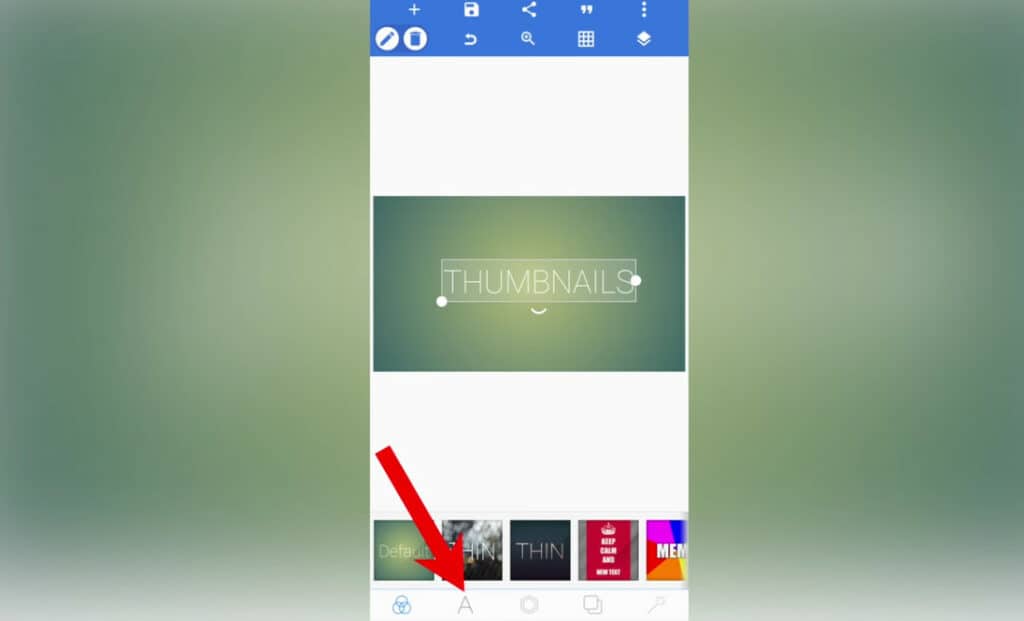
If you click on the ‘A’ icon at the bottom toolbar, a heap of different tools will appear that allow you to customize this text. You can change the font, location, color, size, rotation, and background color of the text all while using these simple tools within the app.

Pixellab makes it easy to incorporate specific branding, like a certain font or color code, into your thumbnail. It’s even possible to upload a font if your brand’s font isn’t available in the app.
How to Duplicate Text on Pixellab
Knowing how to duplicate a text box is a major time-saver. You’ve already created your ideal text with all the added features and edits, so you can save yourself from having to create another text box by using the duplicate feature.

To duplicate the text you’ve already created, just select the text box and choose Copy located in the bottom toolbar. This is an amazing tool if you’re using multiple lines of text and don’t want to have to customize each one.
Pro Tip: Save Your Text Customizations for Future Thumbnails
If you’re planning on using Pixellab to make YouTube thumbnail graphics in the future, the app has a really cool feature that allows you to save certain text styles.
To save your customized text styles, select the text, click the Styles icon, and choose Save. To access your saved texts, just select Browse under the same icon and choose the style you want to use.
How to Add a Photo to a YouTube Thumbnail
Remember the photo you took in the first step for creating custom thumbnails on YouTube for Android? Well, it’s time to add that photo into your thumbnail image.

The Erase Color tool is the perfect background removal tool if you’re photo was taken on a green screen
To add your photo, select the ‘+’ icon located in the top left corner of the app. Assuming your photos are saved on your Android’s photo library, you’ll select from gallery in the dropdown menu and select the photo you want to use.
Before the photo is added to the thumbnail canvas, the app gives you the chance to crop it down. Try to crop out as much of the unusable background as you can before hitting the checkmark to upload it.
How to Remove a Background for a YouTube Thumbnail
Even after cropping your thumbnail image, chances are there are still some parts of the original photo that you’ll need to cut out. Pixellab makes this really easy with a few different editing features to choose from:
1. Use the Erase Color Tool
The first option to remove the background is to use the Erase Color tool, which is a great option for green/blue screens or if the photo has a solid background color.
The Erase Color tool is the ideal background removal tool if you’re photo was taken on a green screen
Just click the Erase Color icon in the bottom toolbar and select the color that you want to take over the background. That’s it!
2. Use the Manual Eraser Tool
Unfortunately, most people won’t be using photos that have a solid background color, in which case it’s time to use Pixellab’s eraser tool.
By clicking the Eraser tool on the toolbar, you’ll be able to manually draw out the background from the image. You can change the size of the eraser, so make it bigger for cutting out large areas and smaller for erasing out those nooks and crannies.
If you want a high-quality final result, it’s best to zoom in on the photo as you erase around the image’s edges.
3. Use the Lasso Tool
The Lasso allows you to draw around the image so that you can easily cut away the excess background. It’s best to then use the eraser tool to clean up the rest of the image.
No matter which tool you use, it’s super easy to remove the background.
For the cleanest background removal, it’s best to use the lasso tool followed by the eraser
How to Add an Outline to Photos for a YouTube Thumbnail
It’s not 100% necessary to add a border to outline your thumbnail photo, but it will help draw attention to your thumbnail. An outline can make the image pop, and it’s a great addition if the crop job isn’t perfect.
Many of the Primal Video thumbnails use outlined photos to make the subject – in this case, Justin Brown – stand out from the background
To do this, just hit the Stroke icon in the toolbar and an outline will appear around the selected image. You can easily change the width and color of the border. Another option is to add a shadow around the image by clicking on the toolbar’s Shadow icon.
How to Add Color Filters in Pixellab
Another thing you can do to make your thumbnail pop is add color filters to brighten things up. Once again, Pixellab makes this easy; just click the Color Filters icon in the toolbar and make adjustments to the image’s color brightness.
How to Add Logos to a YouTube Thumbnail
Graphics and logos are a great addition to give your viewers a better idea of what the video will cover. You can use Google to do an image search for simple logos and graphics, but just make sure you’re legally allowed to use whichever images you select.
If a YouTube logo would fit well in your thumbnail, you can find free-to-use logos on YouTube’s Brand Resources page
After downloading additional thumbnail images to your Android’s library, head back to the app, click the ‘+’ icon, and select from gallery. Then just choose the logo/graphic you want to add. The image will be dropped into the canvas and you can play around with its sizing and placement.
You can also use screenshots of your existing videos to drop into your thumbnail if you feel that they’ll be a good representation of what the content is about.
How to Add a Colored Background on Pixellab
At this point, we haven’t made any changes to the preset Pixellab background, so it’s time to play around with your background color.
Click that ‘+’ icon again and select the shapes option. The default shape will be a plain white square, but you can easily change the color and gradient to fit your branding. Be sure to also resize the background shape so that it fills the entire thumbnail.
To change the background colour of your thumbnail, click the ‘+’ button and select ‘shapes’
Because you’ve just added this shape, it will be overlaid on top of the rest of the thumbnail text and images. To position this shape so that it sits behind the rest of the thumbnail components, click on the layers icon in the top menu and set the shape so that it’s positioned in the bottom layer.
How to Save Your Thumbnail on Pixellab
Your thumbnail finally looks like, well, a thumbnail! That means it’s time to save your work – although it is recommended that you save your work throughout the entire process.
Hit the Save button located at the top of the app, and select Save as project to make sure everything is saved to the app. Next, hit Save again and select Save as image. This will save the thumbnail image to your Android’s photo gallery.
Before you hit Save to gallery, just make sure all the formatting details are correct; it should be saved as a jpeg with a resolution of 1920×1080
How to Upload a Thumbnail to YouTube on Android
The final step for making a YouTube thumbnail on Android is uploading the image to YouTube. Head over to the YouTube Studio app and open up your existing videos.
It’s time to upload your thumbnail to YouTube!
Select the video you’ve created this thumbnail for and click the edit icon. Then, choose Custom Thumbnail, upload your thumbnail, and hit Save. That’s it! You’ve successfully created and uploaded a thumbnail entirely from your Android phone or tablet.
Now You’re Ready to Make Custom Thumbnails on Android!
There you have it – the complete guide on how to make thumbnails on Android.
In this tutorial, we covered all the steps for using our recommended thumbnail-creating app (Pixellab). Now you’re ready to do everything from capturing your thumbnail photo to uploading the thumbnail to YouTube.
For more info on how to improve your channel, check out our FREE YouTube Ranking Guide. In this guide, we cover the 3 most powerful tools and ranking strategies to increase your YouTube traffic by 10x!
Links
When available, we use affiliate links and may earn a commission!
Recommended App:
Recommended Gear & Resources
Check out an up-to-date list of all the gear, software & tools we use and recommend right now at Primal Video on our resources page here!
Related Content


