iPhones are not just great for shooting videos, but also for editing them!
You can find both paid and free video editing apps for iPhone with loads of great features that you’d usually only find on desktop-based video editors.
Important: When available, we use affiliate links and may earn a commission!
In this guide, we’ll share the best video editing app for iPhone right now. Then, we’ll dive into a step-by-step guide on how to edit videos on iPhone using our top pick.
Whether you’re looking to create some awesome YouTube video content or want to know how to edit video like a pro, we’ve got you covered. Just follow along in your preferred iPhone video editor and you’ll be creating professional videos on your iOS device in no time!
And if you’re wondering if you can edit videos on your iPad, the answer is yes! Many of these apps are also available on iPad, so you can edit video on the big screen too.
Here are the exact steps when it comes to how to edit videos on iPhone:
- Step 1: Start a New Project
- Step 2: Edit Down the Video
- Step 3: Add In B-Roll
- Step 4: Add Titles & Text
- Step 5: Add Transitions
- Step 6: Add Music
- Step 7: Adjust Volume
- Step 8: Adjust Color Grade
- Step 9: Export Video
Before we get started, let’s take a look at the best video editing app for iPhone to help you edit amazing videos.
Best iPhone Video Editing App
Our top pick for best video editing app for iPhone and iPad is CapCut.
It’s a great all rounder and it’s a completely free app. So if you’re looking for the best FREE video editing app, it ticks that box too!
Whether you’re an absolute beginner or more advanced, this is a great editing app that will help you create some amazing video content.

We’ll be running through this step-by-step tutorial using CapCut.
If you’re not using CapCut, you can follow along using whichever video editing app you like. The process will be the same no matter which iPhone video editor you’re using!
PRO TIP: If you’re looking for other video editing apps with more advanced features OR a more basic video editing app, check out our roundup of the Best Video Editing Apps for iPhone & iPad.
Before we get started, you can download a copy of our exact video editing process, the Primal Video Method.

How To Edit Videos On iPhone
We’ll be going through this video editing process using an iPad (just because it’s bigger & easier to demonstrate on) but everything’s exactly the same on an iPhone!
Step 1: Start a New Project
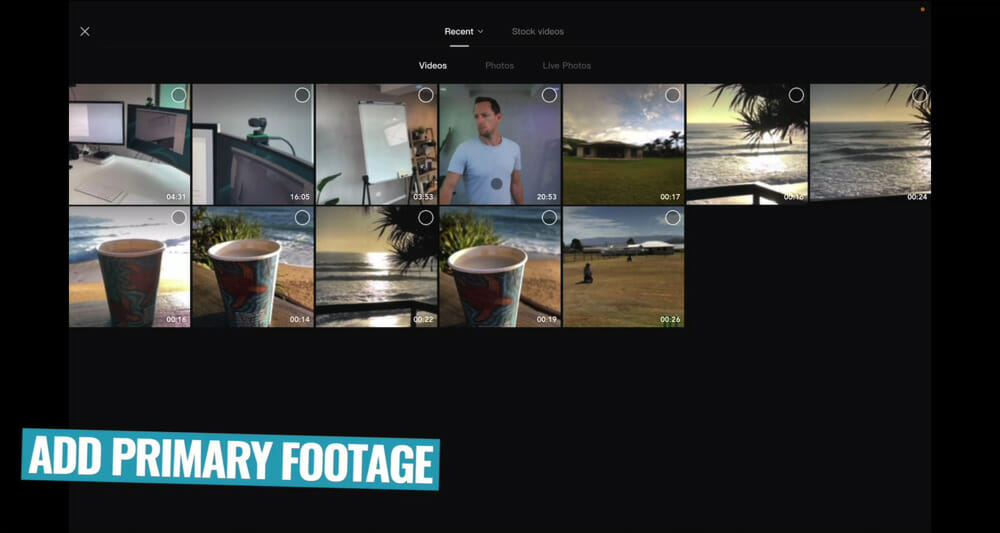
Open your video editing app. On the home screen you’ll usually see any recent projects you’ve been working on.
To create a new project, tap the New Project button. From here, we want to bring in the primary video footage. We’ll bring in the other b-roll footage, graphics and overlays later.

So select any primary footage clips and tap Add.
PRO TIP: You can perform basic edits on the video clips before importing them to your project but we think it’s best to import the entire clip for now and edit it down later.
Then you’ll be taken to the main video editing interface.
Video Editing Interface
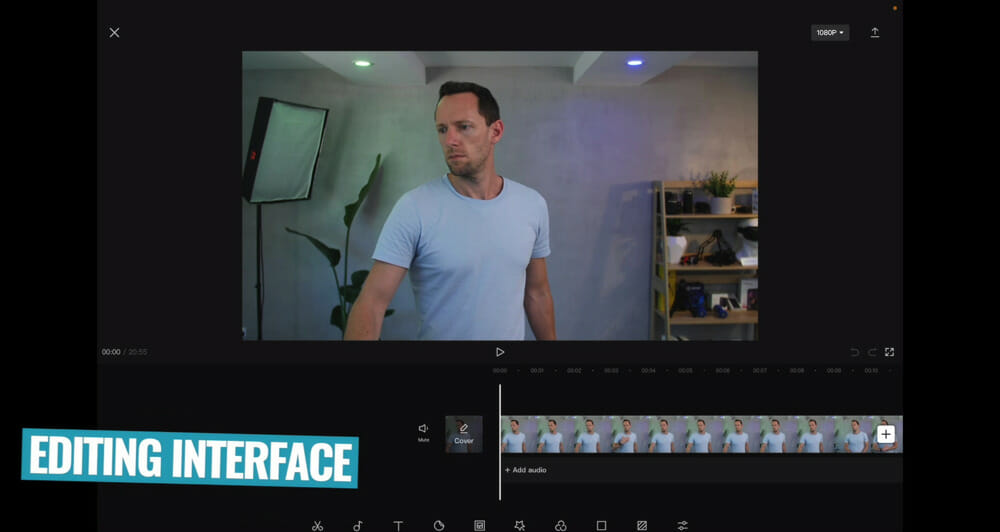
Before we dive into editing the video, let’s do a quick run through of the interface so you know what and where things are:
- Preview Monitor: The main window where you can preview your video clips and watch through your project
- Video Editing Timeline: Along the bottom is your timeline where all your footage and video elements are located
- Other Editing Tools: In the bottom menu is where you’ll find all the other tools for editing video projects
PRO TIP: You can zoom in and out on the timeline by pinching to zoom.
Project Settings
Now that you’re across the general layout of the video editing app, it’s a good idea to check your video settings.
Tap the button in the top right corner where it says 1080P. This is where you can select your video resolution and frame rate.
By default this should match the primary footage that you uploaded. But if you need something specific or you want to change it up at all, you can do that here.

Aspect Ratio
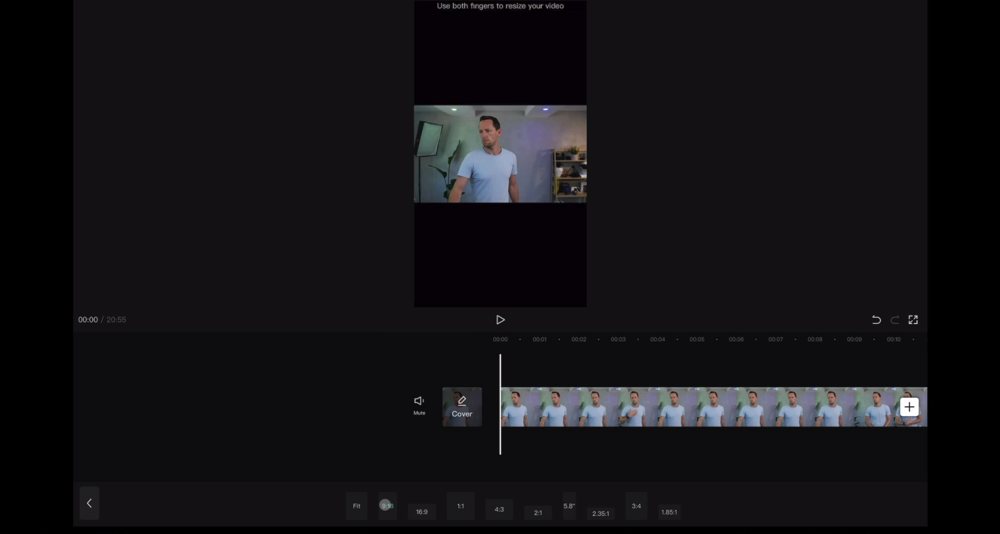
The final thing you might want to adjust before diving into video editing is to adjust the aspect ratio.
In CapCut you can do this by tapping the Ratio button in the bottom menu.
Like the project settings, your project will default to whatever ratio the primary footage is.
But if you want to change this for creating a TikTok or Instagram Reel for example, you can just select the 9:16 ratio and then resize or move your video clip so it suits that ratio.
Step 2: Edit Down the Video
Now you’ve created your project and adjusted any project settings – nice work!
The next step is to edit down your video to remove all the bad takes, mistakes and anything you don’t want included in the final project.
Let’s say you want to remove some bad takes at the beginning of your footage. There are two main ways you can do this.
Trimming Video Clips With Split Tool
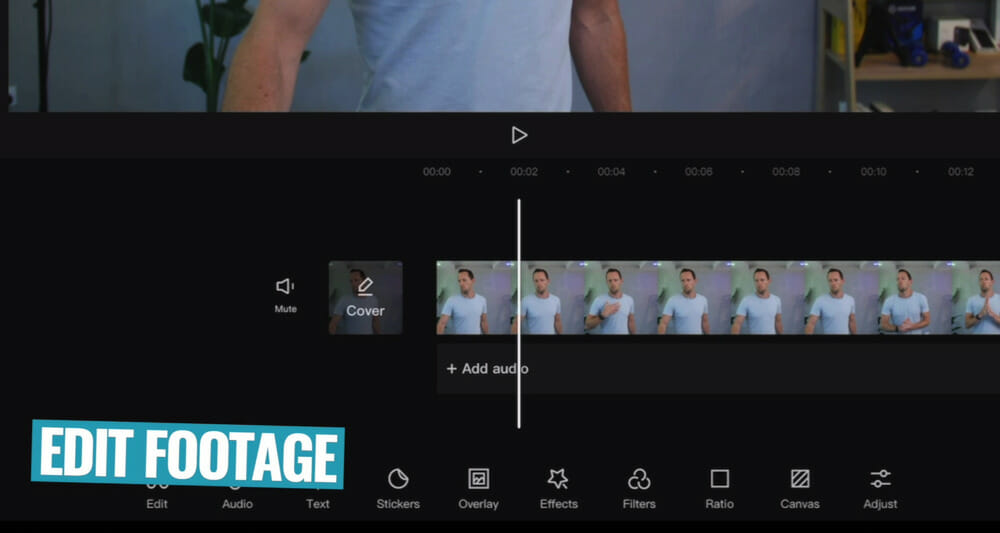
Start by scrubbing across the video clip until you find the point you want the video to begin.
Then tap on the video clip so it’s selected and a bunch more settings will appear along the bottom.
Select Split and your clip will be cut into two separate video clips. Then you can select the first clip with the bad footage and tap the Delete button.

PRO TIP: If you make a mistake while editing, don’t stress! You can press the Undo button.
Trimming Videos With The Handles
Another way you could achieve this same outcome is by adjusting the sides of the clips.
Once again, tap the clip so it’s selected. While the clip is selected you’ll see white handles on either side of it.
You can tap and drag the white handle to the point where you want the clip to begin. Once you let go, that’s the new starting point of the video.

PRO TIP: End clips are automatically added to your project in some video editing apps, including CapCut. If this is the case, make sure you delete it or it’ll be in your finished video!
Removing Footage In The Middle Of A Clip
Now we want to go through and delete any bad takes throughout the entire project.
To do this, you can create one Split at the end of a good take and another Split at the beginning of the next take. Then select the remaining middle video clip and press Delete.
Alternatively, you can create a Split and then use the white handles to trim the video clip accordingly.
Once you’ve only got all the good stuff left over, you can move to the next step.

Step 3: Add In B-Roll
Now we want to add in any graphics, overlay or b-roll footage.
In the bottom menu bar, tap the Overlay button and then select Add Overlay.
Select the overlay clip you want to add in and press Add.
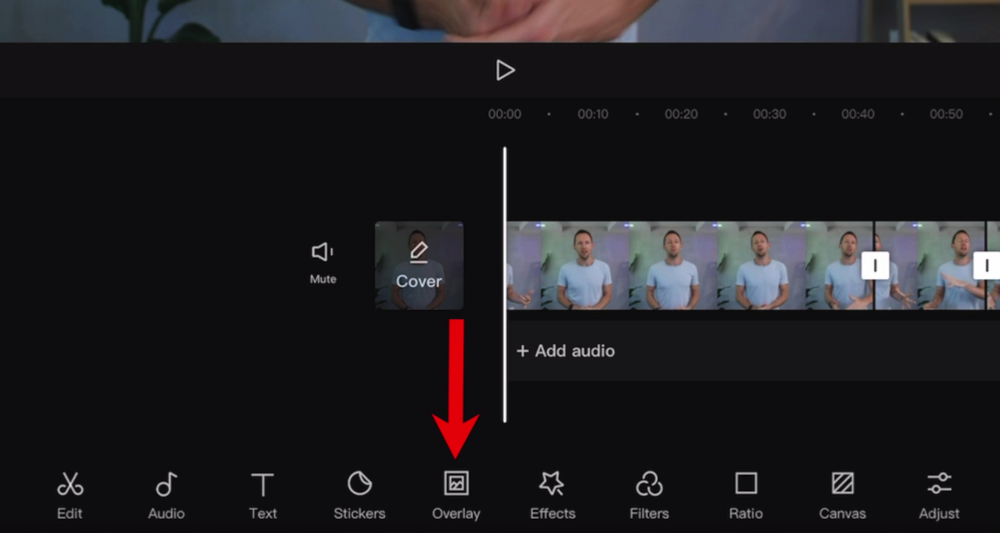
That video clip will now be added in the layer below the primary footage clip.
You can edit the overlay clip using the same tools used to edit the primary footage. So go through and trim or cut the overlay video clip so you’ve only got the sections you want to use.
The clips can be moved around by tapping and holding on the clip and then dragging it to a new location.
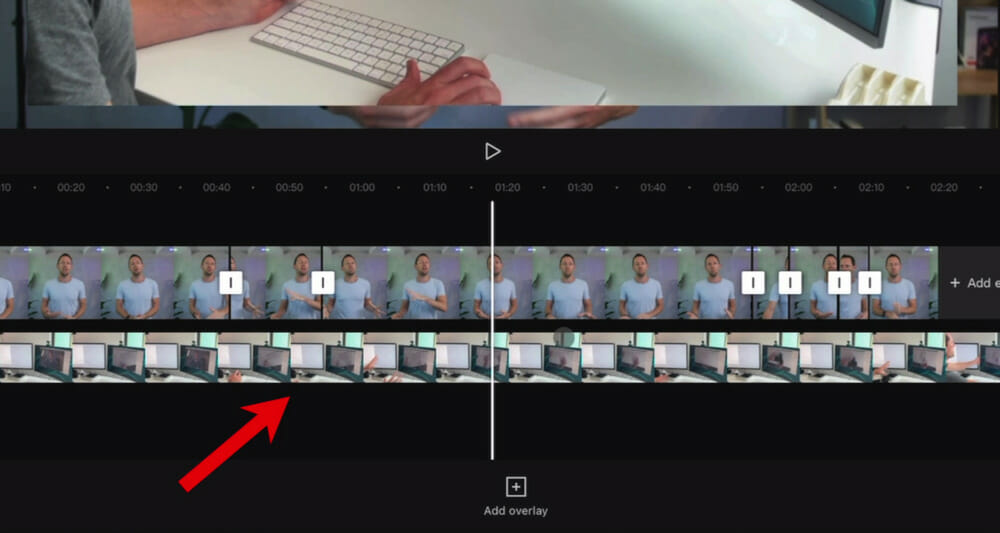
You might find that the overlay footage isn’t full screen. If this is the case, select the video clip on the timeline and then pinch to zoom on the video in the preview monitor.
Feel free to add as many overlay clips as you like. The clips will continue layering underneath each other.
Once you’re finished adding and adjusting the overlay clips, hit the Back icon in the bottom left corner.
Then you’ll leave the Overlay mode and you’ll notice it’s changed to a compressed view of the b-roll clips. This is just to take up less screen real estate.
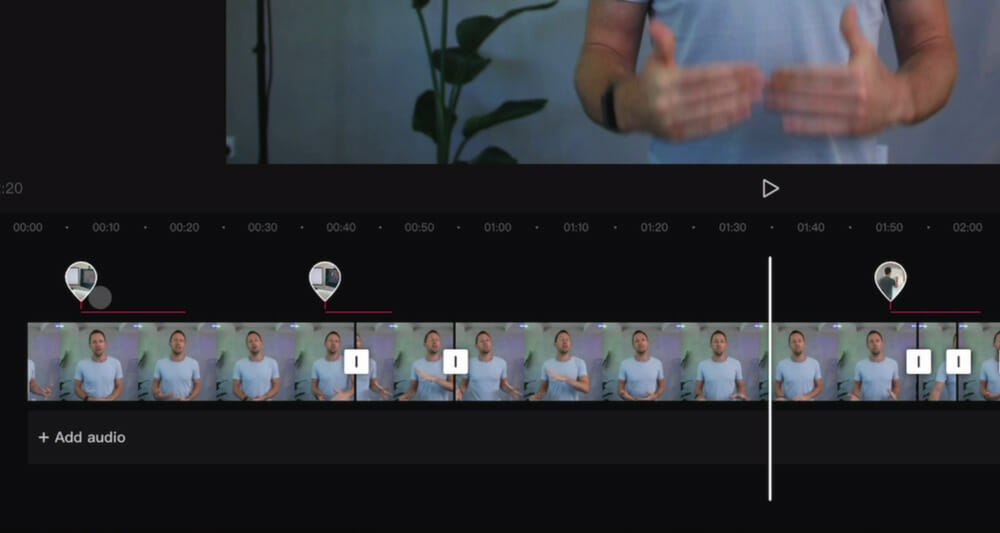
At any time you can go back into Overlay mode to edit them again.
Step 4: Add Titles & Text
Now we can add in any text or titles to the video project.
There are two options when it comes to adding text and titles. You can go to Add Text for more basic options or you check out their templates by going to Text Templates.
Let’s start by checking out the basic text options.
Basic Text (‘Add Text’ Button)
Select the Add Text button and a text box will appear on screen.
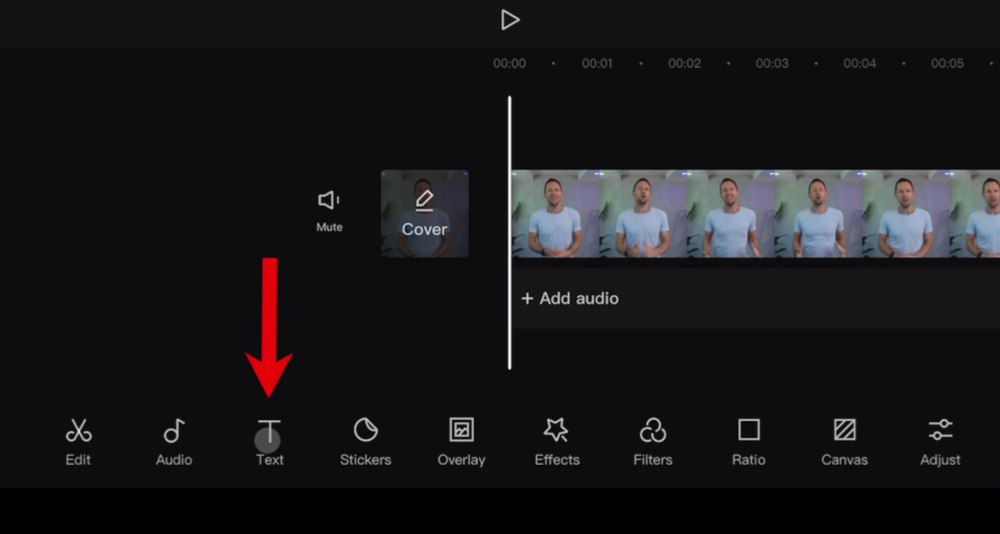
You can enter any text into the box by typing it in.
Then you can make adjustments to the:
- Font
- Style
- Effects
- Animation
- Bubble
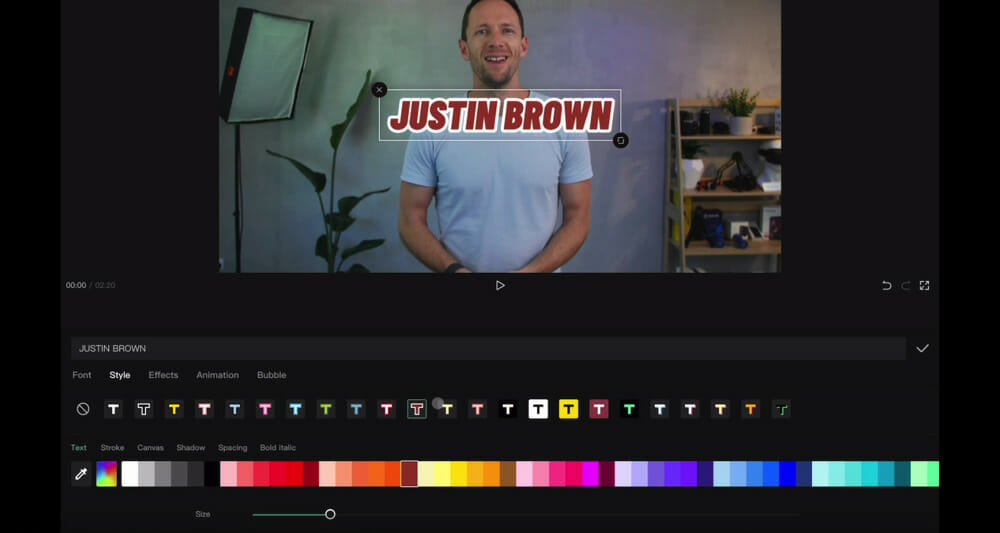
To adjust the placement of the text box, tap and move it across the screen. You can also change the size of it by dragging the corner.
Once you’re happy with the text, hit the Tick icon and that text will be applied to your timeline.
Just like with the other clips, you can move it around on the timeline to change the positioning and you can adjust the length of time it appears on screen by dragging the white handles.
Text Templates
Go to Text Templates in the bottom menu and you’ll see a ton of presets and cool things that you can customize up for your videos.
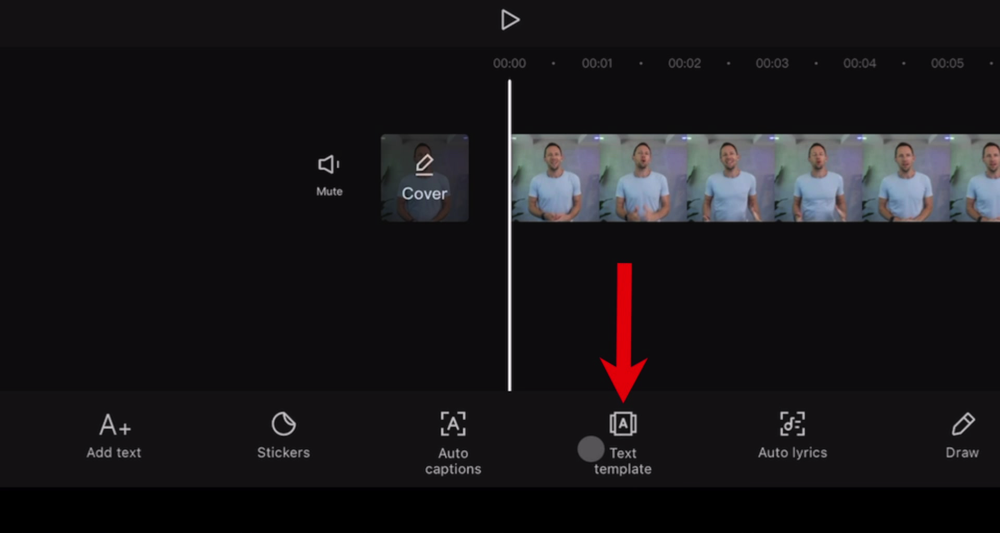
There are different categories you can scroll through like:
- 3D
- Titles
- Social Media
- Vlog
- Chapter
- Subtitle

Just tap one of the presets and then hit the Tick icon to add it to your timeline.
Again, all of this is customizable so you can change the text to suit your needs. Once the title is on your timeline, you can just tap the text box to alter the text.
You can pick it up, move it around and resize it just like the other text box.

Once you’ve added all your titles and text, it’s time to move on to the next step.
Step 5: Add Transitions
The next step is to add in any effects or transitions into your project.
Adding Transitions To Primary Footage
To add a transition between two primary footage clips, tap the little white marker between each of the clips.

Then you’ll see a ton of transitions you can choose from to insert between the two clips.
PRO TIP: Don’t go overboard with these types of transitions – that’s an easy way to quickly cheapen your video.
However, for situations where the two clips look essentially the same (like in our YouTube videos), we generally wouldn’t recommend using a preset transition.

Instead, we’d add a zoom in.
This is where you zoom in slightly on the second clip to change up the look of your shot.
To do this, select the second clip and then in the preview monitor pinch to zoom in slightly.
You don’t want to zoom in too much, especially as you might lose quality depending on how you filmed the footage.
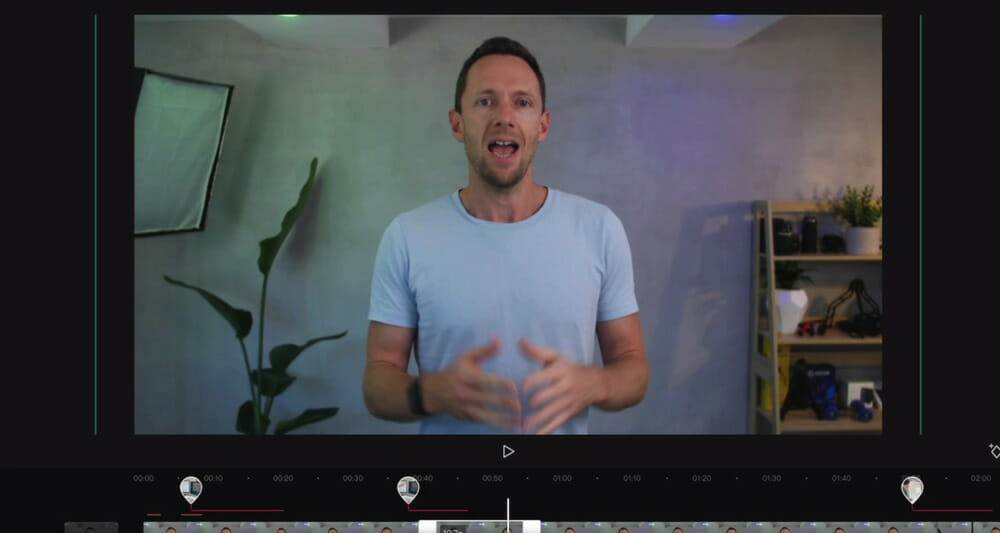
The idea is just to create a subtle effect. It’s a great way to break up your content.
Make sure you try to keep the eyes in a similar position as this will make the transition less jarring for your viewers.
Adding Transitions To Overlay Footage
To add transitions and effects to your overlay footage, select the clip on the timeline and tap Animation.
Again, these are things we’d suggest using sparingly as it usually doesn’t look great when they’re overused.
Just select the one you want to go with, tap the Tick icon and it will be applied to that clip.

Adjust Speed
Another cool feature inside most video editing apps is the ability to speed up or slow down your clips.
In CapCut, select the clip and tap Speed in the bottom menu. Here you have two options: Normal or Curve.
The Normal tool allows you to increase or decrease your speed using a slider.
The Curve tool provides a range of presets as well as custom speed adjustments. This allows you to get really granular with the speed control!

Background Removal
This is another really powerful tool that allows you to get creative with your video edits.
Select a clip on the timeline, hit Cutout and go to Remove Background.
It will then automatically remove the background of your shot.

Other Effects
Go to Effects in the bottom menu. Here you can see Video Effects, Body Effects and Photo Effects.
If you hit Video Effects for example, you’ll see a bunch of different options. There’s things like Blur, Camera Shake, Color Glitch and Butterflies.
To apply an effect, tap it and hit the Tick icon. Then the effect will be added to your timeline.

Like all the other clips, you can pick it up, move it around and adjust the length of the effect on the timeline.
So go ahead and add any effects and transitions to your project.
Step 6: Add Music
The next step is to add music and sound effects to the video.
To do this, you can press the Add Audio button below the primary footage on the timeline or you can hit Audio in the bottom menu.

Then you have the option to add:
- Voiceover
- Effects
- Sounds
If you press Sounds you’ll find a bunch of free music and audio tracks that are included with CapCut.
But we strongly recommend only using this music if you’re creating TikTok videos!

CapCut is owned by the same company behind TikTok, which is why a lot of the music in CapCut is fine to use for TikTok. But you could end up with copyright strikes or copyright claims if you use this music in other places.
So we really suggest grabbing your own music if you’re not uploading to TikTok.
If the music you want to use is on your device, you go to the Folder icon and select From Device. You should see your audio tracks appear, you can select it and it will be added to your timeline.
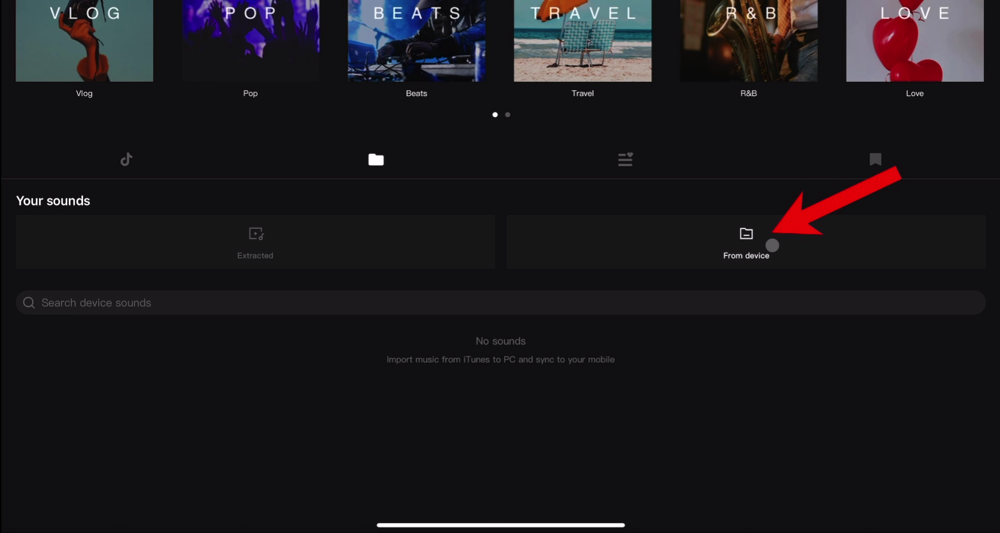
Just like regular clips, you can move the audio clip, adjust the length and insert Splits to completely customize it for your project.
Make sure you adjust the end of the audio so it finishes at the same time as your video.
Select the audio clip on the timeline and hit Fade. This allows you to fade in and fade out the audio.
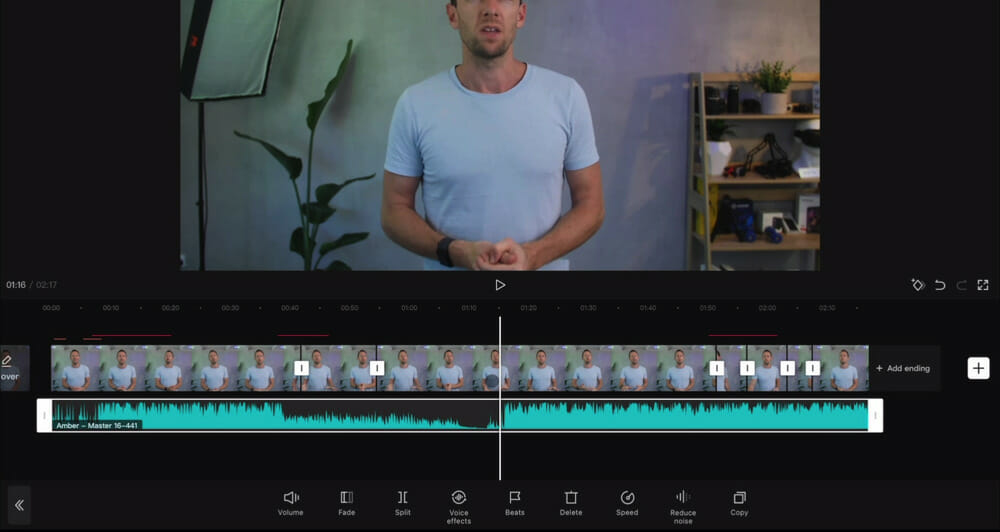
Now that you’ve got the audio added to your project, you might find that you’re tweaking and adjusting some of your cuts to match the beat.
So make sure you listen through and make any changes to make the video flow seamlessly.
Step 7: Adjust Volume
After the audio is added, you need to make sure the audio levels are set correctly.
We always recommend setting the primary audio, the spoken piece, first and then adjusting the music and sound effects afterwards.
So we’ll start by muting the music track so we can focus on the primary audio. Tap the audio clip, press the Volume button and drag the slider to zero.

Then select your first primary footage clip on the timeline and go to Volume.
PRO TIP: It’s a good idea to go through this process using headphones so you’re getting the actual volume levels.
Once the audio is set on that first clip, you can hit the Loudness Adjustment button and this will go through and process that volume level for the remaining clips.
Then you can adjust the background audio.

Select the music track clip again and hit Volume. The right volume level will come down to personal preference and that particular music track.
So listen through and find a level where the music isn’t too overpowering and the audience can still hear what’s being said without being distracting.
We usually find that between 30 and 40 is a good starting point.
When that’s set, hit the Tick icon and the changes will be applied.
PRO TIP: If you have b-roll or overlay clips on your timeline, don’t forget to adjust or mute the audio for those as well.
Step 8: Adjust Color Grade
Next up is color grading. Again, select the first primary footage clip on the timeline.
Then you have two options: Filters or Adjust.

If you go to Filters, you’ll find a lot of Instagram-style filters that you can apply to your videos.
These could provide a great starting point if you’re after a specific look and feel.
You can specify the intensity of the effect and you can make adjustments to the brightness, contrast, saturation, etc. before adding it to your project.

The other option (which we’re more likely to use) is to make your own adjustments to the color.
Go to Adjust in the bottom menu bar. We recommend adjusting the:
- Exposure
- Temperature
- Shadows
- Hue
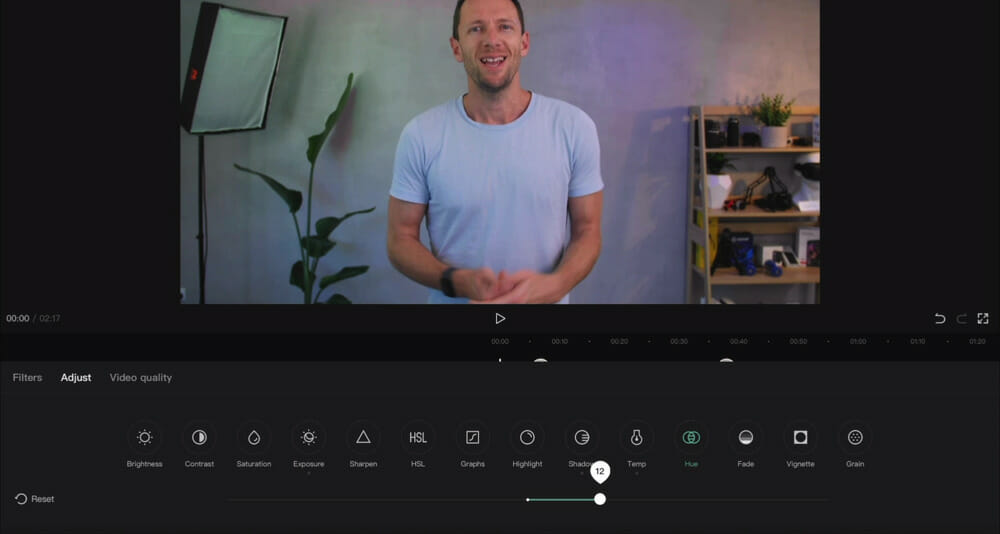
This is a creative thing – there’s no right or wrong here! You can experiment with different options and go with the overall look that suits your video.
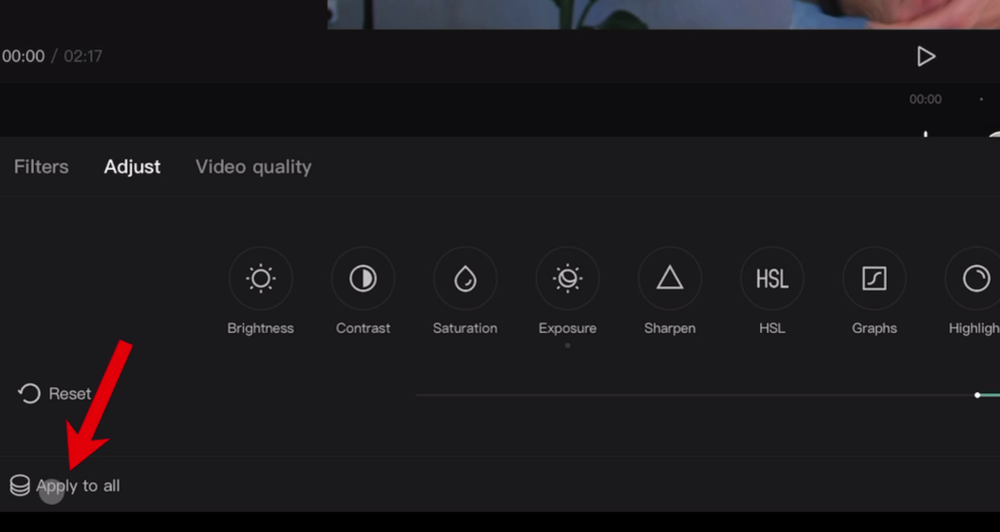
Once you’ve finished making color adjustments, hit the Apply To All button.
Then those color adjustments will be applied to all the primary footage clips.
You can use this same process to color grade your b-roll or overlay footage.
After you’ve finished color grading, it’s time to export your video project!
Step 9: Export Video
If you want to make any adjustments to the quality, frame rate or any other video settings make sure you do that before exporting.
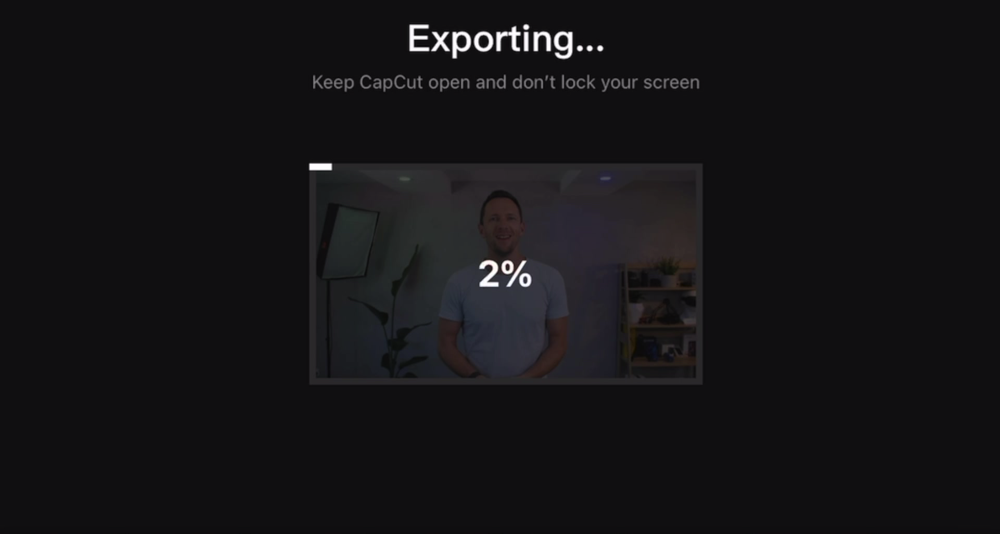
Then hit the Export button in the top right corner and the video will begin saving out.
Once it’s exported, it’s a great idea to play back your video and make sure everything is how you want it. Then it’s ready to be released to the world!
Now you know how to edit videos on iPhone! As you can see, CapCut is a really good video editing app but don’t forget you can follow along using any video editing app that suits you.
Don’t forget to download your free copy of the Primal Video Method.
It’s the ULTIMATE step-by-step video editing process that we use for every video project. You can use it to follow along while you’re editing videos to help you cut your video editing time in half.
FAQ
What is the best way to edit iPhone videos?
The best way to edit videos on iPhone is using a video editing app. Our top recommended app is CapCut but you can check out the other top options here. Then follow the step-by-step process covered in this guide.
Can a video be edited on iPhone?
Absolutely! You just need to download a video editing app, then you’ll be able to edit awesome videos on your iPhone. There are lots of great ones out there, with free and paid options available.
How do I cut and edit a video on my iPhone?
While you can do basic trims using the built-in iPhone tools, you’ll find a ton more tools in a video editing app. There are plenty of awesome free video editing apps out there and they can be easily downloaded to your iPhone. See our complete roundup of the top options here.
Recommended Gear & Resources
Check out an up-to-date list of all the gear, software & tools we use and recommend right now at Primal Video on our resources page here!
Related Content


