VN Video Editor recently ranked in our guide on Best FREE Video Editing App For Android & iPhone AND it got an honorable mention in our Best Free Editing Software For Mac & PC.
Given that it’s such a great video editing software, we thought it was time for an updated step-by-step tutorial to show you exactly how to edit videos using this awesome video editing app.
Important: When available, we use affiliate links and may earn a commission!
We’ll teach you everything you need to know – all the key features and a ton of video editing tips to get you cutting videos like a pro.
Also known as Vlog Now, this professional video editor app is available on iOS, Android and Mac. We’ll be running through this tutorial using the VN Video Editing app on iPad.
Because the app is cross-platform and cross-device compatible, the process will be exactly the same for iPhone, Android and even on desktop. So feel free to follow along on your device of choice.
Here’s exactly what we’ll cover in this VN Video Editor tutorial:
- How To Import Footage On VN Video Editor
- VN Video Editor App Interface
- How To Edit In VN Video Editor
- How To Add B-Roll In VN Video Editor
- How To Add Text In VN Video Editor
- How To Add Effects In VN Video Editor
- How To Add Music In VN Video Editor
- How To Adjust Audio Levels In VN Video Editor
- How To Color Grade In VN Video Editor
- How To Adjust Video Speed In VN Video Editor
- How To Export Videos In VN Video Editor
Let’s get started.
How To Import Footage On VN Video Editor
Open the VN Video Editor app and press the + button at the bottom of the page. Then select New Project.
The next step is to import footage. You can import all of the clips you want in your edit at this point. But we recommend just selecting your primary footage now and adding in the B-roll clips later.
VN Video Editor will default to the Recents folder for importing files. You can find files in a different location by tapping Recents and selecting another folder.
If the files are saved onto your device, you can tap the More icon in the top right corner and select Import from File App.
Tap your primary footage file and then press the Next arrow. Your footage will now be imported to your project.
VN Video Editor App Interface
Now let’s run through the VN Video Editor app interface so you can get familiar with the tools and where they’re located.
The preview window is where you can playback your video project.
On the bottom right corner of the preview, you can see an icon to preview on fullscreen.
The editing timeline is where the editing happens. There are different tracks for music, titles, graphics, footage, primary audio – all of the elements of your video.
You can scroll through the timeline by swiping on your device. If you’re using a computer, you can click and drag or use the keyboard.
The bottom menu bar is where you can access all of the tools, filters and effects.
The media controls allow you to Play your video (you can also use Spacebar on keyboard to Play and Pause), Skip to the end of your project or Skip to the beginning of your project.
The Original button in the top menu bar is where you can change the format of your video. If you leave it on Original, the frame ratio will default to the format of your footage.
You can change the frame ratio to suit YouTube videos, Instagram Reels, TikTok videos, or other custom sizes.
Now that your primary footage is uploaded and you’re familiar with the interface, it’s time to trim down your footage.
How To Edit In VN Video Editor
Just like in all video editing apps, there are a few different ways you can trim or edit video clips.
Sometimes it might make more sense to use one over the other, or you might just find that one tool suits your editing style better. So we’ll run you through all of the options.
If you go to the start of your video, you’ll see a white line going from top to bottom. This is the playback indicator.
Align the playback indicator where you want the video to start – after any preparations or mistakes you made before the good footage begins.
Let’s try using the Drag method to remove the initial part of our clip that we don’t want included in our final project. Tap on the clip and yellow handles will appear on either side of the clip.
Click and drag the handle to where you want the video to start.
Press the Skip button to jump to the end of your footage.

We’ll use the Split tool to remove any unnecessary footage at the end of your video project. Drag the playback indicator to where you want your clip to end. Then press the Split button in the bottom menu bar.
You’ll now have two clips, one on the left with the footage you want to use and one on the right with the bad cut.
Select the last clip and press the Delete button to remove it. Now the video will end at the point you made that split.
You can use these tools to remove unnecessary footage throughout the entire project. Simply make a Split where the bad footage begins. Then either make a second Split where the bad footage ends and delete the middle clip. Or you can drag the handles to remove the footage you don’t want.
PRO TIP: Check the audio bar to see where there are any long pauses in your footage. This usually indicates footage you’ll want to remove – where you had a break or made a mistake and started again. This is a quick way to find footage that needs to be removed.
To change the placement of any clips, you can just drag and drop it anywhere you want on the timeline.
Now go through your project and remove all of the bad takes, mistakes and any footage you don’t want in your finished video project.
Make sure you’re hitting Play and watching the footage as you go through this process. This will allow you to really tighten up the clips and leave you with a high quality edit.
PRO TIP: Don’t forget to delete the VN Video Editor clip at the end of your video. Simply select the clip and press Delete.
How To Add B-Roll In VN Video Editor
Next up, we’re going to bring in the B-roll footage. To do this, press the Overlay icon above the primary footage track. Then select Stocks.
The clips that have already been added to the project are marked as Imported. So tap the B-roll clips that you want to add in.
When you import B-roll footage this way rather than with the primary footage, it will be on a different layer. This makes it super easy to edit. The B-roll clip will appear on top of the primary footage in the preview window. You can move this clip around, make it smaller or larger, and even rotate it.
Now go to the editing timeline and trim the B-roll clip to just the footage you want to use.
You can Split this clip or drag the handles to edit it down. To change the placement of the clip, simply click and drag it across the timeline.
A really cool feature inside VN Video Editor is the magnetic timeline. This means once you’ve placed a B-roll clip on the timeline, it will be linked to the primary footage clip beneath it. Then if you click and move the primary footage clip, that B-roll clip will come with it.
This is useful if you decide to change the order of your clips later but the B-roll footage is relevant to that clip.
So, add in all of your B-roll footage at this point.
Then it’s time to add titles and text to your video.
How To Add Text In VN Video Editor
Go to the start of the editing timeline and tap the Text icon above the B-roll footage track.
You can choose from Title, Title Template or SRT Files. Title is regular text or you can access presets by going to Title Templates (there are some great options in here such as Name & Description, Frame and Video Title).
Tap Title or Title Template depending on the type of title you want to use.
An editable text box will also appear in the preview window. To insert your text, simply tap the text box and type. You can also change the text box position and size by dragging it or tapping the Resize icon in the bottom right corner.
You can make further text customizations in the menu:
- The T icon: Change the preset/templates of your text
- The Ff icon: Change font and adjust font size
- Color Wheel: Choose text color, background color, letter spacing and insert things like drop shadow
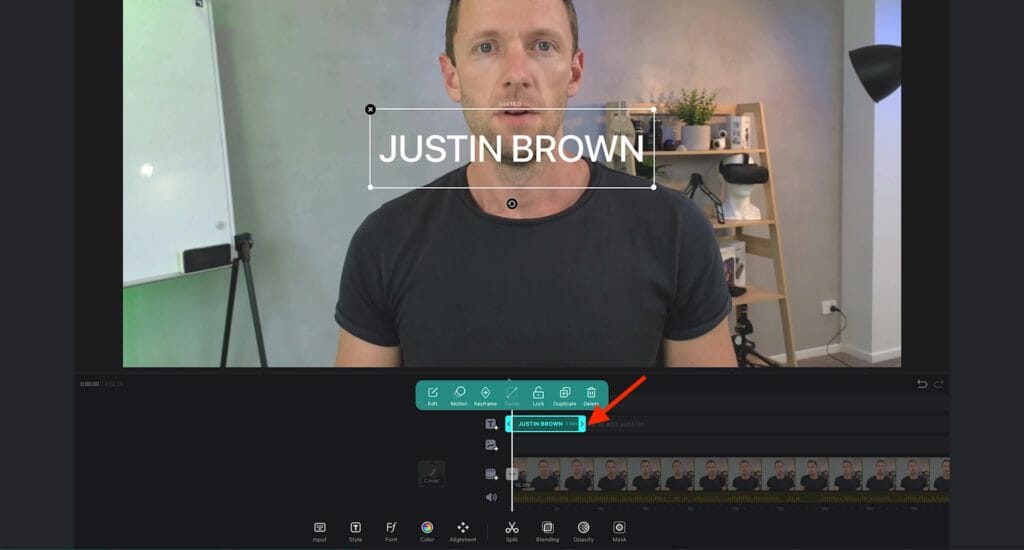
Hit the Tick icon and the text will appear on your video editing timeline.
Just like with every clip on the timeline, you can drag the handles to adjust the length. To move the text clip, tap and drag it to where you’d like it to play.
If at any time you want to go back and make changes to the text, select the text clip and press Edit.
Adding Text Animations
You can also add animations to the title. Tap the text clip and select Motion.
Here you can add effects for:
- In Animation: How the text will appear on screen
- Out Animation: How the text will appear off screen
- Loop Animation: Repeating animation
You can choose from effects like fade, scale, slide, gradient, etc.

The slider bar at the bottom will allow you to determine the duration of the effect.
When you’re done, tap the Tick icon to apply those changes.
Now let’s add in transitions between clips.
How To Add Effects and Transitions In VN Video Editor
On the editing timeline, select one clip and you’ll notice a + button between the selected clip and the one next to it.

This will bring up the transitions panel. Under Base transitions, there are general transitions like Fade to Black or White, Dissolve and Zoom. Under Matte transitions, there are some more obscure options like Zebra, Swirl and Memory.
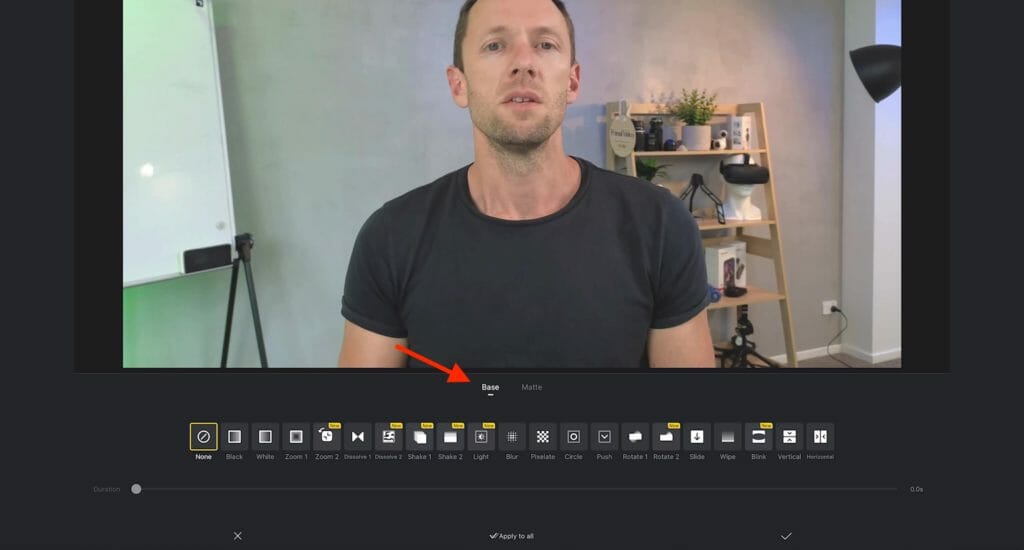
However, we normally don’t add transitions like this between clips that look the same.
Instead, we recommend zooming in slightly on either the first or second clip. This will almost make it look like you’ve used a second camera angle. It’s a great way to break up your content rather than having a hard cut.

To do this, select the second clip by double tapping then either pinch and zoom and tap and hold to move the footage around if you want to change the placement on screen.. You don’t need to zoom in too much – this is a subtle effect.
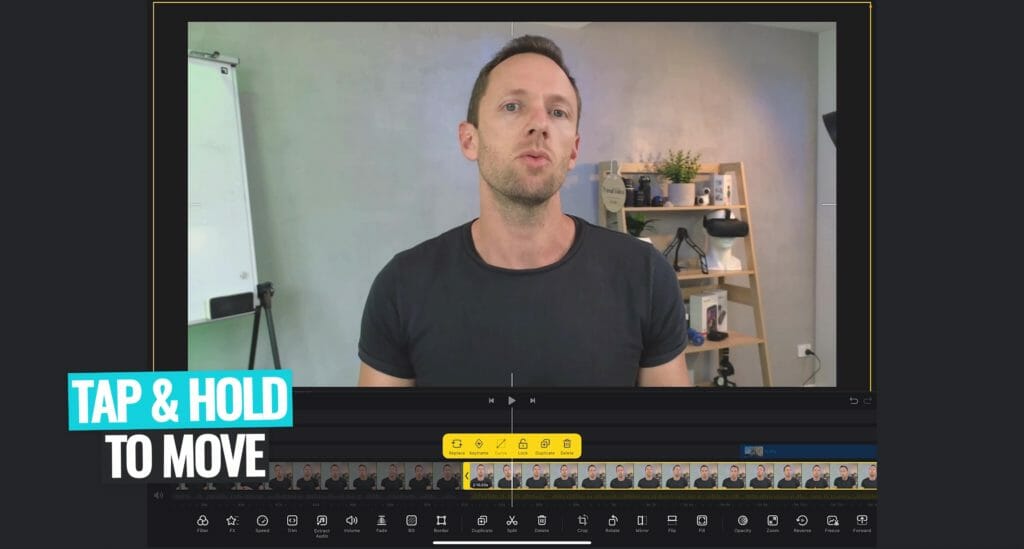
Make sure you align the person’s eyes in both clips so that the transition isn’t jarring or confusing for the viewer.
If you want to add transitions to your B-roll footage, select the clip and press Motion. These are the same as the text animations we used before. Simply choose an effect and tap the Tick icon.
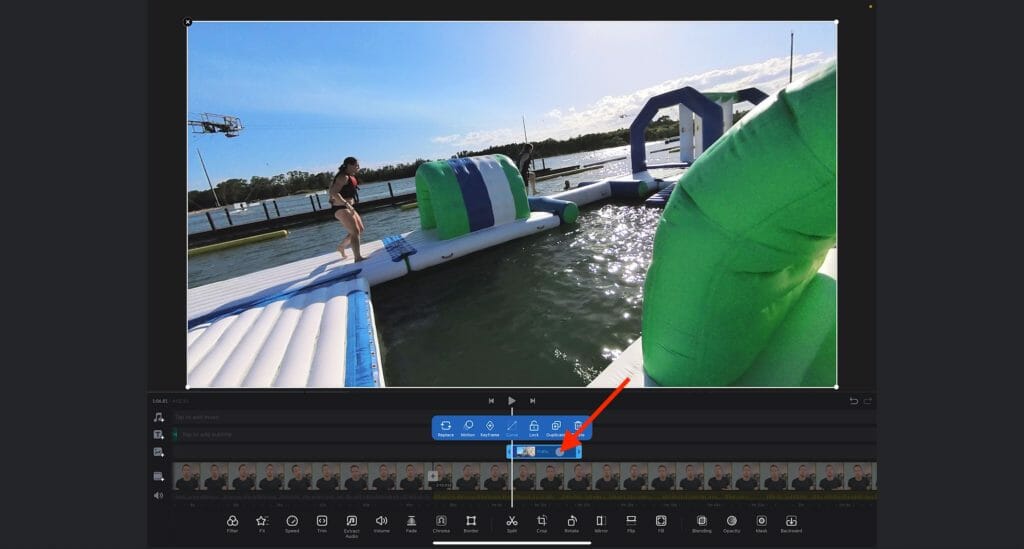
To view the other effects that are available, just click the Star icon (FX) in the bottom menu bar. You’ll see a ton of different effects that you can use as transitions as well.
Now go through and add in any transitions or zoom effects to your entire project.
Then let’s add music.
How To Add Music In VN Video Editor
Tap the Music icon above the Text track. Here you can select Music, Sound FX or a Recorded audio file.
While a lot of apps have music and sound effects included, we strongly recommend using a platform with royalty free music that you know covers all of your licensing.
That’s why all of the music we use in our videos comes from Artlist or Epidemic Sound.
To upload your own music that’s been downloaded from a trusted site, select Music then go to My Music. Press More and select File App. Find and select the track you want to import and then hit Open. It should then upload/import the track in the app.
Before the music clip is added to your timeline, an Options panel will appear. Here you can adjust the length of your music clip.
Using ‘Beats’ In VN Video Editor
Another one of the really cool video editing features in this video editing app is Beats. This is awesome if you’re creating videos where you want to cut your clips to the beat. The Beats feature allows you to mark the beat throughout the track.
To do this, press Beats and then press Play. As the music plays, tap the Flag icon to add a marker on the beat of the music.
Hit the Tick icon and your music track will be imported as a clip on the timeline. Then these markers will appear on your clip on the timeline and you can use them while editing to make sure you’re cutting on the beat.
Once the clip is on the timeline, once again you can adjust the length of the audio/music clip by dragging the handles. To make any changes simply tap the clip.
Now that your music track has been added, it’s time to adjust all the audio levels in your project.
How To Adjust Audio Levels In VN Video Editor
We always recommend setting the primary audio levels first and then adjusting your background music levels afterwards.
So the first thing we need to do is mute the background music. To do this, select the music clip then click Volume in the bottom menu bar and drag it to zero.
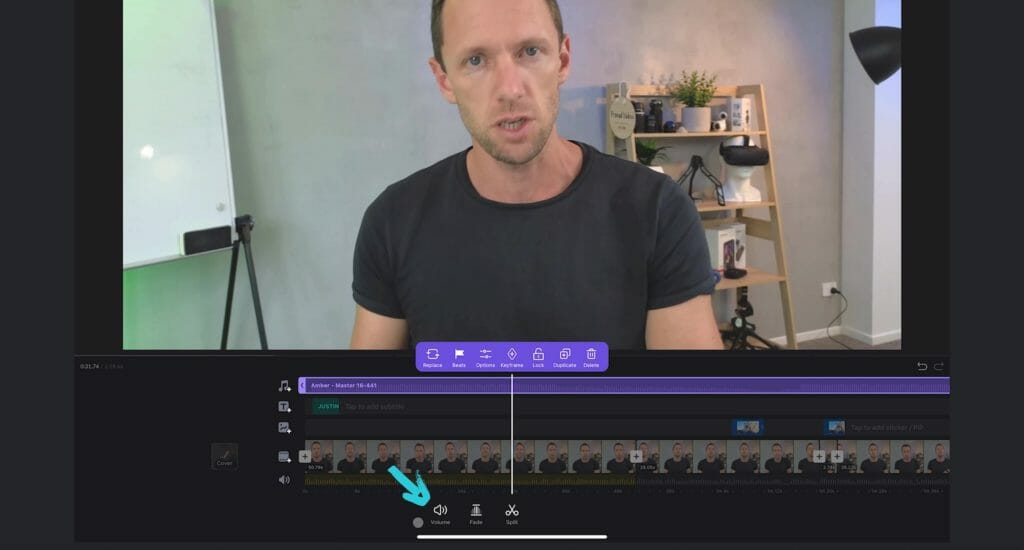
Next, select your primary clip and click Volume. We’ve found that 100% is usually perfect but you might need to make it louder or quieter depending on how your audio was recorded. Then hit Apply to all so this setting is set across all the primary video clips on your timeline.
If your B-roll or overlay footage has audio, you’ll most likely want to mute this. To do this, tap the clip and press Volume. Drag the slider bar to zero and then press the Tick icon.

From there, we can now adjust the volume of our background music track. Select the music and click Volume. We recommend setting your background music between 27% – 33% but this will be different for different tracks.
Now let’s take a look at the color effects and fix any colors in your video.
How To Color Grade In VN Video Editor
To color grade your project, select the clip on your timeline and press Filter in the bottom menu. There’s a ton of filters and presets in here that you can apply to your video. Think of these like Instagram filters.
If you find one you like – feel free to run with that one. But you can also select a filter and customize it or you can start from scratch.
To start from scratch, make sure Original is selected under Filter. Then go to Adjust. There are heaps of options in here that you can play with to dial in the perfect look for your video.
The main ones we adjust (in this order) are:
- Exposure
- Color Temperature
- Vibrance
- Sharpness
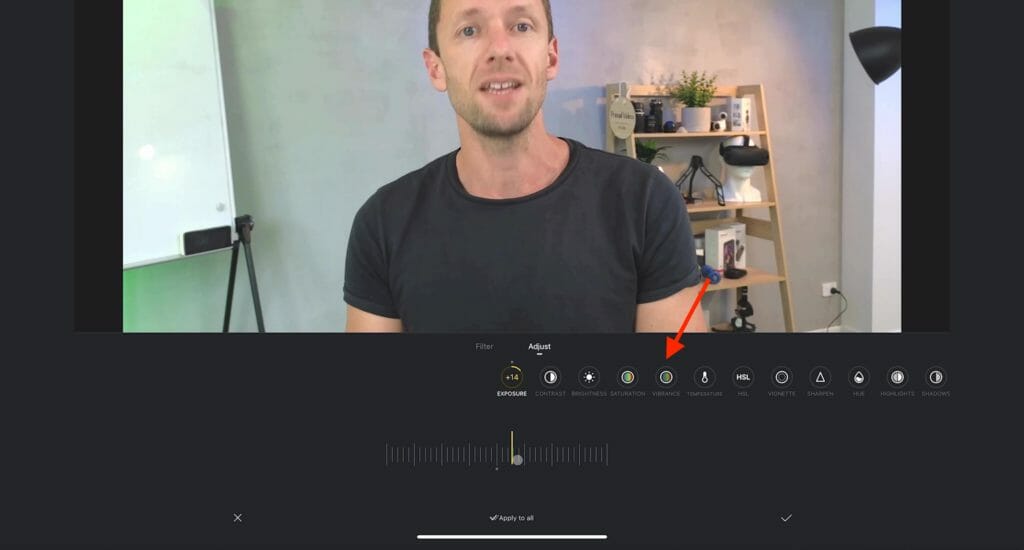
Once you’re finished customizing, tap Apply to all. This color effect will now be applied to all of your primary footage clips.
You can follow the same process to adjust the colors of your B-roll clips. Simply select the clip, go to Filters in the bottom menu bar and make any changes there.
That’s the editing process done! But before we run through the exporting process, there are some other really cool features we want to share with you.
How To Adjust Video Speed In VN Video Editor
If you want to make any changes to speed, select a clip and then go to Speed in the bottom menu.

Under Regular you have a slider bar that you can adjust to make the clip faster or slower. This is just your standard speed control setting.
But there’s a whole additional element of speed control in here!
If you go to Curve, you can really dial in your speed control. You’ve got the ability to change between ⅛ x speed and 8x speed.
By adjusting the curve, you could have the beginning of the clip playing at 8x speed, the middle playing at 36% speed and the end playing at 450% speed.
So this gives you a massive amount of control and you can really customize the speed pattern.
There are even presets in here. Tap the Preset button and you can choose between options like Jump Cut, Montage and Hero Time.
So you can use these adjustment abilities to really match your edit.
Now let’s export your video.
How To Export Videos In VN Video Editor
Tap the Share button on the top right corner of the Preview area. The default setting here is Auto. VN Video Editor has based those Auto settings to match the primary footage that you uploaded.
So the Auto setting is probably going to be perfect for most people.
If you want some specific settings, you can adjust these in Manual. You can adjust Resolution, FPS and Average Bitrate.
When you’re ready to save out your video, press Export. Make sure you don’t lock the screen or leave the app while the project is exporting.
Once your video has been saved, make sure you playback the entire video so that you can see how everything looks and sounds together.

PRO TIP: It’s a great idea to go through this playback process using headphones for a more accurate idea of how the volume sounds.
Now You Know How To Use VN Video Editor
That’s our complete walk-through VlogNow tutorial. We covered everything you need to know to create professional videos and speed up your video editing process using VN Video Editor.
VN Video Editor is one of the best video editing apps right now.
It’s an amazing free video editor with some awesome video editing features for Android, Mac, iPhone and iPad users. It has an incredible amount of features and allows you to easily edit using pretty much any device!
If this isn’t the best free video editor for you, check out our complete guides on the Best Video Editing App For iPhone or Android. We review all the features you need to know so you can pick the right option for you.
FAQ
Is VN Video Editor free?
Yes, VN Video Editor is a completely free (& awesome!) video editing app.
Is VN Video Editor available on PC?
VN Video Editor is available on iPhone, Android, Mac and Windows PC.
Is VN Video Editor good?
VN Video Editor is a great video editing app for beginners or anyone wanting to do a quick & basic edit. It’s easy to use with an intuitive interface while still having some great intermediate editing tools.
Recommended Gear & Resources
Check out an up-to-date list of all the gear, software & tools we use and recommend right now at Primal Video on our resources page here!


