If you want to learn how to live stream with Ecamm Live, this is the guide for you!
In this complete Ecamm Live tutorial, we’ll take you step-by-step through how to use Ecamm Live & share why we think it’s the best live streaming software for Mac right now.
Important: When available, we use affiliate links and may earn a commission!
Ecamm Live is an incredibly powerful and easy to use live streaming platform that keeps getting better with its ever-expanding list of features. Made just for Mac users (sorry to any Windows users!), Ecamm Live is one of our top recommended options for Mac live streaming.
It has some amazing and advanced features such as multistreaming (the ability to stream to multiple platforms at once), hosting multiple guests and ISO recording which makes it a great option for video creation as well.
So if you’re wondering how to go live on Facebook, YouTube, LinkedIn, Twitch or any other major streaming platforms professionally AND easily – this Ecamm tutorial is for you!
Here’s exactly what we’ll cover:
- Overview
- Ecamm Live Settings
- Ecamm Live Interface
- How To Add Text & Graphics
- How To Adjust Audio In Ecamm Live
- How To Use Scenes In Ecamm Live
- How To Add Guests In Ecamm Live
- How To Record In Ecamm Live
- How To Go Live In Ecamm Live
Let’s get started.
Ecamm Live Tutorial Overview
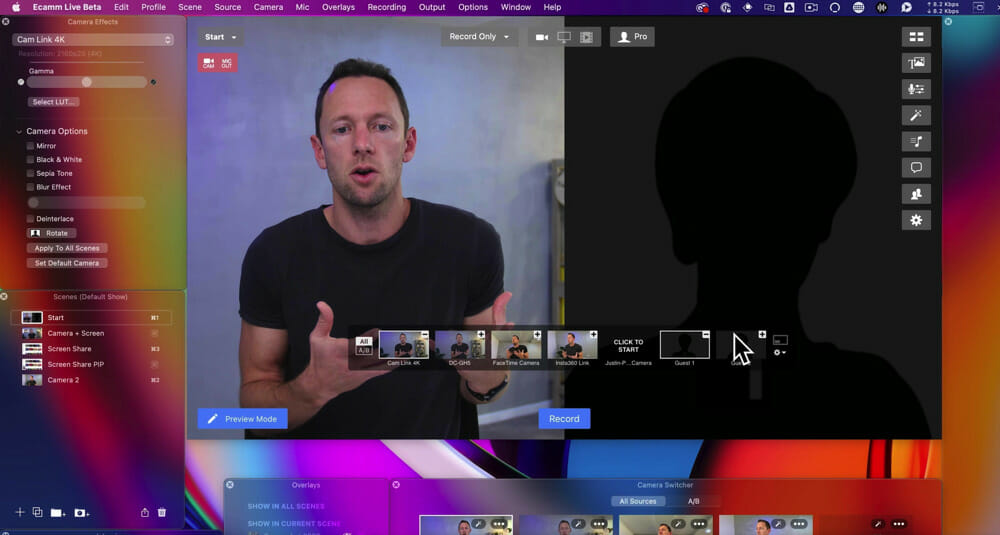
This is what Ecamm Live looks like. The way we’ve got it set up does look a little crazy but know that everything is fully customizable.

A lot of the menus and utility windows can be hidden. Just go to Window and select Hide All Utility Windows. Then you’ll be left with only the tools and settings that you usually need access to.
But since we’re doing a full run through of the interface, make sure you turn the utility windows back on so you can see and access everything.
Ecamm Live Beta
We also wanted to mention that we’re currently using the beta version of Ecamm Live right now.

Personally we think it’s amazing. It’s been rock solid in all of our testing and we’ve been using it for years like this.
If you’re someone who geeks out on this stuff and wants access to the latest & greatest features, we definitely recommend grabbing the Ecamm Live Beta Version.
This means there might be some things that look a little bit different on the full release version of Ecamm Live.
So if you’re seeing things that are different to mind, it’s just because there might have been an update but these will be pushed out to your version very soon.
Ecamm Live Settings
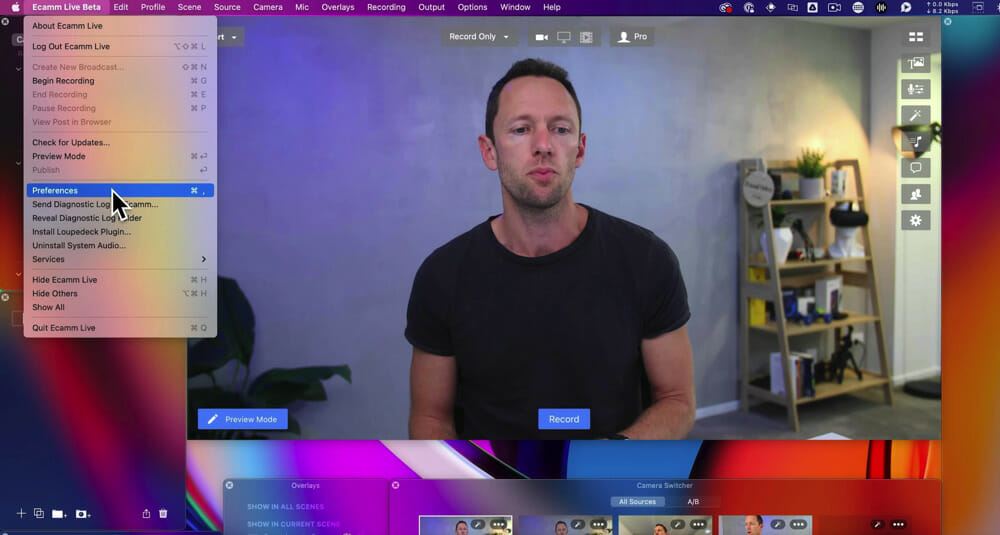
Now the first thing you want to do when jumping into Ecamm Live is go through your settings to get everything set up correctly.
There are two ways you can access the Settings menu:
- The Settings icon in the right menu bar
- Go to Ecamm Live in the top menu bar and select Preferences
As with a lot of live streaming software, there’s tons of settings and functionality and live streaming features you can play around with. We’re not going to run through every single setting – just the key things.
So we recommend jumping into the Preferences section and reading through to see if any of the other features could be really useful for you and helping streamline your workflow.
We’ll walk through each of the settings we suggest checking out.
General Settings
All of the settings inside this section are pretty self explanatory.
We leave all of these on the default settings.

Account Settings
The account settings is where you can log into your Ecamm Live account to unlock any features.
Stream Settings
This is really the first place you want to come to start adjusting the live streaming settings.
Here you can adjust:
- Stream size and recording size: There are options from as low as 540P right up to 4K 2160P (for any video recording we normally put this on 4K and for general live streaming we just leave it on 1080P)
- The shape of your live stream: There’s options like standard wide screen, extra wide screen, square and you can even do portrait live streams which is great if you’ve got access to that feature for Instagram live streaming
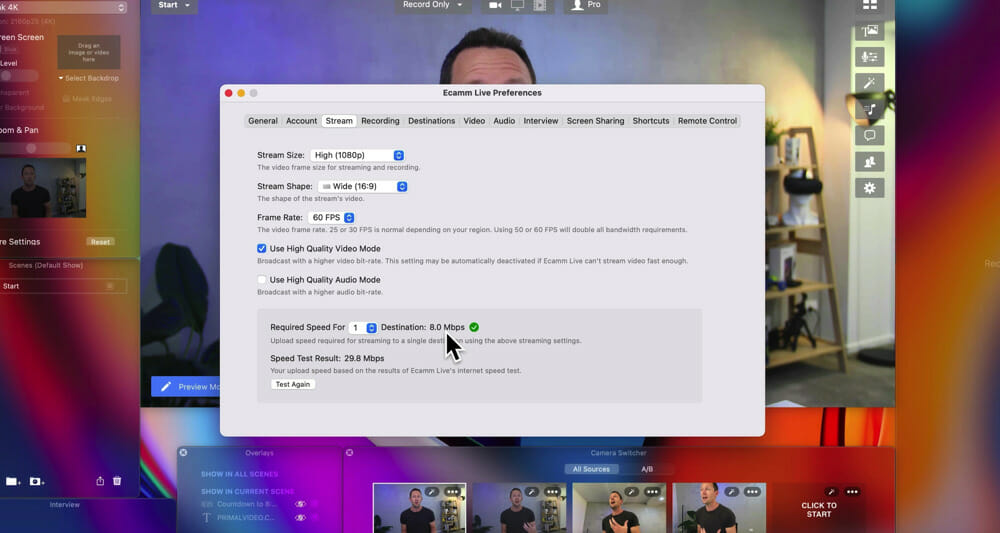
- Frame rate: You can choose from 24 frames per second right up to 60 frames per second but it will depend on the video quality you require
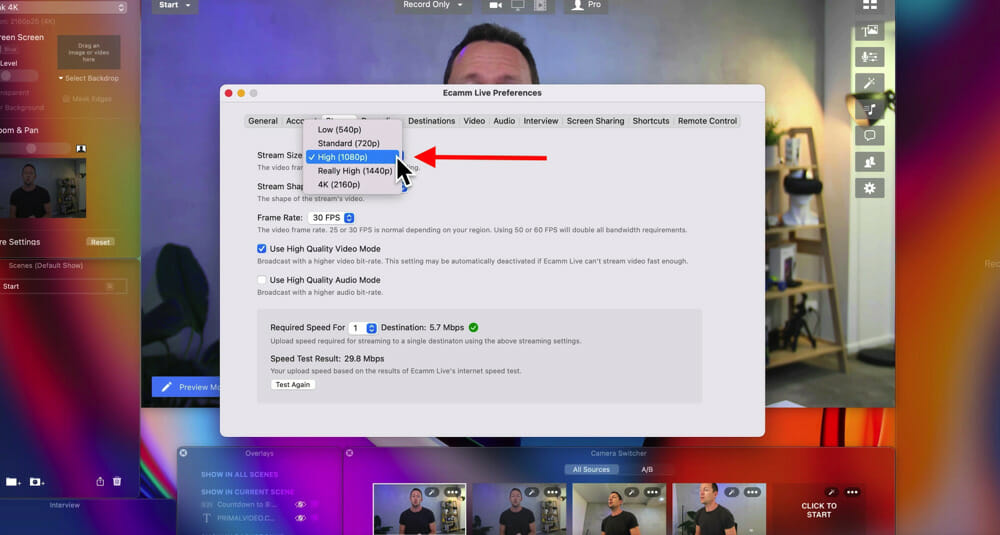
One feature we LOVE here is that once you specify your frame rate and your quality, it will automatically analyze your internet bandwidth speed to do a speed test.
So for example, for this connection here we have around 30 megabits per second upload. Based on the settings we adjusted, the required speed is going to be around 8 megabits per second upload.
If you drop this to a lower quality stream or lower frame rate, the required speed will drop as well.
Below that you’ll see a box: Use High Quality Video Mode. We generally tick this box but obviously that does use more bandwidth.
So if you are on a lower speed connection, you can deselect it and you’ll still have a decent quality stream. But for a really clear stream, we’d recommend leaving it ticked.
Likewise for audio, you can tick the box: Use High Quality Audio Mode. However, we usually leave this one unticked. But if you’re doing any audio production or live streaming where audio quality is really critical and you want the best quality, you can select that box.
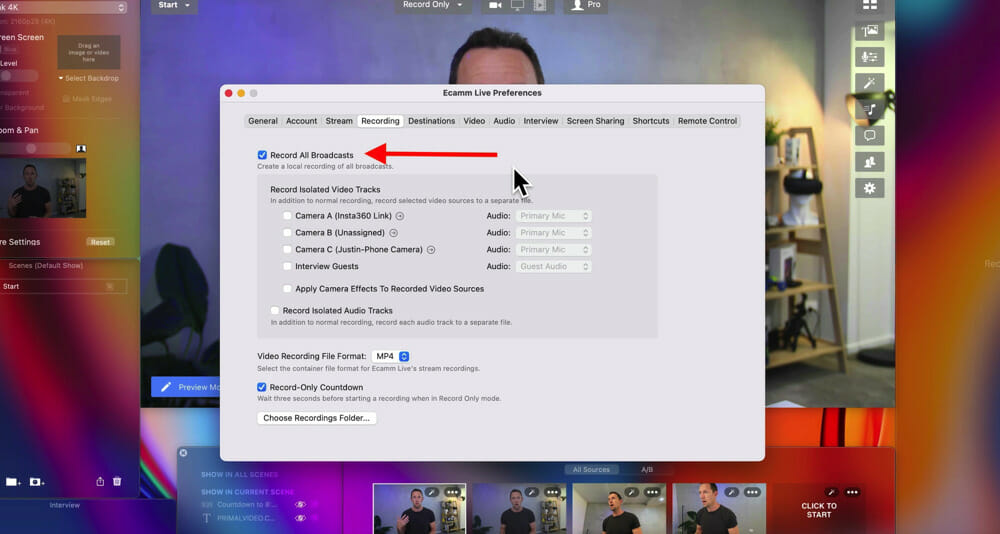
Recording Settings
The default setting here is to record all broadcasts. As you’re live streaming, it will do a backup recording to your computer as well which we think is awesome!
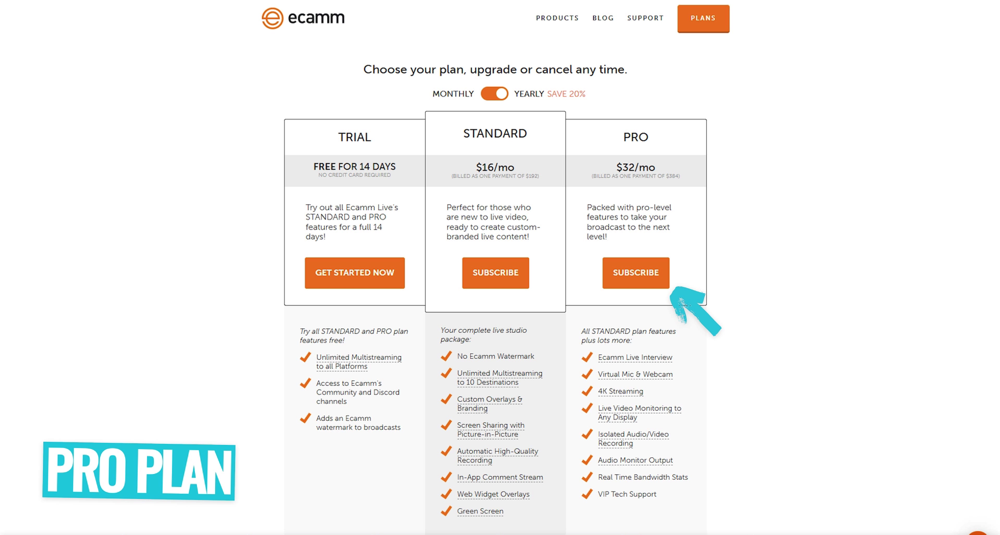
If you’re on the Pro version of Ecamm Live, you can unlock isolated video recording. This is one of our all time favorite features in Ecamm.
This allows you to record your different video sources and audio sources all as separate files. When it comes to video production and video editing your live events after they’ve ended, this is an insanely powerful tool.
We also use this to record content for our Accelerator program because it allows us to record the computer screen and the webcam separately so we can edit everything together afterwards.
But this is also really useful for using with your interview guests as well. It allows you to capture a separate video and audio recording for each of the different guests or inputs.
Destinations Settings
This is where you can add all the different destinations you want to live stream to.
Just go to Add New Destination… and you can choose which platforms you want to go live on.

This includes pretty much all the major streaming platforms, such as:
- A Facebook profile, group or page
- YouTube
- Twitch
- Amazon
- Anywhere else using an RTMP stream key
If you click on Additional Destinations as well, you can see there’s multi-streaming support using Restream, Switchboard and Onestream.

But keep in mind that Ecamm Live has built-in multistreaming as well. So you can add all of your different destinations and then tick the boxes of each destination you want to stream to for each live stream.
PRO TIP: If you’re streaming to multiple locations, you can go to Preferences, then Stream and down the bottom you can check the required speed for the number of destinations you want to live stream to.
Video Settings
We leave all of these settings on the default option. This is another area we’d recommend having a read through as there might be some specific settings that suit your workflow.

Audio Settings
The main setting here that you might want to adjust is the Broadcast System Audio option.
If you’re recording or sharing your computer screen on a live stream and you want to broadcast the system sound, that’s where this setting comes in handy. For example, maybe you want to be able to play a YouTube video with sound during your recording or live stream.
You can select:
- Never
- When sharing the screen
- All the time
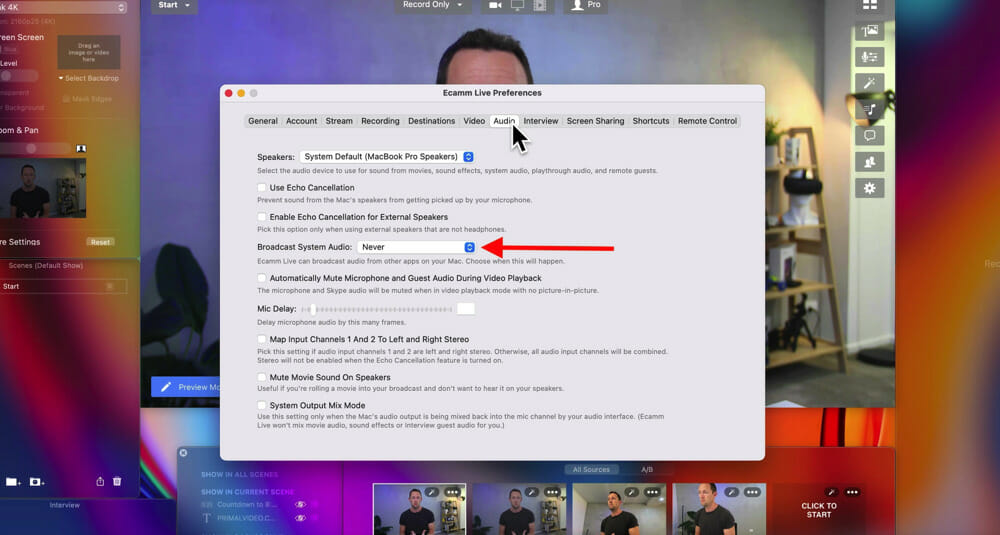
We have this set to Never because that’s what suits the types of content we’ve been creating, but it will come down to your specific needs.
Another cool setting in here is Mic Delay.
If you’re using a more professional camera that’s hooked up via HDMI and you’re using a USB microphone for example, it’s pretty common to have an audio delay.
So go down to Mic Delay and adjust this manually to make sure everything is perfectly in sync for your viewers.
Screen Sharing Settings
Another really cool feature is the ability to turn on or off your desktop icons while you’re sharing your computer screen. You won’t find this feature in most live streaming software but it’s such a great tool!
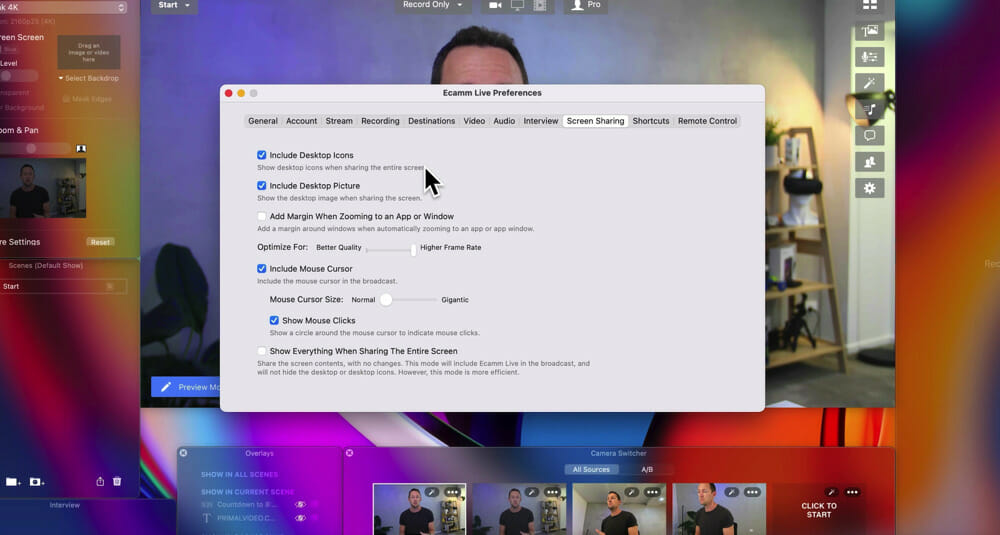
You can also turn on or off your desktop wallpaper. So if your background is a bit too bright or distracting or something like that, you can just toggle this setting to turn it off while you’re screen sharing.
The size of the mouse cursor is also customizable, so you can make this really big if you want people to be able to easily follow along with where you’re clicking.
Shortcuts
If you’re interested in getting a bit more advanced, you can automatically trigger events using the Shortcuts feature.
These events can be triggered when you open Ecamm Live, a broadcast starts, a broadcast ends or when you quit Ecamm Live.

We’ve seen people who’ve set this up so that all the lights go off once Ecamm Live closes. So you can really customize this stuff up and get pretty advanced with it.
Remote Control
If you’re using something like the Elgato Stream Deck, there’s full integration and support. You can access that in this Remote Control tab.
Now that you’ve got your settings sorted, let’s take a look at the overall interface.

Ecamm Live Interface
The window where you can preview your video is the main area. All the extra windows and boxes around the sides are ways for you to access the key settings quicker and easier.

Video Mode
To adjust the video modes you just need to click on the top menu bar in the main window.
This is where you can choose the following options:
- Stream: If you select this option, it will check if you have any scheduled or upcoming streams based on the destinations you selected in the Settings
- Record: Having this on ensures your live stream will be recorded, but if you have this enabled and ‘stream’ disabled it will just record without needing to go live
- Virtual Cam: This is a really powerful tool that takes your Ecamm Live feed and uses it as your webcam footage when opening apps like Zoom or Google Meet (so you can use titles, graphics and all sorts of cool stuff when using other apps)

Camera Modes
Next to the video mode options is where you can switch from your camera/webcam to a screen share or to play a video file.
You can have multiple of these enabled at once. So you can have your camera appear on screen at the same time as your screen share. Or you can just click the little Camera icon to just screen share.
PRO TIP: When screen sharing, you might notice that your screen doesn’t fit the full broadcast window. You can pinch to zoom in on the window to rescale it or move the image around. This is an awesome feature for if you’re running a tutorial live and you want to zoom in on something in particular.
The next icon across from the Camera icon is the Video File icon. This is for sharing pre recorded videos You can just select the file and it will start playing automatically. Then you can switch back to your camera just with the click of a button.
So you can just use these features in Ecamm Live, there’s no need to get carried away. But there are a lot more awesome features you can take advantage of!
Video Sources
If you hover your mouse over the main window, you will see the different options you have for video sources.
So you can see here that Justin has the built-in Mac camera and the Insta360 Link.
This is awesome if you want to run a multi-camera stream. You can literally just click between the different angles while you’re live.
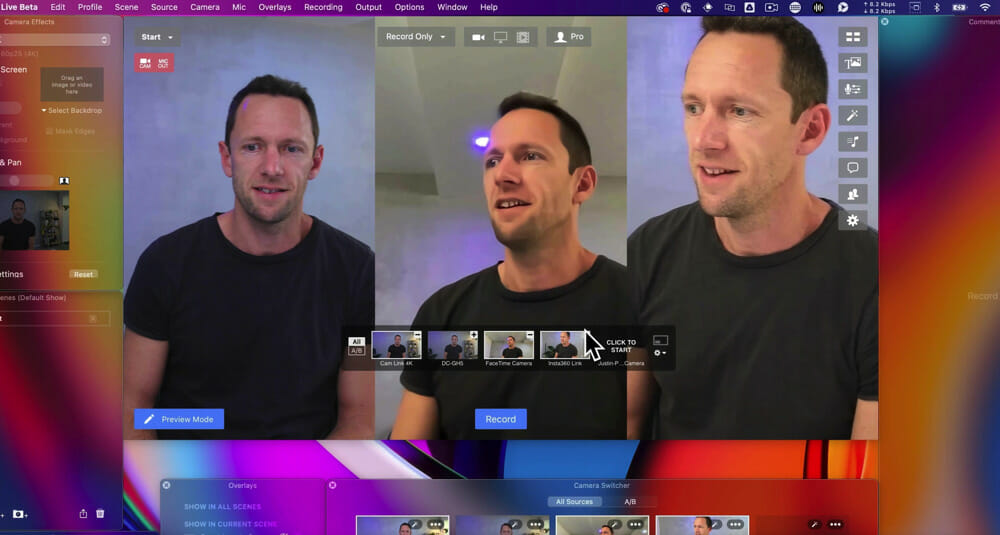
You could even bring multiple angles on screen at once just by clicking the little + icon in the top right corner of the video.
Camera Effects
For each of the cameras or inputs you can adjust the camera effects.
If you’re not seeing the Camera Effects window, you can go to Windows and select Camera Effects.

At the top you can select which camera you want to adjust, then you’ll see some awesome options such as:
- Green screen
- Pan and zoom
- Color adjustments
- Mirror the video image
All of these settings are saved for each of the different cameras or inputs that you have. So if you adjust the settings for one camera and then have different settings applied for another camera.
How To Add Text & Graphics
You can really easily add in a range of text and graphics to your live streams in Ecamm Live.
Adding Text In Ecamm Live
Go to the Overlays window and you’ll see a number of icons along the bottom. These indicate what types of things you can add into your live stream.
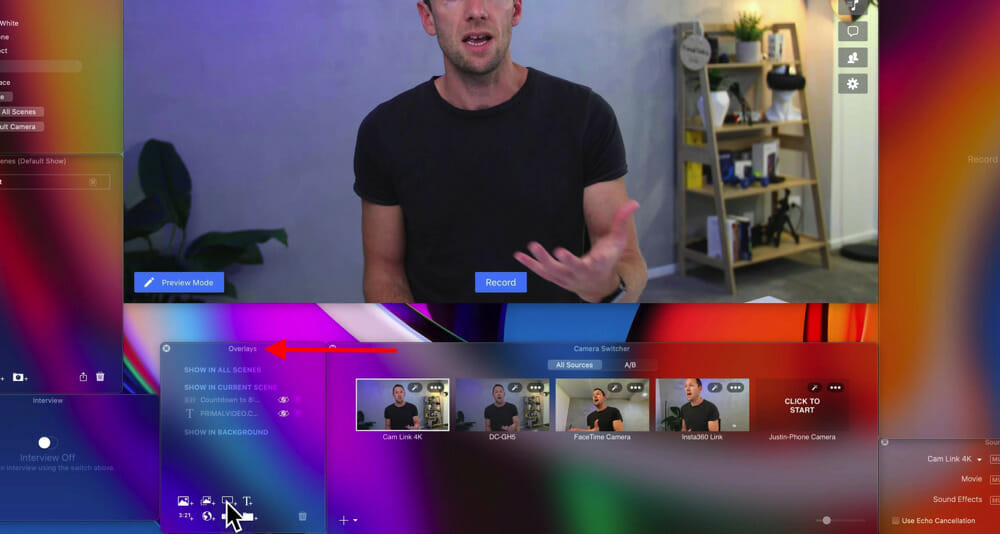
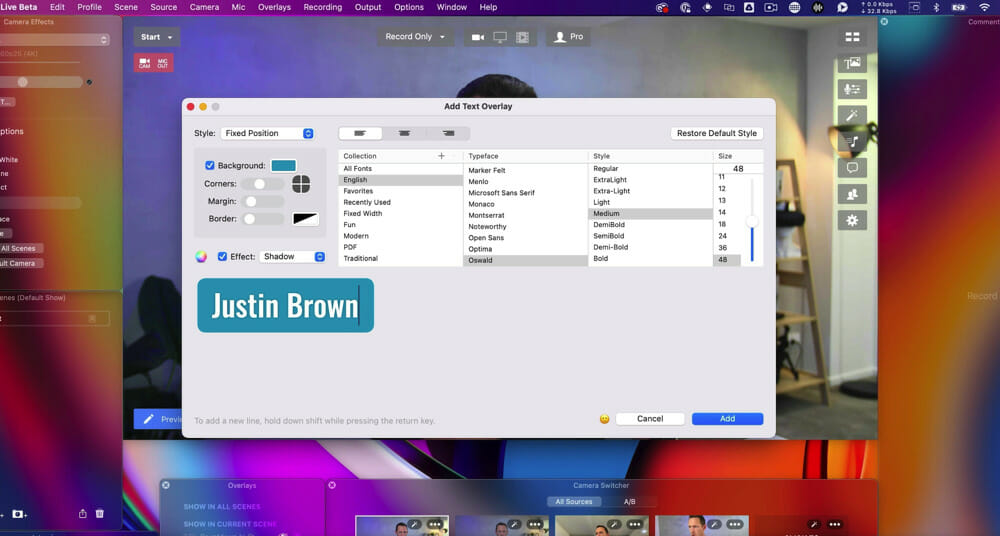
If you select the Text option, a new window will appear where you can adjust:
- Font
- Size
- Background color
- Margin
- Border
Once you’ve made your adjustments hit Add. Then you can move the box around, pinch to scale it up or down and you can do all of this while you’re live.
You can also prepare the text before you go live and then when you’re ready for it to be displayed while you’re live, simply click the Eye icon in the Overlays window to turn it on or off.
Adding A Countdown Timer In Ecamm Live
It’s also really easy to add countdown timers to your live streams.
Go to the Overlays window and click the Countdown icon.

A new window will appear. Here you can either specify the time or a particular date and time. This means you can set it up in advance.
You can also switch this around so it counts upwards instead of down, making it like a stopwatch.
Once you’ve selected all the relevant settings, hit Add and it will appear on your live stream.
Adding Images In Ecamm Live
To add images into your live, you can either hit the Image button in the Overlay window or you can drag and drop an image from your computer into your Ecamm Live stream.
You can resize it and move it around. Just hit the X icon if you want to remove it.
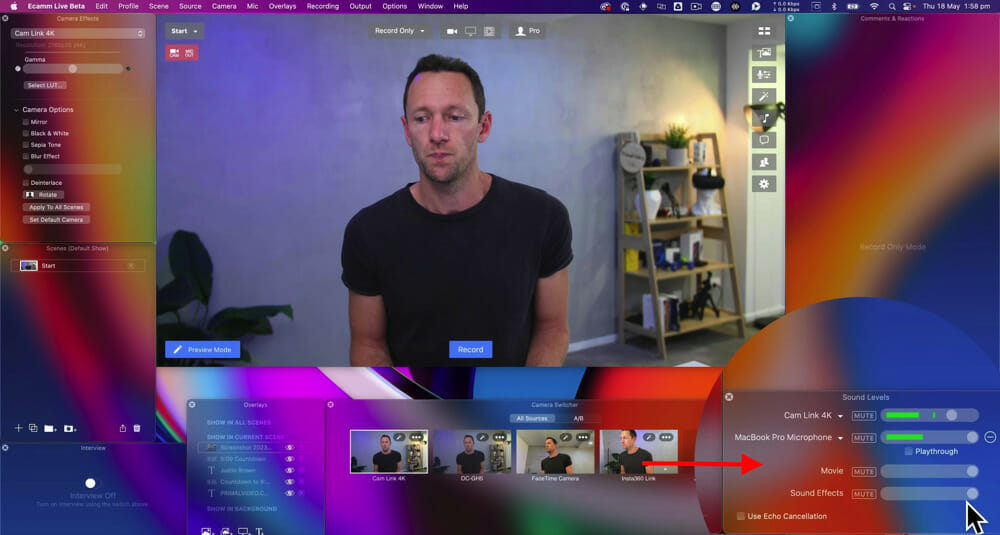
How To Adjust Audio In Ecamm Live
In the bottom right corner you’ll see the audio bars.
Here you can:
- View the audio levels of your selected microphone
- Select different microphones or audio sources
- Adjust the volume levels
- Add multiple audio sources (by clicking the + icon)
- Control video sound volume & sound effect volume
Speaking of sound effects, there are also some built-in sound effects you can use.
Press the Sound Effects icon in the right menu bar. A window will appear with several different sound effects like Applause and DJ Air Horn.

How To Use Scenes In Ecamm Live
So far we’ve covered a lot of the basic functionality within the main interface. But you can really take things to the next level by using Scenes.
Scenes are essentially presets or templates with different settings that you can switch between while you’re live.
Go to the Scenes panel in the bottom left corner (if you’re not seeing it, you can enable it by going to Window in the top menu).
Press the + icon in the bottom left corner of the panel to create a new scene. Add a name for the Scene and then adjust any settings you want to be assigned to that scene.
This makes it insanely easy to switch between things. You could have one Scene for one camera angle, another Scene for another camera angle and a third Scene for a screen share you want to be able to quickly jump to.
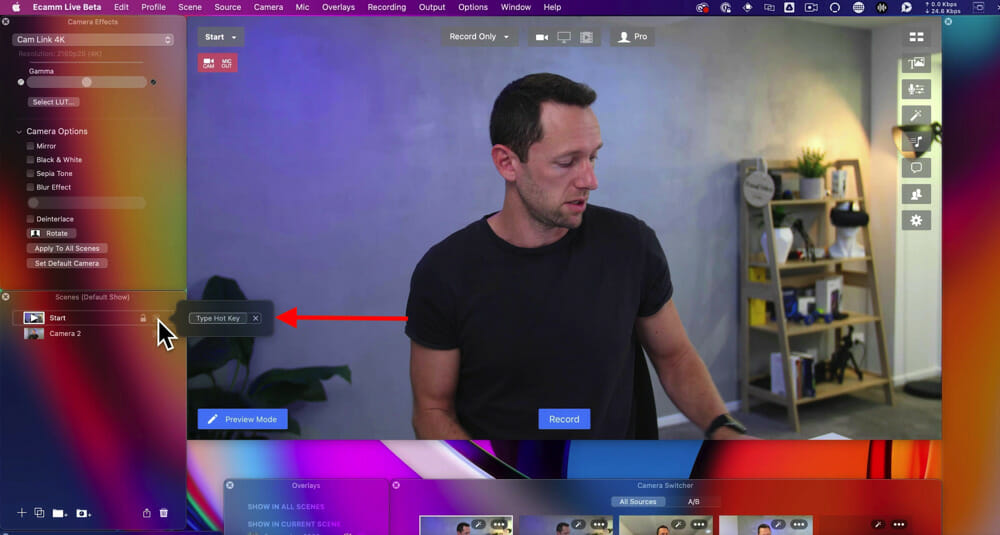
You can even set keyboard shortcuts to make the change even easier. Press the button on the side of the Scene and it will prompt you to enter a hotkey.
So you could assign Command + 1 for Scene 1 and Command + 2 for Scene 2. This allows you to switch Scenes really quickly and can really speed up your workflow.
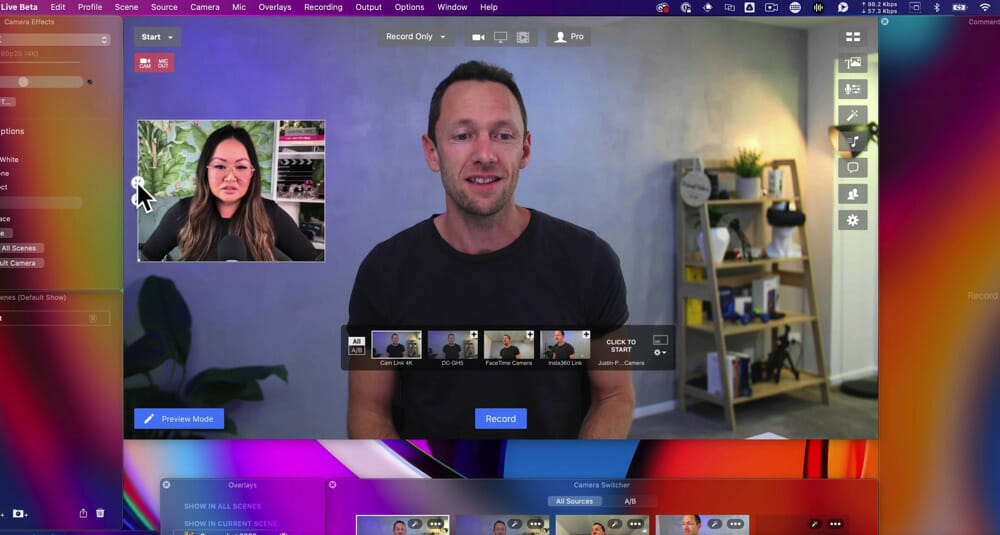
Adding PIP (Picture In Picture)
Another cool feature is adding a picture in picture to your live streams.
Go to the Overlays window and select the icon for New Camera Source. Then a new window with your camera will appear in the main window.
You can move this around, select different cameras and even change the shape of the window.
PRO TIP: If you select Custom in the Shape section, you get a ton of customization. You can scale the box by adjusting the size, or you can hold down Option and click & drag to crop the video image as well.
In the Overlay window, if there are any graphics you want to be shown over all the Scenes, simply click and drag it under Show In All Scenes.
You can categorize the Scenes into different groups and you can even add automations within the groups as well.
For example you could switch to a different scene after a certain amount of time or once an action has been triggered.
Say you wanted to switch between different camera angles. You could add the Scenes which have different camera angles into a folder. Then go to Settings for that folder and select Advance To: Next Scene every 10 Seconds.

How To Add Guests In Ecamm Live
There are a couple of different ways you can add guests.
Adding Guests Via Skype
There’s a direct integration with Skype. So starting a Skype call is an easy way to bring guests in.
Guests will appear as extra video sources, so you can add guests into your stream or recording just by hitting the + icon in the top right of that video source.
Adding Guests Via Interview Feature
You’ll need to be on the Pro Plan to access this feature.
The Interview tool allows you to bring guests in without any extra tools, integrations or anything like that.
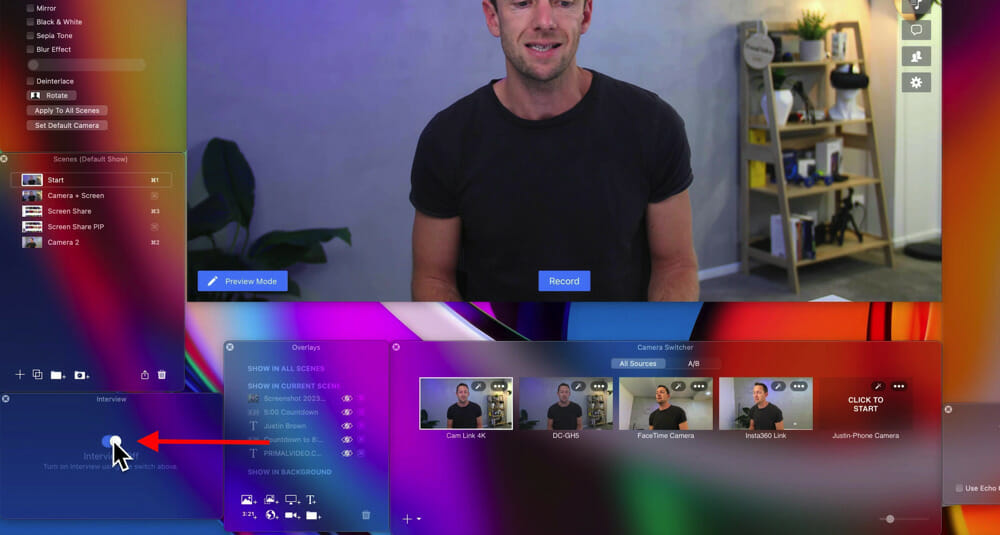
Go to the Interview window in the bottom left corner (remember if it’s not enabled, you can enable this by going to Window in the top menu).
Click on the Interview window to turn it on. Straight away you’ll notice that in the video sources window there’s a Guest 1 input.
You can hit the + button to add this to your stream or recording and it will work as a placeholder until your guest comes in.
PRO TIP: You can even create Scenes using that placeholder so it’s all good to go when your guest arrives.
To add your guests in, go to the Interview window and copy the invite link. Send this to your guests and once they’ve clicked the link, they will appear as a video source ready for you to add to the stream.
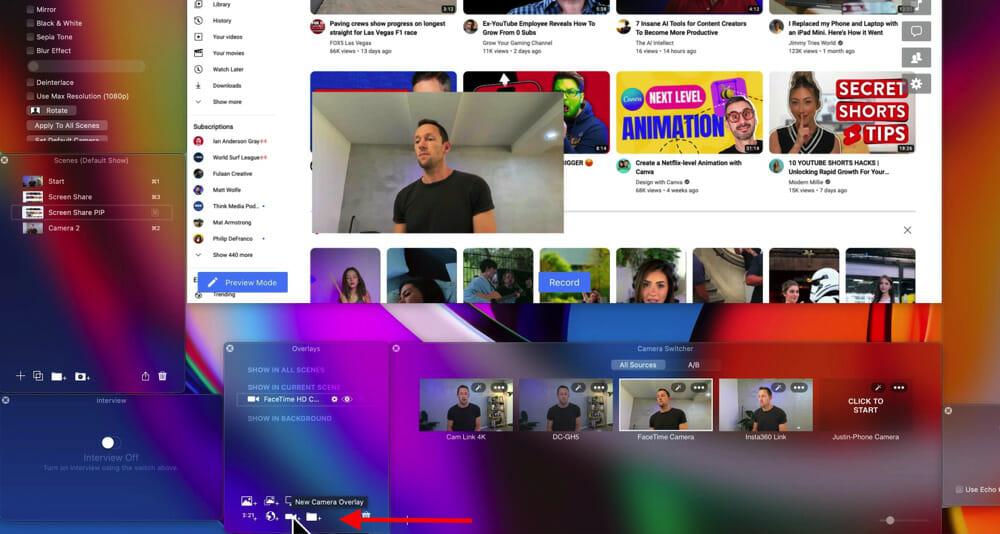
Adding Guests As Picture In Picture
Let’s say you wanted to add a picture in picture of one of your guests while screen sharing in your live stream or recording.
Go to the Overlays window and click the New Camera Overlay icon. This will add the new camera overlay onto your main screen. Then you just need to switch the camera input from your camera to Guest 1.
PRO TIP: You can have up to 10 guests when using the Interview feature, which includes 10 placeholders as well.

Then when your guest joins, make sure you click the Assign button and assign them as Guest 1. Then wherever you had a placeholder for Guest 1, that will be filled by the person you assigned.
Once you’re ready for the guest to leave, they can either leave themselves or you can hit the X icon in the Interview window.
How To Record In Ecamm Live
To record in Ecamm Live, make sure Record is enabled in the top window. To start a video recording just hit the Record button. When you’re ready to end the recording, press the Finish button.

Then you have three options:
- Edit in Descript
- Send it directly to YouTube
- Show where the file was saved on your computer

How To Go Live In Ecamm Live
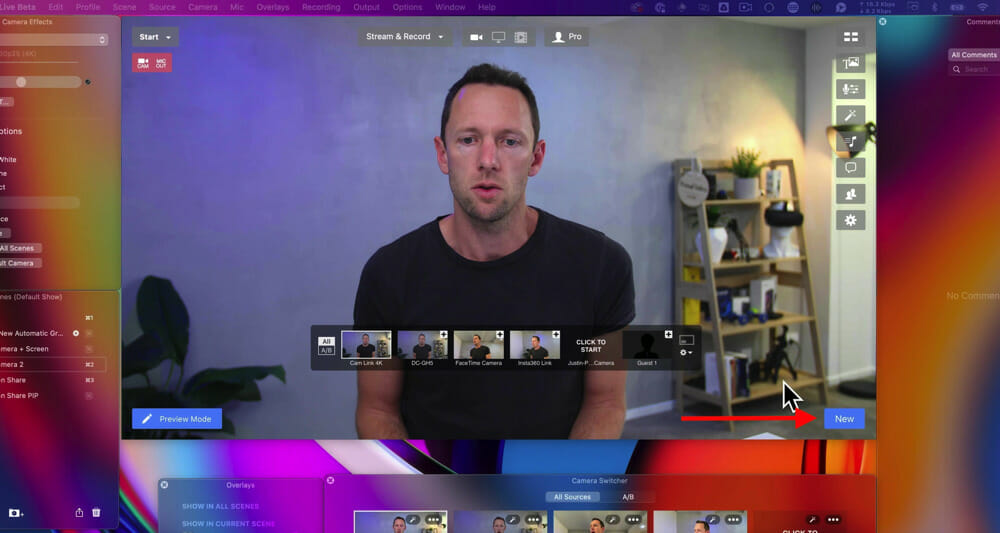
To go live, make sure either Stream & Record or just Stream is selected in the top window. Then hit New in the bottom right corner.
A new window will appear where you can:
- See the destinations you’re going live to & add more destinations
- Give the live stream a name
- Select the visibility (e.g. Public, private, unlisted)
- Adjust the latency
- Schedule the live stream
- Add a thumbnail
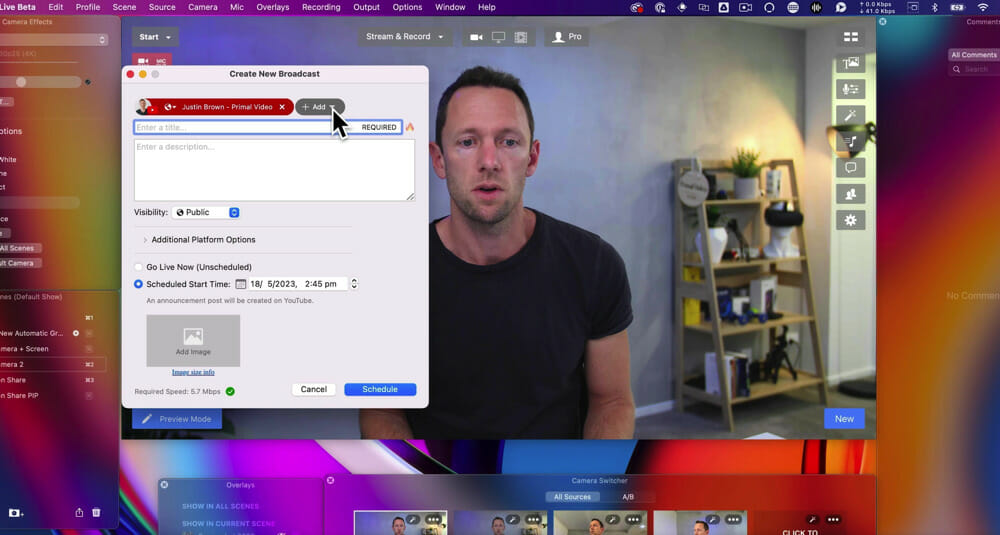
Once you’ve adjusted those settings, press Go Live Now.
Interface While Live
Once you’re live, you’ll be able to see settings such as:
- How long you’ve been live for
- The video format
- How many live viewers there are
If you click on the icon displaying how many viewers you have, there are some more features you can access:
- View live stream in web browser
- Copy the live stream URL (so you can send it out)
- Go directly to the YouTube Live Studio
- End the stream
How To Feature Comments While Live
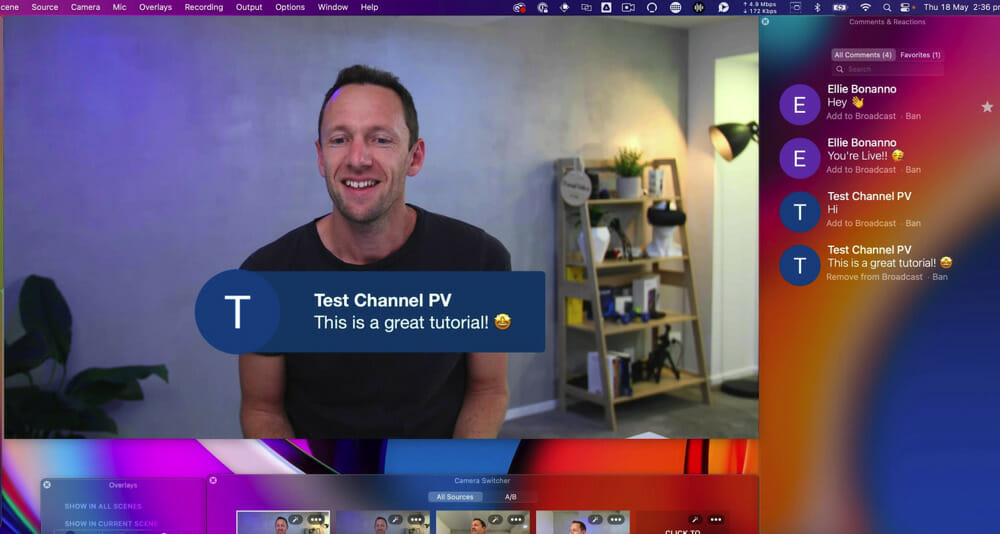
Once you have some people commenting on your stream, these will appear in the Comments window. This means you don’t need to be checking YouTube to view the comments – you can do it all from Ecamm Live.
This is even better if you’re multi-streaming to other platforms as well, as the comments from all platforms will appear in the Ecamm Live Comments window.

There’s a Favorite button, so you can shortlist any good comments or questions.
You can also feature any of the comments just by clicking on it in the Comments window. It will then appear in your live stream. You can scale it and move it around. This is awesome for creating an engaging live stream as people get to see their comments onscreen.
When you’re ready for the live stream to end, hit Finish in the bottom right corner.
After it’s finished, you’ll see a few options:
- View the video on YouTube (or whichever platform you were live on)
- Delete the video
- Show the local recording on your computer
- Edit in Descript

There you have it, our complete crash course on how to use Ecamm Live.
Hopefully now you can see why we think it’s the best live streaming app for Mac.
If you want to see how Ecamm Live stacks up against the other Mac live streaming platforms, check out our complete roundup of the Best Streaming Software For Mac.
FAQ
Is Ecamm Live only for Mac?
Yes, Ecamm Live is a Mac-only live streaming app.
How many guests can you have on Ecamm Live?
On Ecamm Live’s Pro Plan you can have up to 10 guests join your live stream or recording.
Can you use Zoom with Ecamm?
Absolutely! Using Ecamm Live’s Virtual Camera feature, you can send your Ecamm Live output to a range of integrated apps including Zoom.
Recommended Gear & Resources
Check out an up-to-date list of all the gear, software & tools we use and recommend right now at Primal Video on our resources page here!