Smartphones aren’t just for capturing your videos; they’re awesome tools for editing them too! So if you’re wondering how to edit videos on Android, you’re in the right place.
There’s a massive list of video editing apps on Android, ranging from completely free to more expensive paid options that have the functionality and tools of desktop video editing software.
Important: When available, we use affiliate links and may earn a commission!
In this guide, we’ll share our top pick for best video editing app on Android.
Then we’ll dive into how to edit YouTube videos using your Android phone.
We’ll take you through a step-by-step video editing process that will help you create professional looking videos like a pro on your Android device in no time!
Here are the exact steps to follow when it comes to editing videos on Android:
- Step 1: Start a New Project
- Step 2: Edit Down the Video
- Step 3: Add In B-Roll
- Step 4: Add Titles & Text
- Step 5: Add Transitions
- Step 6: Add Music
- Step 7: Adjust Volume
- Step 8: Adjust Color Grade
- Step 9: Export Video
But before getting started, let’s take a look at the best editing app for Android users.
Best Android Video Editing App
When it comes to editing on Android, CapCut is the best video editing app we’ve come across.
It’s a great all-rounder, meaning whether you’re an absolute beginner right through to a more advanced user – it’s a solid video editor.

Plus there’s a free version, so if you’re looking for a FREE video editing app it’s definitely worth checking out.
We’ll be running through this tutorial using CapCut, but don’t worry if you’re using a different video editing app! You can follow along to this process using any app that suits you. It’s the process that’s the most important part.
If CapCut isn’t right for you, check out our Best Video Editing Apps For Android roundup.
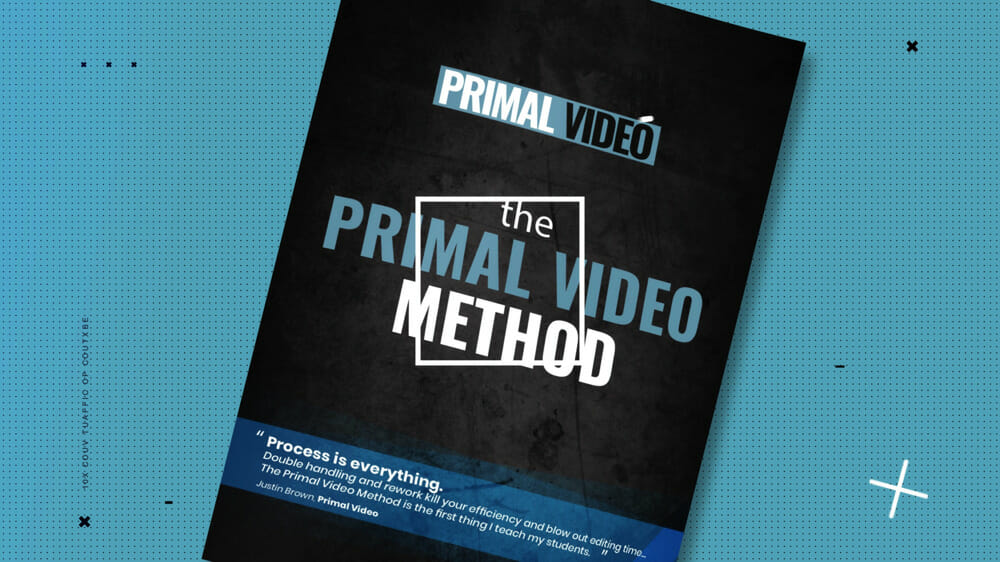
PRO TIP: You can download a free PDF guide of the Primal Video Method (our ultimate step-by-step video editing process) to follow along to this tutorial.
How To Edit Videos On Android
Now open your video editing app of choice and let’s get started!
Step 1: Start a New Project
When you first open your video editing app, you’ll be taken to a home page where you can see any existing projects that you’ve been working on.
To create a new project, tap the New Project button.
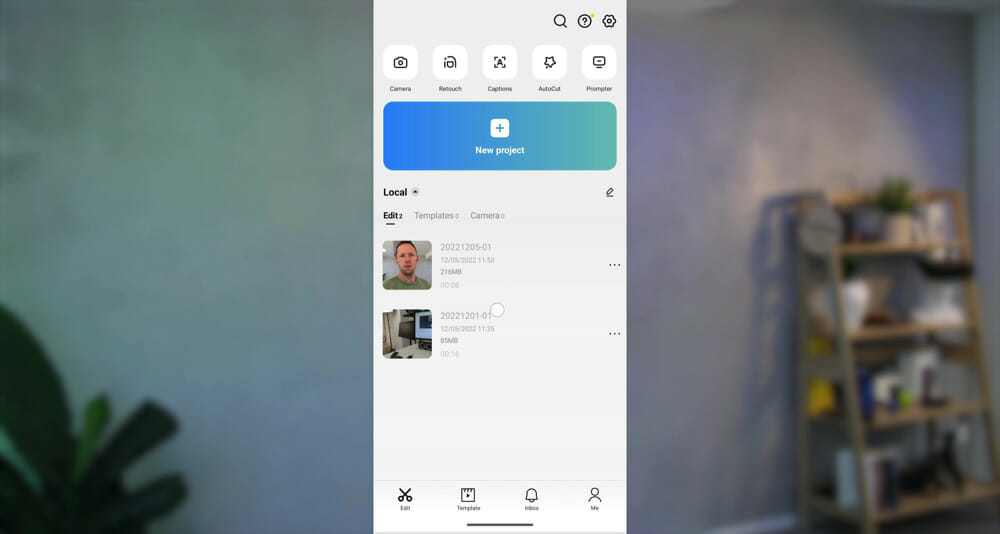
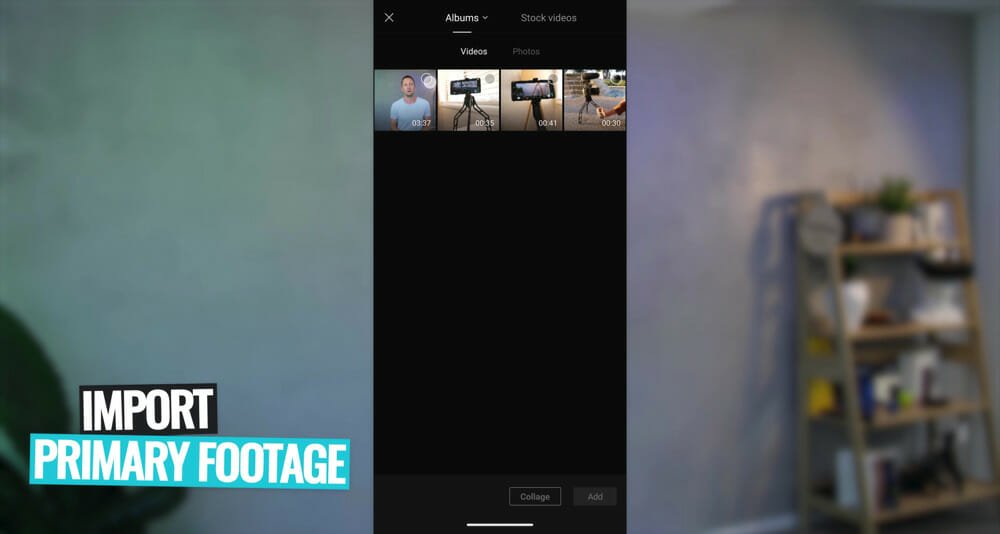
From here you’ll be prompted to import your video project.
You can go ahead and import all of your video assets at this point but it’s much easier if you import your primary footage first, and add in your other video files later.
So select your primary footage files and tap Add.
Now let’s run through the general user interface and some video settings you might want to adjust before diving into the edit.
Editing Interface
Let’s go through a general breakdown of the interface so you have an idea of where things are and what they do:
- Playback Area: This is where you can preview your project/video editing masterpiece
- Video Editing Timeline: All of your video assets will appear here – this is where the magic happens
- Main Menu: Along the bottom is where you can access the main video editing tools
PRO TIP: You can pinch to zoom in and out on the video editing timeline.
Obviously the interface might be a bit different depending on which video editing app you’re using, but now you know the general idea of which tools are what.

Project Settings
To adjust your project settings, tap the 1080P button in the top right corner.
Most video editing apps will automatically set these video modes to the exact settings of the first clip you imported to the project.
So if your original footage has the right settings, you don’t need to make any changes. But if you do want to make adjustments, here’s where you do it.
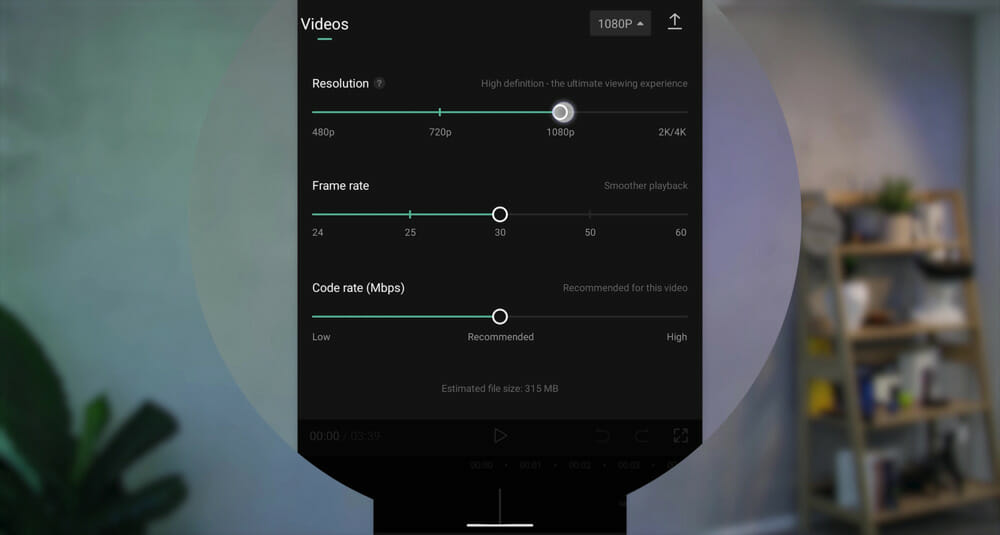
This is where you can adjust your:
- Video resolution
- Frame rate
- Code rate
Now it’s time to start editing down our primary footage.
Step 2: Edit Down Your Footage
You’ll notice that when it comes to video editing, there are usually multiple ways you can do things. Trimming your footage is one example of that!

We’ll start by trimming the beginning of a clip. Let’s say there’s a long pause at the start of the video clip so we need to remove it.
Here are some ways you might do that.
Handle Tool
Select the video clip on the timeline. White handles will appear at the start and end.
Tap and hold the front handle, drag it to the point where you want the video to start. When you release it, that is the new starting point of the video.

This is a really quick and simple way to remove footage from the beginning of your footage.
You can also use this tool to trim footage from the end of your footage.
Split Tool
Another way to edit your footage is using the Split tool.
If you swipe across the video clips on the timeline, you’ll see that you can move where the vertical white line is.
Align the white line where you want the video to start and tap the Split button in the bottom menu.
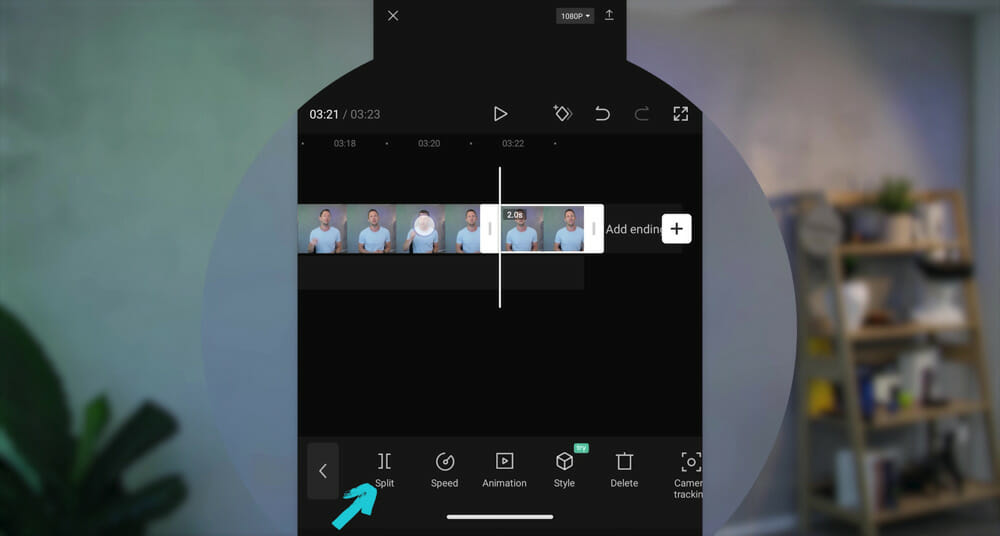
This will cut the video clip into two and you can delete the bad clip by tapping it and selecting Delete.
So that’s how you can remove footage from the beginning and end of the clip, but what if you want to remove footage from the middle of the clip?
Removing Footage From The Middle
Go to the point where you want the clip to end. Select the Split button to cut the video clip at that point.
From here you have two options:
- You can drag the white handles to trim off the part you don’t want to keep
- You can create a second Split and then delete the middle clip
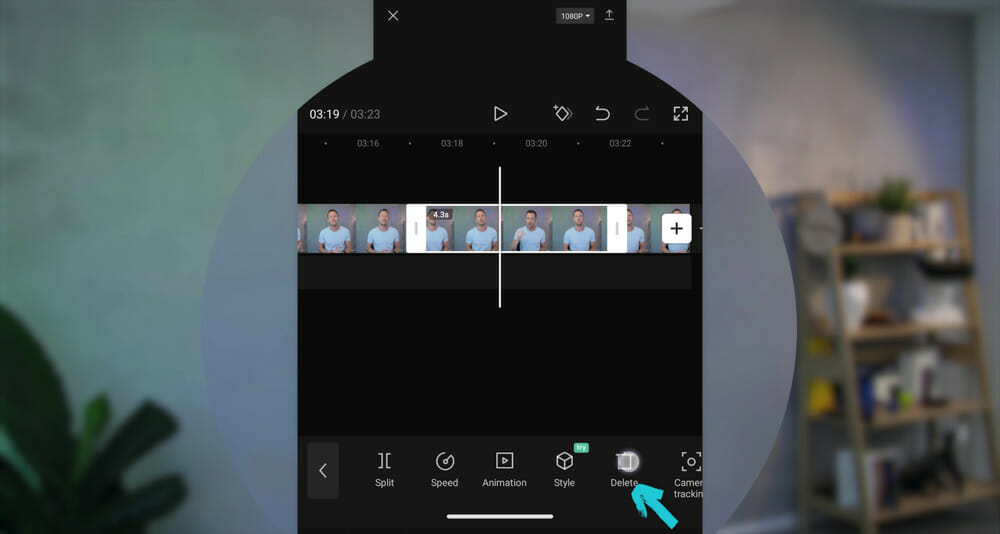
So now go through and use those tools to remove any bad takes, mistakes or anything you don’t want in your final video project.
All of the different clips are movable, so you can hold down and then drag them around the timeline to build out the exact story you’re trying to convey.
PRO TIP: In a lot of apps, especially free video editing apps, you’ll notice they automatically add a title card promoting their app. You can usually remove these by tapping and pressing Delete.
The next step is to add in b-roll clips.

Step 3: Add In B-Roll
To add b-roll or overlay footage to your video project, select Overlay in the bottom menu. From there you can select all your b-roll footage clips and they will be added to your video editing timeline.
You’ll notice that b-roll footage will be added in the video layers beneath your primary footage. You can keep all of your b-roll clips on one video layer or you can stack them.

Once your b-roll footage is added in, it will play over top of your primary footage but your primary audio will remain.
B-roll clips are just like your primary footage clips, so you can edit, trim and move them in the exact same way.
PRO TIP: If you check the playback window while your b-roll footage is playing, it might not fit the full screen. If this happens you can select that clip on the timeline and then use two fingers to zoom in on the clip in the playback window so that it’s full screen.
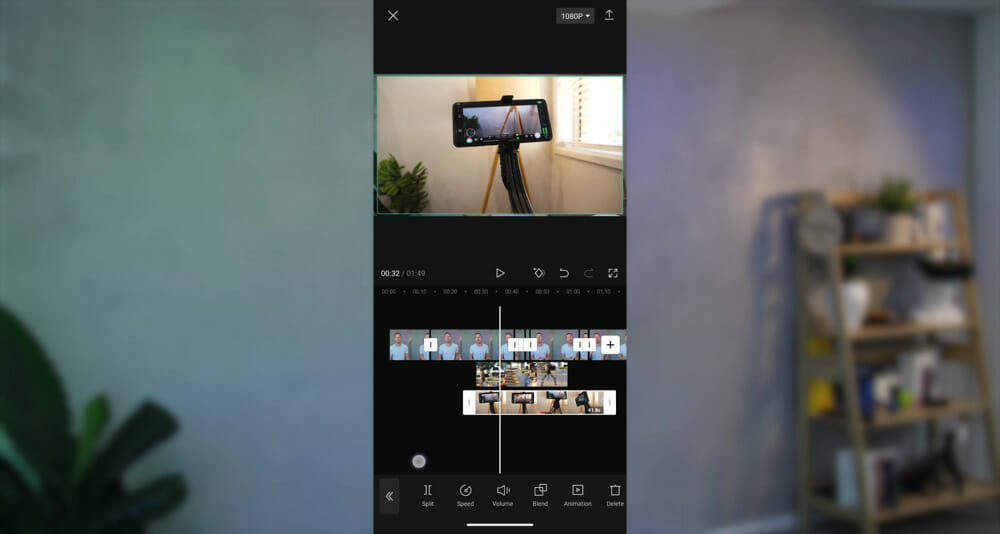
In CapCut, you’ll need to exit out of the Overlay editing area. When you do this, the b-roll clips will be condensed so they don’t take up as much screen real estate.
You can return to the Overlay editing area by tapping the Overlay button or clicking on any of the minimized b-roll clips.
So go through and add any b-roll or overlay clips to your video project.
The next step is to add in titles and text.
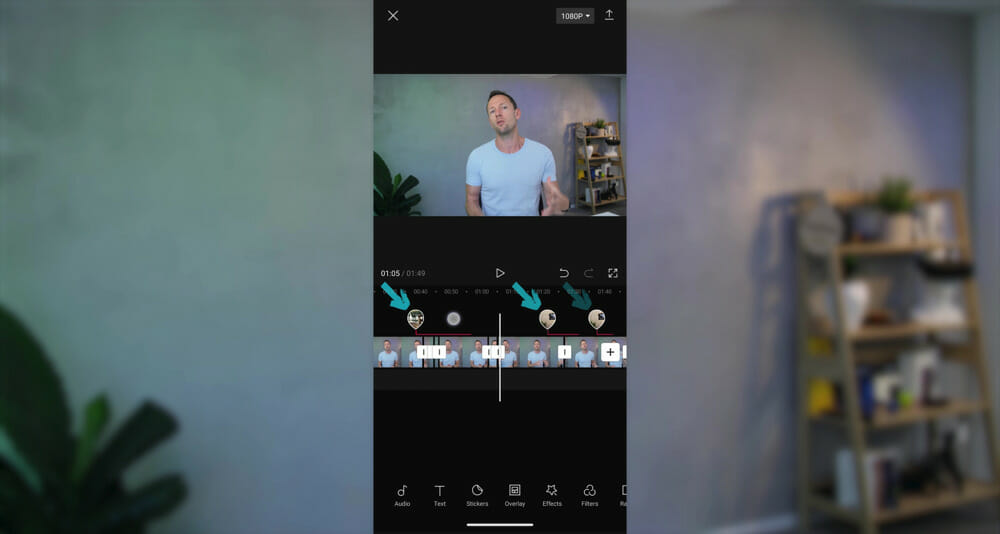
Step 4: Add Titles & Text
To add text to your video, tap the Text button in the bottom menu.
From there, go to Add Text.
You can type in your desired text, and you can make adjustments to the following things:
- Font
- Style
- Effects
- Animation

These are fully customizable, so you might even pick one of the presets and then adjust the settings to suit exactly what you want.
When you’re finished hit the Tick icon and the text will be added to your video editing timeline.
Just like the other clips, you can adjust the length by moving the handles. You can also drag it to wherever you want it to be placed on the timeline.
If you want to make any further changes to the text, you can tap the text clip and it will re-enter edit mode.
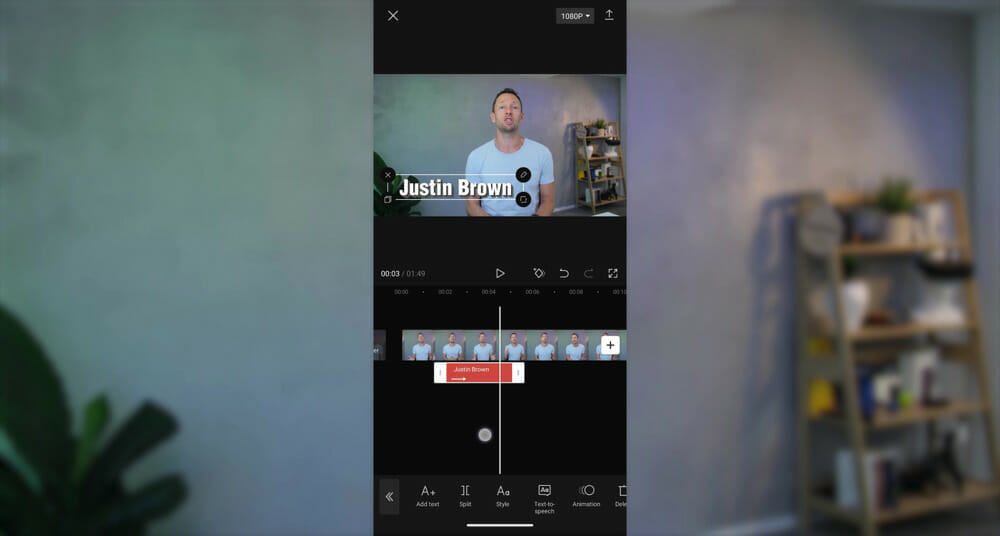
Most video editing apps also have templates or text effects you can use.
In CapCut, you can access these by going to Text Templates. You’ll find lots of animated titles and graphics here.
The text in these is completely customizable so you can edit it to suit your video.
Then you can add it to your video editing timeline and adjust it like the regular text clips.

So go through and add any text or titles into your project.
The next step is to add in transitions and effects.
Step 5: Add Transitions & Effects
There are multiple different types of transitions and effects you can use to build out your video.
Built-In Transitions
To add a built-in transition between two primary footage clips, scrub across to where you have a cut between two clips and tap the white box.
A bunch of different transitions will appear. You can adjust how long the effect will go for by moving the slider bar and you can add the transition just by tapping it.

However, we wouldn’t normally use a transition like this between two clips that look essentially the same (like in our YouTube videos). You’d usually only use those types of transitions for clips that look different.
Instead, we would slightly zoom in on one of the clips.
Zoom In Transition
Inserting a slight zoom between clips that look the same is a great way to break up your content, make it look a bit different and keep your viewers engaged.
To do this, select the second clip on your timeline and then in the playback window pinch to zoom in slightly.
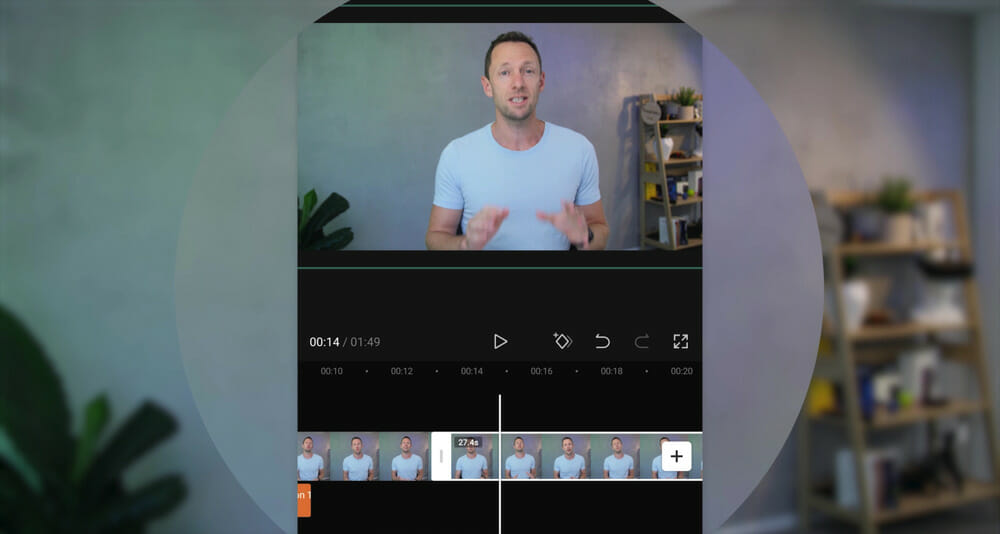
PRO TIP: Don’t zoom in too much as depending on how you filmed the footage, you might lose video quality – this just needs to be a subtle effect.
Make sure the eyes are lined up as closely as possible to make the transition less jarring for your viewers.
When you play through your footage you’ll notice this slight zoom in effect.
Transitions Between B-Roll Clips
To add a transition onto a b-roll clip, select the clip on the timeline and go to Animation in the bottom menu.
You’ll see a ton of different options in here. You can select In, Out or Combo depending on when you want the transition to appear.
PRO TIP: Don’t go overboard with these types of transitions as they can make your video look amateur-ish.

Speed Effects
Another cool effect you play around with in your video projects is making video speed adjustments.
To access these effects, select the video clip on the timeline and select Speed.
There are two types of speed adjustments: Normal and Curve.

Normal will usually provide a slider bar that you can adjust to either increase or decrease the speed.
Curve is where you’ll find different presets for speed variation along with a Custom option where you can manually set key frames to dictate when your video will speed up or slow down.
Other Video Effects
There’s tons of other video editing features and effects you can play around with in your video editor.
For example, there’s things like:
- Camera tracking
- Cutout (this removes the background of a clip)
- Stabilize shaky footage
- Reverse your footage
- Motion blur
This definitely isn’t all the features available, so make sure you jump into your video editor app and see what’s in there!

So go through and add all of your transitions and effects at this point.
The next step is to add audio and sound effects.
Step 6: Add Music
To add audio to your video project, scrub back to the very beginning of your footage.
Press the Add Audio button and you’ll have a few different options as to the type of audio you can add: Sounds (music), Effects, Extracted or Record.
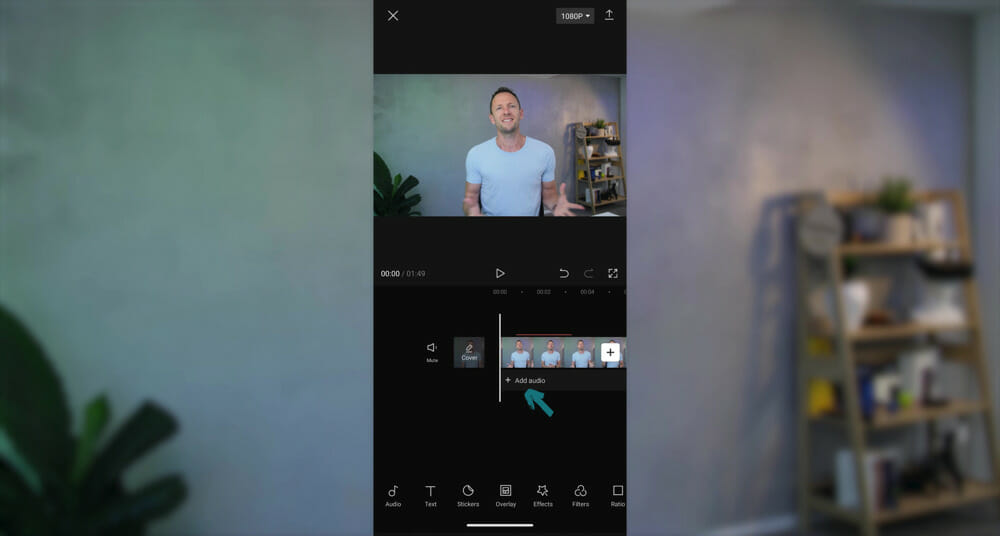
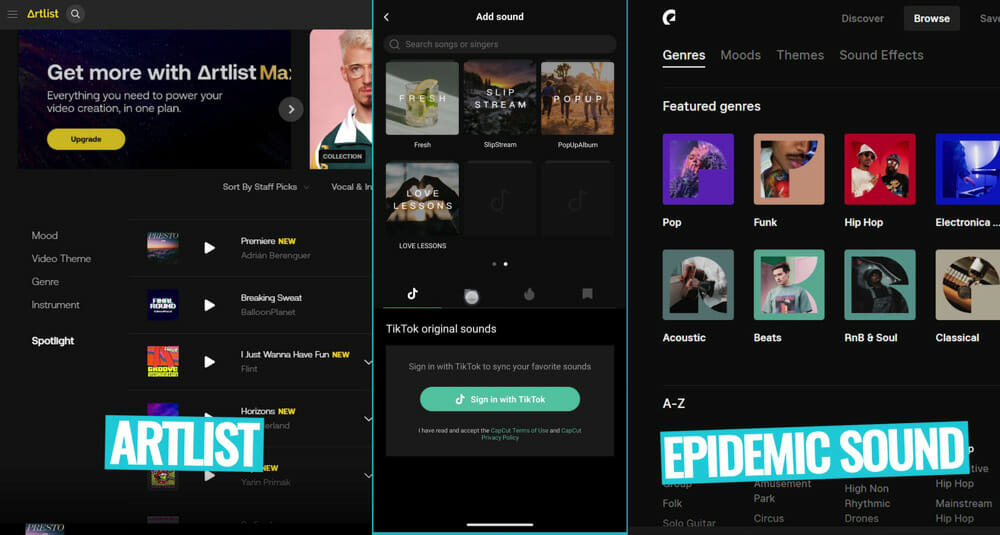
Most video editor apps offer some free music built-in to their apps.
In the case of CapCut, it has some awesome free music but we strongly recommend that you only use this music if you’re making videos for TikTok. Because CapCut and TikTok are owned by the same company, you’ll likely be safe to do this.
But if you’re creating videos for other platforms, there’s a good chance you’ll get a copyright claim or copyright infringement if you use that music.
Instead, we always go to Artlist and Epidemic Sound to find music for our video projects. This way we know for sure we’re not going to have any copyright issues down the track.
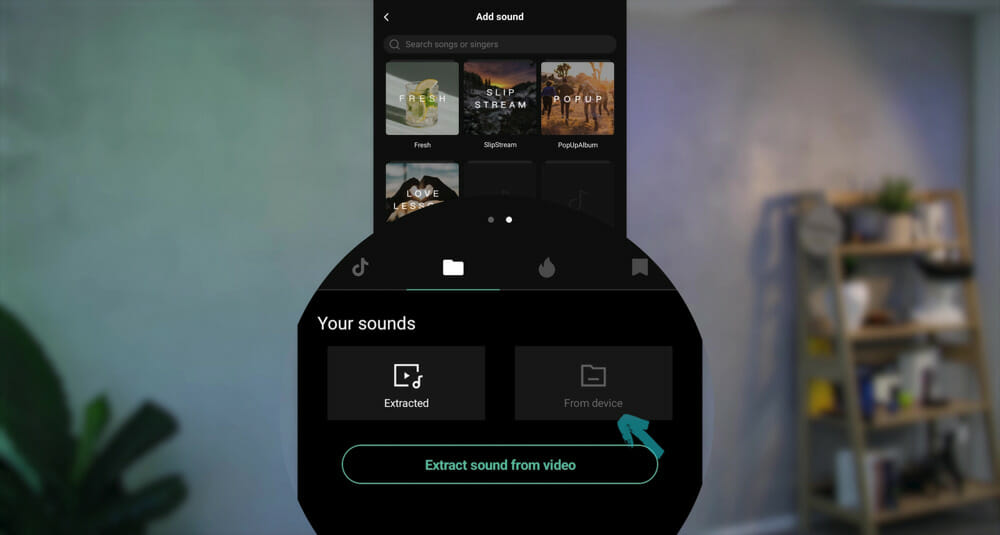
If you’re uploading music that you already have saved on your Android device, go to the Folder icon and select From Device.
Press the + button and it will be added onto your video editing timeline below the video clips.
You can use all of the editing tools we mentioned earlier to edit the audio clip. You can trim, cut and move around the clip so that it suits the story you’re building out.
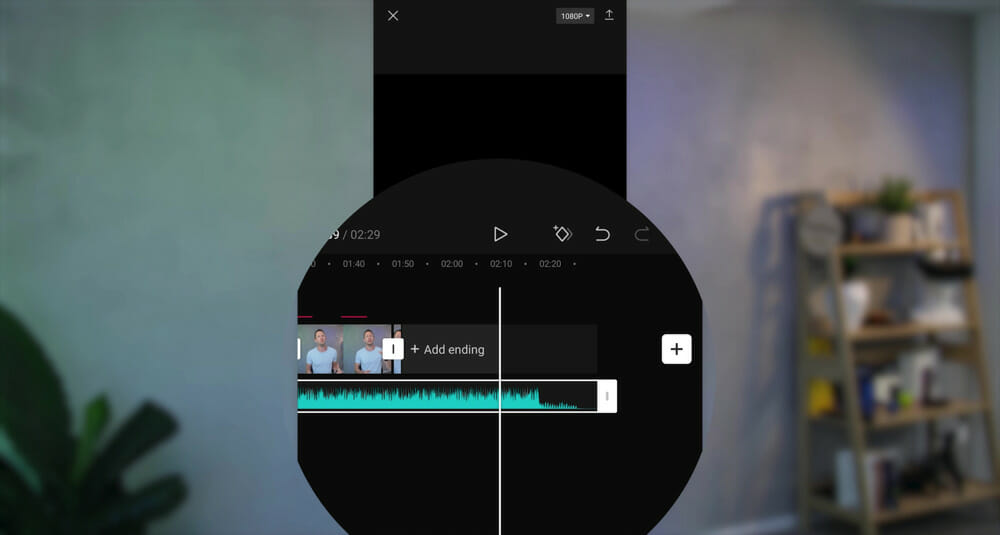
PRO TIP: Make sure your audio clip ends at the same time as your video project.
You can also fade in and fade out on your audio. To do this, select the clip and press Fade. You can select the amount of time you want the fade to take and then hit the Tick icon.
Now that you’ve got your audio added to your video project, you might find as you’re playing through the edit that you’re making minor adjustments to the clips so they match the beat or the music.
The next step is to adjust your audio volume.
Step 7: Adjust Volume
When it comes to adjusting volume, you always want to start with the audio from your primary camera footage first.
This means focusing on any spoken pieces or narration up front, and then adjusting any background music or sound effects after that.
Setting Primary Audio
To set your primary music, start by muting the background music to allow us to focus on the primary audio.
To do this, select the audio clip, go to Volume and set it to zero.

Most video editing apps do a really good job of automatically setting your volume levels for you. So you generally don’t need to play around too much unless you notice that your clip is too loud or too quiet.
If you do need to make any adjustments, you can adjust the Volume slider.
There’s a really cool feature in CapCut for volume adjustment.
If the volume levels of your first clip are set correctly, you can tap the Loudness Adjustment button. It will analyze all of the clips on your timeline and adjust the volume levels to match that first clip.
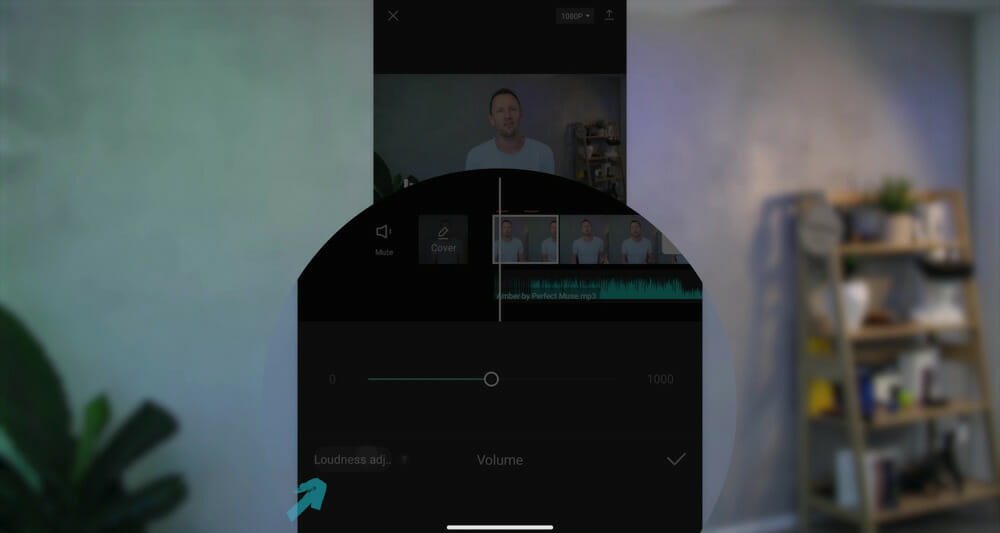
This can save you a bunch of work if you have lots of different volumes throughout your video.
Once you’ve set your primary audio levels, you can adjust the music volume.
PRO TIP: It’s a great idea to go through this process using headphones so you’re dialing this in perfectly.
Setting Background Music Volume
This is another aspect that comes down to the particular project you’re working on. There’s no right or wrong, it just depends what you’re going for in that particular video.
For the videos we make and with the music tracks we usually use, generally our volume level is set between 25 to 35.
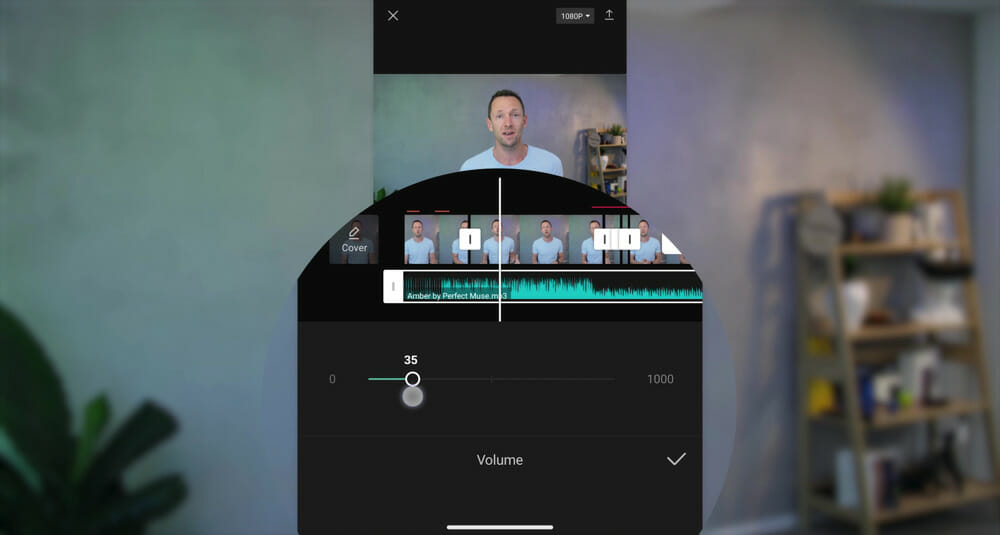
Select the music track, go to Volume and adjust the slider bar until you reach the right volume.
Setting B-Roll Clip Volume
You’ll likely also want to adjust the volume of your b-roll clips or overlay footage.
To do this, tap on a b-roll clip on the video editing timeline to open the Overlay settings. Select the b-roll clip and go to Volume.
In our videos, we generally set our b-roll footage volume to zero. But this will come down to your specific video project.
Now that you’ve set the volume on all of your clips, the next step is to color grade your footage.

Step 8: Adjust Color Grade
Adjusting the color of your video clips is a great way to change up the look and feel of your video.
There are two main options when it comes to color grading: using filters or making manual adjustments.
Filters
Select the first clip on your timeline and go to Filters.
There’ll be lots of different options that are similar to Instagram filters.

If you find a filter you like the look of, you can always use that as a starting point and make manual adjustments from there. To do this, select a filter and then go to Adjust.
You can also adjust the strength of a filter by moving the slider bar.
Adjustments
With the first video clip selected, go to Adjust in the bottom menu.
There are lots of different settings in here and you can use the slider bar to make any changes.
We’d usually recommend adjusting the:
- Exposure
- Color temperature
- Shadow
- Saturation or HSL

So use those tools to go ahead and make any color adjustments to the video clip.
In most video editing apps, after making changes to one clip you can apply any color adjustment changes to all remaining clips.
You can do this in CapCut by hitting the Apply To All button.
Use these same tools to make any color changes to your b-roll clips as well.

Once you’ve finished adjusting the colors in your video, the final step is to export your project!
Step 9: Export Video
Before hitting that Export button, it’s a good idea to check your video settings just to make sure everything is set correctly.
You can do this by tapping the 1080P button in the top right corner.
Then hit the Export icon to the right of the 1080P button and your video will begin saving to your device.
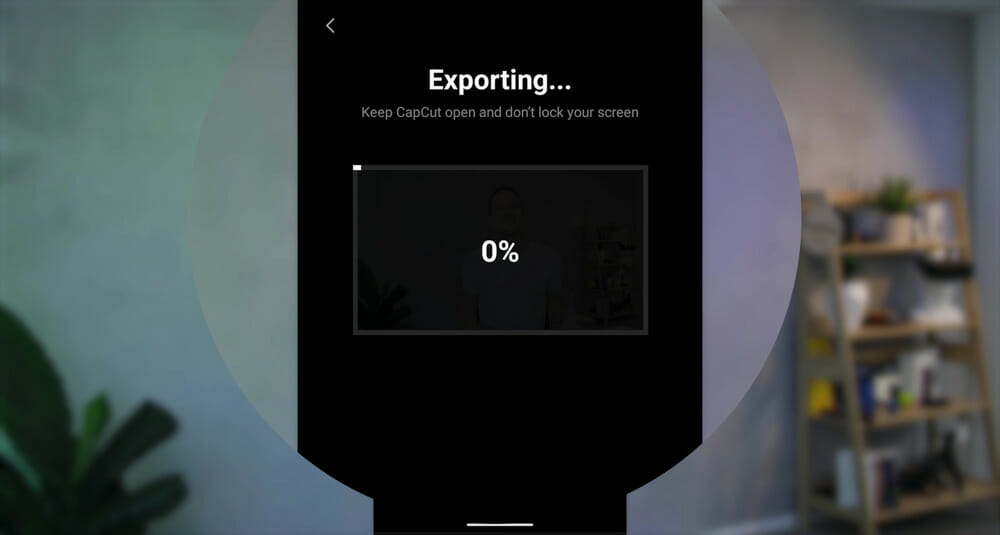
After it’s exported, make sure you watch through the entire project again to see if everything is exactly how you want it.
You can jump back into your video editing app to make any further adjustments if needed.
Then your video project is ready to release to the world!
As you can see, CapCut is a really powerful video editing app but remember you can follow this exact process using your video editors of choice.
Now you know how to edit videos on Android.
Don’t forget to download the step-by-step process that we followed in this tutorial.
It will help you edit video faster and easier! You can download a copy of the Primal Video Method here.
FAQ
Can I edit a video on my Android phone?
Absolutely! Using your Android device is a great option when it comes to editing videos. All you need to do is download an Android video editing app and then follow the above step-by-step process.
How can I edit videos for free on Android?
To edit videos for free on Android, you’ll need to download an editing app. Check out our roundup of the Best Free Video Editing Apps in 2023 to find the right free video editor for you.
How do I edit and cut a video on my Android phone?
You can edit and cut videos on your Android phone using the Split tool. This cuts your video clip into two sections. Go to Step 2: Edit Down Your Footage in this article to learn more.
Recommended Gear & Resources
Check out an up-to-date list of all the gear, software & tools we use and recommend right now at Primal Video on our resources page here!
Related Content


