Without a doubt, video editing is often one of the most daunting parts of the video creation process for many people, especially if you’re just starting out and not familiar with the process of taking raw footage and turning it into a video masterpiece.
But it doesn’t have to be that way.
Once you learn the basics and start to understand the fundamental process, you’ll soon see that you can get up to speed and edit videos like a pro in no time at all!
In this article, we’re going to walk you through the step-by-step process for video editing for beginners on Windows PC.
We’re also going to show how to edit FAST too – sharing our pro tips and tricks to help you learn all the shortcuts to save you a ton of time.
And at the end of this article, we’ll also share our free guide with you that’ll show you how to cut your editing time in HALF with our tried and tested Primal Video Method.
So, are you ready?
Important: When available, we use affiliate links and may earn a commission!
How to Edit Videos on Windows PC
Firstly, the steps we’re about to go through in this tutorial can be done with any video editing software, so if you already have one you’re comfortable with, that’s awesome!
If you haven’t picked one yet and you’re looking for some free software to get started with, we recommend that you try Shotcut, which we’ll use in this tutorial to show you how the process works. Shotcut is great for beginners right through to intermediate levels because it’s easy to use, intuitive, and has some awesome pro features.
Now it’s time to learn how to edit videos on Windows PC, with our 8 step process!
Here’s a quick preview of the steps:
Step 1: Set Up your Project
Step 2: Refine your Raw Footage
Step 3: Build Out the Story
Step 4: Add in Titles
Step 5: Add in Effects And Transitions
Step 6: Add in Audio
Step 7: Color Grade your Video
Step 8: Export and Review your Video
Step 1: Set Up your Video Editing Project
Before we dive into the detail of how to edit your video, there are a few things you need to set up to create a solid foundation for your editing project.
So, you’ll need to:
- Create and configure your new project.
- Import your media files.
How to Create a New Project
When you open Shotcut, the first interface you’ll see is the ‘Project Window’. This is where you can find existing projects or create new ones.
Creating a new project is really simple. Just select where you want your new project to be located, name the project, and choose your video mode.
Video mode is the resolution and frame rate you’d like your video to have, and there are numerous options to choose from. Alternatively, you can leave this on automatic, and your project will be set at the best resolution and frame rate based on the first video you import.
Click on ‘Start’ after completing the above and you’ll be directed to a new interface. This is the workspace where all your editing work will happen.

Before you start importing your footage into this workspace, it’s worth familiarizing yourself with its layout.
Your workspace has different sections which are:
- In the center, you have the ‘Playback’ area where you can preview each video.
- At the bottom, the ‘Timeline’ is where you’ll perform most of the editing work.
- On the left, you’ll find a window that shows ‘Playlists’, ‘Video Effects’, and ‘Properties’.
- On the right, you’ll see the ‘Audio Bars’ and a window that shows recently used video files.
Each section’s size can be adjusted by dragging the edges of the section with your cursor to the required size.
How to Import your Media Files
Now you’re ready to bring in the files that you’re going to be working on.
If you plan on working on just a single clip:
- Click ‘Open file’ in the top left-hand corner of your screen.
- Navigate through your file manager until you find your video clip.
- Click ‘Open’ and your video will now be visible in your playback area.
- You can now drag it from there onto your timeline in preparation for editing.
Step 2: Refine your Raw Footage
When it comes to editing videos, there are many ways to achieve the same outcome. The key is to decide which method is going to be quickest and easiest for you.
When editing down your video, the first thing you should do is cut out the bad takes or areas of silence from your raw footage.
To do this: ‘Zoom In’ on the clip to have a better view of the audio waves. The flat areas in the audio waves indicate the areas where you were silent and these are the parts of your clips that you should cut out via Method 1 or Method 2 below.

Method #1
- Drag the ‘Playback Head’ to the point where you want the video clip to begin.
- Click ‘Split At Playback’ at the top of the timeline or just press ‘S‘ on your keyboard. This will split your video clip into two parts.
- Click on the unwanted part and press ‘Delete’. This will leave a space on your timeline that you can remove by dragging back the other part of your clip so that your video now starts at this point.
Alternatively, after step 2 above, you can select the unwanted clip and press ‘Shift + Delete’ on your keyboard which will delete the clip and close up space in a single movement. This is called a ‘Ripple Delete’.

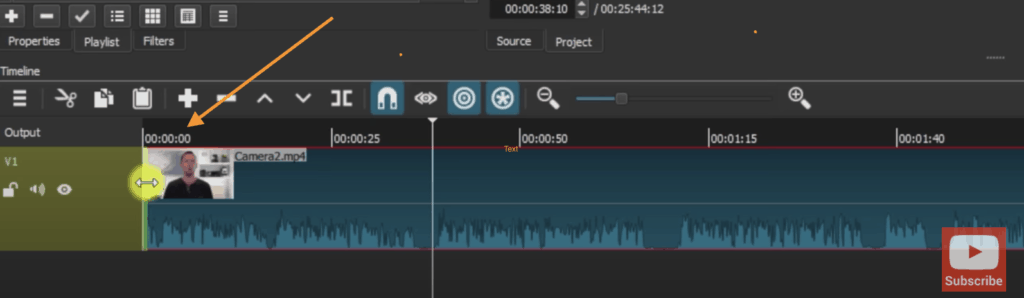
Method #2
- Hover your cursor over the left side of your video clip and you’ll see that your cursor changes to a green color with two arrows.
- Now click and drag your cursor to the right and you’ll notice that it’s moving the timeline along.
- Then all you have to do is keep moving it until you get to the point where you want your video clip to start and release.
Using either of these two methods, you can now go through and remove any errors or footage that you know you don’t want to use in your finished video. At this point though, if you’re unsure about any clips, leave them in there for now.
Step 3: Build Out the Story
Once you’ve completed a first pass and removed the footage you don’t want, it’s now time to add in some B-roll or overlay footage to help your viewers stay engaged and better understand your video.
If you’re looking for quality stock footage, check out our review of the top sites for royalty-free footage. Currently, we’re using Artgrid and Storyblocks! (affiliate links).
To add in B-roll footage:
- Click on the three little lines in the top left corner of your timeline.
- Select ‘Add a New Video Track’ and a new video track will be created above your primary video track.
- Now, click and drag your B-roll footage onto the video track line, making sure that ‘Ripple Trim and Drop’ is un-selected (otherwise your primary footage will be overwritten).
Just like your primary footage, you can now split and remove any parts of your B-roll footage that you don’t want to keep. If you want to try a different way of doing this, you can use ‘In and Out Points’ to remove parts of your B-roll.
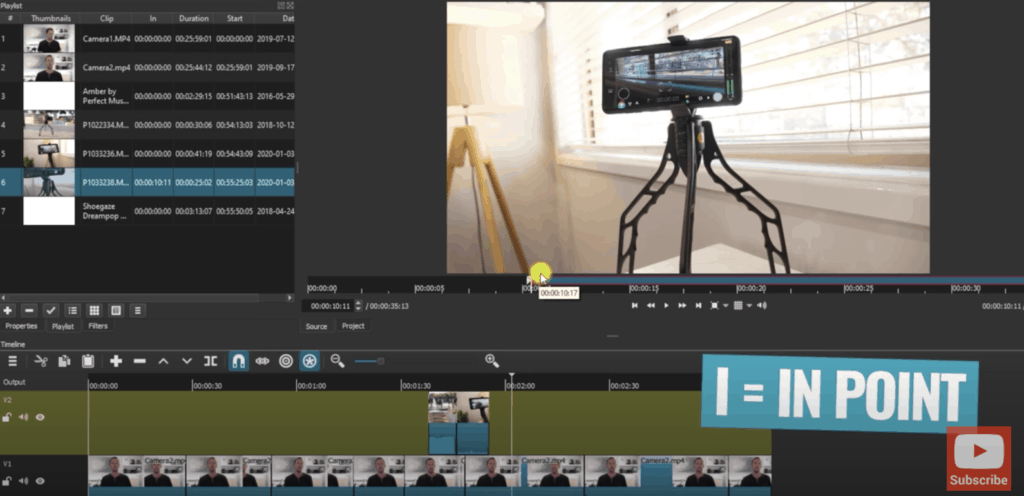
To use In and Out Points to trim your B-roll:
- Double click on the B-roll clip that you want to manipulate so that it starts playing in the playback area.
- Move your cursor to the point where you want your clip to start and click ‘I’ on the keyboard to mark your ‘In Point’.
- Then click ‘O’ on the keyboard to mark your ‘Out Point’ where your video will end.
- You can then click and drag that specific clip onto the timeline.
You can find a full list of keyboard shortcuts at the end of this article to use as a quick reference guide.
Step 4: Add in Titles
After you’ve built out the story of your video, it’s time to add in any text or titles that you need.
Here’s how you do so:
- Select the clip you want the title to show on.
- Move the playback head to where you want the title to start and press ‘S’ (Split).
- Then move it to where you want the title to end and press ‘S’ again.
- Select the section of the clip that’s been split and find ‘Filters’ in the top menu and click it.
- Click ‘+’ to add a new filter.
- In the search bar that shows up, type in the word ‘Text’ and double click on ‘Simple Text’.
From this point, it’s just a matter of customizing your text by choosing the font type and size that you’d like. You can also add outlines and background colors as well as adjusting the size and position of where your title appears on screen.

If you want to go one step further and make title screens for your videos, check out our step by step training in this tutorial. We use a service called Placeit (affiliate link) to make these as they have an awesome range of templates that you can customize up to suit your needs.
And if you want to learn how to make animated video titles, we also have a tutorial on how to do this which you can watch here.
Step 5: Add in Effects and Transitions
Once that’s done, the next thing to do is add in some transitions or effects into your video.
Transitions can make your video look polished and professional, but the key is to not go overboard and add in too many. Use them sparingly to create a storytelling element in your videos.
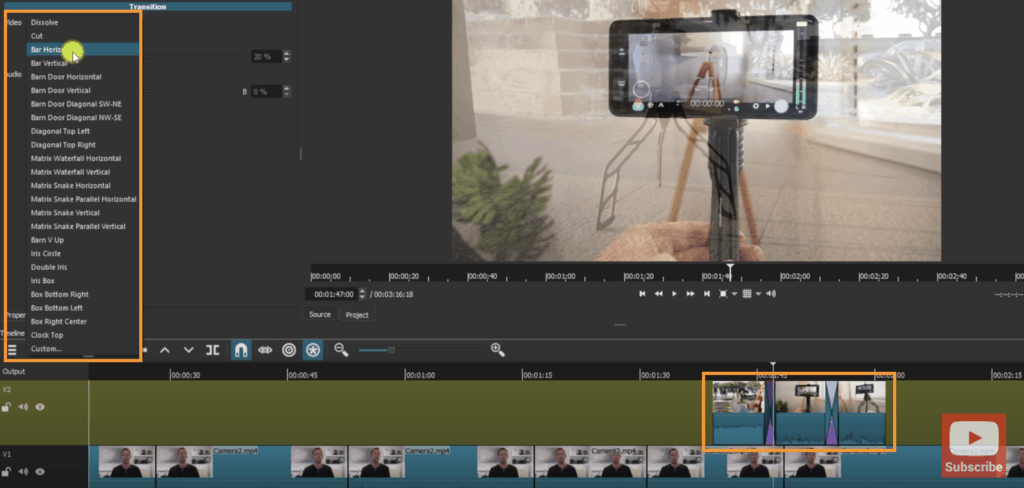
To add in a transition:
- Click and drag a specific B-roll clip until it overlaps with another B-roll clip to create a simple ‘Fade’ transition between the clips.
- If you’d like to use another type of transition, click on the area of overlap between both clips (with a cross in it) and click on ‘Properties’ at the top of your timeline.
- Then click on the drop-down menu to select the type of transition you’d like to use between the two clips.
Generally speaking, transitions work well with B-roll footage, but we tend not to use them with our primary footage because they can be quite distracting. Keep things simple and you can’t go wrong!
Instead, we prefer to ‘Zoom In’ on one of the clips to create a subtle difference between the shots and avoid a ‘Hard Cut’.
The subtle change in the shot helps keep the video engaging and also helps mask any minor lighting changes or movements between the shots, making them less jarring and noticeable than simply using a ‘hard cut’.

To Zoom in:
- Select the clip you want to zoom in on.
- Click on ‘Filters’ at the top of the timeline, scroll down and select ‘Size and Position’.
- Resize the clip by either manually entering in the size or by using the markers on the playback monitor to scale the image up.
Pro Tip: you can apply the same effect that you’ve just created to another clip by:
- Selecting the clip and clicking on ‘Filters’ at the top of the timeline.
- Then clicking on ‘Copy Filters’ in the section above the timeline.
- Then selecting the clip you want to paste the effect onto and clicking ‘Paste’ in the same menu.
Step 6: Add in Audio
Now it’s time to import any music into your video, so the first thing you’ll need to do is to create a new track for your audio.
You can do this by:
- Clicking on the three little lines at the top of the timeline.
- Selecting ‘Add Audio Track’ which will create a layer below your primary footage.
Now you’re ready to click and drag the audio track you want to use onto the new layer on the timeline.
If you’re looking for some quality background music for your video, check out our recommendations for the top royalty-free music sites here.
Adjusting the Audio Track
Now that you have the audio track on the timeline, you’ll want to jump across to the end of your video to make sure the audio is finishing at the same time as the primary footage. Just select and drag the red handle at the end of your audio clip to bring it in line with your primary footage.
If you want to make any adjustments to your primary footage to match the music, the best way to do this is to lock the audio track.
You can do this by:
- Clicking on the ‘Padlock’ icon on the left of the audio track.
- Clicking on ‘Ripple Trim and Drop’ in the menu above the timeline.
- Then you can make any edits without affecting the bottom audio track.
Don’t forget to unlock the audio track when you’re finished and to check that your music still finishes at the same time as your primary footage.

Adjusting Audio Levels
Now it’s time to adjust the volume levels in your video. We always start with our primary footage before moving on to the audio clip.
To adjust the volume levels you can either do it on a clip-by-clip basis or on the entire audio track. If your video has been shot with the same camera and microphone and the audio is fairly consistent, it’ll be easy for you to adjust the audio level on the entire track.
To adjust the audio:
- Mute the music track.
- Select the entire primary footage track.
- Click on ‘Filters’ and then click on the ‘+’ to add a new filter.
- Scroll through the menu and click on ‘Gain/Volume’.
- This will bring up a volume bar that is set at 0 decibels. Slide the volume bar to the right to make the audio louder or to the left to make it softer.
Pay attention to the volume indicator section on the right of your screen as your video plays. Ideally, you want your volume to remain in the green zone. When it starts to enter the red zone, it means that your audio is too loud and needs to be adjusted.
Once you’re happy with the volume of your primary footage, go through the same process with your audio track by un-muting it first and following the steps above.
There’s no set volume level to aim for with your music track; just make sure it doesn’t annoy or interfere with your viewers’ listening experience.

Step 7: Color Grade your Video
The next step after adjusting the audio is to color grade your video and as usual, you should start with your primary footage.
There are three basic filters you’ll need when color grading which we’ll explain now:
- Brightness: this filter allows you to make your shots brighter or darker. Move the slider to adjust the brightness level.
- White Balance: this filter changes the color temperature of your shots. You can also use the slider to switch between warm tones like yellow and cool tones like blue.
- Color Grading: is more complex than the other filters but there are essentially three wheels that allow you to do different things.
- The first wheel is for adjusting the shadows or dark areas in your shots.
- The second is for adjusting the mid-range colors.
- The third is for altering your highlights or bright colors in your shots.
You can make any color change by moving the slider beside each wheel or the marker at the center of each wheel.
So, now that you understand the three filters you should be using to customize your footage, you can add them in by:
- Select the first clip in your primary footage.
- Click on ‘Filters’ and then ‘+’ to add a new filter.
- Scroll through the menu and select ‘Brightness’.
- Repeat the previous steps for ‘White Balance’ and ‘Color Grading’.

Pro Tip: you can copy any of these filters from one clip to another clip by clicking on ‘Copy filter’. Then selecting the clip you want to copy to and clicking ‘Paste’.
Step 8: Export and Review your Video
At this point, your video is complete and it’s finally time to export it!
To do this:
- Click on ‘Export’ at the top of your screen. You’ll see that there are numerous presets to choose from, but the default preset creates an MP4 file which is suitable for most purposes.
- Then click on ‘Export file’, choose where you’d like your video to be saved, and click ‘Save’.
Your video will then begin exporting and you can track its progress on the far right of your screen.
When your video is ready, we’d strongly recommend that you preview your video on a few different devices (phone, computer, tablet, etc.) to make sure you’re happy with the overall look and feel of your video on multiple devices.
Now you’re Ready to Edit Videos on PC!
There you have it – the complete guide to video editing for beginners on PC!
Our 8 step editing process gives you the tools you need to transform your raw footage into a high-quality, polished video that you’ll be proud to share with your audience.
These steps can be applied to any video editing software, but if you’re still wondering what to use, check out this video on the Best Video Editing Software for Windows PC.
And, as promised earlier, here’s a copy of The Primal Video Method, our free guide that outlines the step-by-step process to cutting your editing time in HALF.
Shotcut Keyboard Shortcuts:
- Play = L
- Pause = K
- Rewind = J
- Split = S
- Ripple Edit Left = Shift + I
- Ripple Edit Right = Shift + O
- Ripple Delete = Shift + Delete
- Select In Point = I
- Select Out Point = O
Links
When available, we use affiliate links and may earn a commission!
Recommended Software for Starting Out:
Other Software we’re Using on PC:
Recommended Stock Footage Sites:
Recommended Stock Music Sites:
Create your own Custom Animated Titles & Effects:
Recommended Gear & Resources
Check out an up-to-date list of all the gear, software & tools we use and recommend right now at Primal Video on our resources page here!