The first thing you need to know about DaVinci Resolve is that this software is seriously powerful when it comes to video editing.
It packs a real punch with an impressive list of tools and features that have been designed to help you create great videos that look super polished and professional.
Important: When available, we use affiliate links and may earn a commission!
DaVinci Resolve by Blackmagic is one of the best video editing software options on both Mac and Windows.
But with all that power comes a steeper learning curve than most editing programs, so a little upfront investment of time is required to learn how to use DaVinci Resolve 18.
We love DaVinci not only because there’s an incredible free version, but also because it has all the advanced tools that we use regularly to edit our videos. This is why one of the most common video requests we get is for a DaVinci Resolve Beginner Tutorial.
Now, we originally did a tutorial on DaVinci Resolve 16 and DaVinci Resolve 17 but this is our UPDATED DaVinci Resolve 18 tutorial with all the latest advanced features and updates. You’ll learn exactly how to use DaVinci Resolve 18 by following our complete guide.
Here’s everything you need to get started!
We’ve created this complete tutorial for beginners, stepping through everything you need to know to get up-to-speed and editing videos fast. Even if you have no experience using Resolve, follow along to gain a solid understanding of how DaVinci is built so you can start cutting videos like a pro much sooner than you expected!
How to Get Started with DaVinci Resolve
The ‘Project Manager Window’ is the first screen you’ll see when you open DaVinci Resolve and it’s essentially like your launch pad. Here, you can see existing projects that you’ve already created or you can start new ones by clicking on ‘New Project’ at the bottom right corner of the screen.
Once you’ve selected a project, you’ll be taken to the DaVinci Resolve interface where you can access different ‘workspaces’ that allow you to complete certain functions such as editing, color grading and special effects editing.
These different workspaces in DaVinci Resolve are:
- Media: where you import & store all the media you’ll be using in your video
- Cut: where you perform basic edits to cut down your footage
- Edit: where the bulk of your editing happens
- Fusion: where you add any special effects and motion graphics
- Color: where you can color grade and color correct
- Fairlight: where you get access to all the professional audio tools
- Deliver: where you can export and render your video projects
You’ll be working through most of these workspaces to turn your raw footage into a high quality video that you’ll be proud of. You’ll likely be moving from left to right, starting in ‘Media’ and working your way along to ‘Deliver’ as you go through each of the editing phases.
Learn How To Use DaVinci Resolve
There are 3 things you should do before you start editing your video.
1. Configure Your Settings In DaVinci Resolve
First thing’s first, you’ll need to set up the project. Setting up a project correctly is important because it will make the video editing process a lot quicker once you begin!
Configuring basic settings in DaVinci Resolve is like laying the foundations of a house. Do this correctly and you’ll set yourself up for success.
In the bottom right of your screen, you will find the ‘Settings’ button. The main settings to adjust are the:
- Timeline Resolution: We usually set this to 1920 x 1080 (there are also options for vertical resolutions or portrait mode)
- Timeline Frame Rate: We use 25 frames per second (you will most likely select 24, 25 or 30fps depending on the type of footage that you have)
- Playback Frame Rate: Match this number to the timeline frame rate
- Video Format: Match this number to the timeline frame rate
2. Import Your Video Footage Into DaVinci Resolve
The next step is to import your video footage into DaVinci. We recommend importing all the files you’ll need when you start editing such as music tracks, b-roll footage, images as well as the raw footage so they’re all in one place and ready to go when it comes time to edit.
To import files:
- Select ‘File’ in the menu bar at the top
- Click on ‘Import’
- Select ‘Media…’ or press Command + I and this will open your computer’s drive folders
- Find the files you want to import and click ‘Open’
PRO TIP: If you hold down ‘Control/Command’ and select multiple clips, they will all be imported when you hit ‘Open’.
You can also simply drag and drop the footage into the ‘Media Pool’ if you have the folder easily accessible on your computer.
3. Get to Know The DaVinci Resolve Interface
There are a ton of useful features available in DaVinci which enhance the editing experience by giving you greater control and flexibility when you’re editing.
Check out the features below and test them yourself to get a feel for how they work:
- Editing Timeline: where you’ll be editing your videos
- Media & Other Tools Menu: where you can select to show your media pool and all available transitions, titles and effects
- The Playback Monitor: shows you what your finished product will look like (at the top of the screen)
- The Playback Controls: allow you to play through your footage and zoom in or out on the timeline to get more control, or more perspective over the edit
- Editing Preview Bar: the bar in between the playback window and editing timeline is where you can easily see the zoomed out view of the edit and scrub across your footage
You can also customize how the clips on the timeline look by turning the audio waveforms on/off or adding/removing thumbnails.
Learn How To Edit Videos In DaVinci Resolve
It’s time for the rubber to hit the road now that you’ve set up your project correctly and you’re familiar with the workspaces, tools and features available in DaVinci Resolve.
Follow the 8 Step Process below to learn how to edit videos like a pro in DaVinci!
Step 1: Edit Your Raw Footage
The first step on the editing journey is to bring in all of the primary video footage onto the timeline by simply dragging it down.
We then recommend that you do a quick scan of your footage and remove anything that you know you don’t want to use in your finished video. At this point though, if you’re unsure about any clips, leave them in there for now.
There are two areas in DaVinci Resolve where you can cut down your footage which are:
- The Cut page: where you can start to trim down your footage with some considerably basic tools. This is useful if you’re going to be cutting down lots of different clips.
- The Edit page: where you can cut down your footage and build out the story, all within this one workspace.
The process is very similar for both the Cut page and the Edit page, so go with whichever one suits your workflow.
To cut/trim down your footage in DaVinci Resolve:
- Enable ‘Ripple On’ button on the left hand side of the editing timeline
- Drag the playback head to a specific point that you want your clip to start and press the ‘Split’ or scissors icon next to the Ripple On icon or pressing CTRL or CMD + B
- Select the clip you want to remove and press the ‘Delete’ button
Another way to trim your footage is to click and drag the start or end and release at the point you want your clips to respectively start or end.
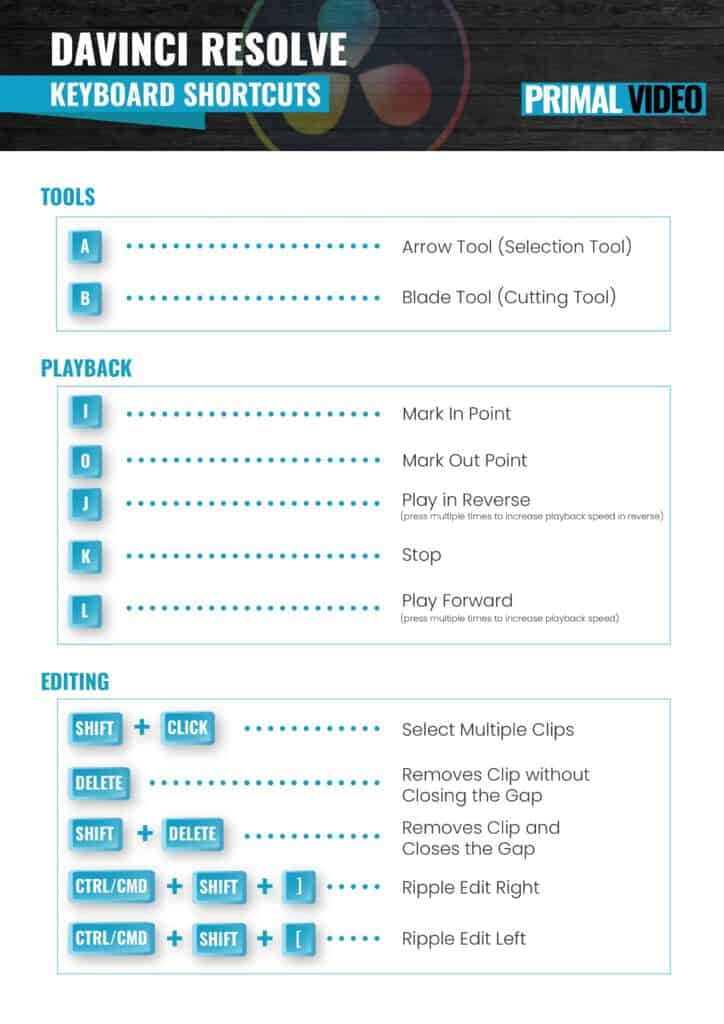
There’s also a tool called ‘Ripple Edit Left/Right’ which enables you to trim a clip and ‘ripple’ the rest of the clips in the timeline (effectively closing the gap between the two edit points). Check out the keyboard shortcut list at the end of the article if you want to speed up your editing even further.
Step 2: Build Out The Story
Once you’ve completed a first pass and removed the footage you don’t want, it’s now time to add in some b-roll or overlay footage to help your viewers stay engaged and better understand your video. If you’re looking for quality stock footage, check out our review of the top sites for royalty-free footage.
If you want to add an entire clip of B-roll into your video, click and drag it on the timeline. However, if you only want to bring in a specific portion of your B-roll footage, follow these steps:
- In your Media Pool, double click on the B-roll footage that you want to add to open it in the ‘Preview’ window
- In the ‘Preview’ window, move your cursor to find where you want that clip to start and click ‘I’ on the keyboard to mark your ‘In Point’
- Click ‘O’ on the keyboard to mark your ‘Out Point’
- You can then click and drag that specific clip onto the timeline
- If the clip has audio on it, you can mute it by dragging the horizontal ‘volume level’ line down with your cursor or you can click ‘Delete’ to remove it altogether. You can also select to only use either video or audio for your B-roll before you drag it into the editing timeline.
Video editing is an iterative process. As you’re adding b-roll, you may find yourself making some minor edits to your timeline – tweaking and adjusting some of the clips, all to refine your edit down and take you further to your final project.
Step 3: Add Titles Or Graphics
Now that you’ve added your b-roll clips, it’s time to add any text, titles or graphics into your video.
To add these in, click ‘Effects Library’ and then ‘Titles’.
The titles in the top menu are basic text titles that you can add in and customize as you like. The ‘Fusion’ titles are more advanced and have cool features like 3D.
You can customize your titles in the ‘Inspector Palette’ by changing:
- Fonts, font size, position or rotating the titles
- Adding in drop shadows, strokes or backgrounds to match your branding
- Adjusting the length or start/end time of your title
Go one step further and add in an animated intro at the start of your video by following this tutorial to take your video to the next level!
Step 4: Add Transitions Or Effects
Transitions can make your video look super polished but the key is to not go overboard and add in too many. Use them sparingly to add in a storytelling element to your videos. Less is more!
- To add in transitions, click ‘Effects Library’ and then ‘Video Transitions’
- To add in a ‘Fade In’ transition, click on ‘Cross Dissolve’ in the left menu bar and drag it onto your clip at the start or the end (or both)
- A ‘Dip to Color Transition’ has a similar effect but incorporates a brief fade to a specified color (usually white or black) as well as the fade between the clips
PRO TIP: If you have a hard cut between two similar video clips, instead of a transition, you could add in a subtle zoom on one of the shots like we often do at Primal Video to break up the shot.
To do a zoom transition, you need to go to ‘Inspector’ on the top right corner of DaVinci Resolve.
Select ‘Video’ and drag your cursor left or right in the Zoom setting. Alternatively, you can use Dynamic Zoom or use other effects.
Step 5: Add Music & Audio
Adding music or audio into your video is a great way to make it more interesting for your viewers to watch. For our top picks of the best royalty-free music sites, check out our full review.
To add music, start by selecting your imported music track and dragging it down onto your timeline. You can use all the same tools we’ve mentioned in the previous section to edit your audio clip such as the start and end handles, ‘Blade/Split’ tool, ‘Ripple Edit’, ‘Delete’ etc.
If you want to add a ‘Fade In’ and a ‘Fade Out’ to your music track, move your cursor to the top corner of the clip and drag it left or right.
The time indicator that is displayed shows how long the fade will last until it reaches no volume.
Likewise, to fade your audio out at the end of your clip, grab the same marker and drag it back to the left where you want the fade to start.
Step 6: Set Audio Levels
There are two general areas of audio that you need to pay attention to during the editing process.
The first is the spoken audio which is the core/primary audio in the video. We’d recommend that you start here and adjust this first.
To do this:
- Mute the music so the only sound you can hear is what’s actually being said in the video.
- Enable the audio mixer by clicking on ‘Workspace’ in the top menu bar, then ‘Show Panel in the Workspace’ and select ‘Mixer’. You can then see the various volume levels for the different audio files in the menu on the bottom right of the screen.
- Pay attention to the colors in the audio menu as your video is playing. Ideally you want your volume within the yellow area or just within the red area but definitely not touching the top. If it does touch the top, grab the slider and lower it down a little.
- If you want to adjust your audio on a clip-by-clip basis, you can put your mouse on the volume line that appears in the center of the audio clip and simply drag it up or down.
Once you’re happy with your primary audio, you’ll then need to adjust the second area of audio which is the music track that complements your spoken audio.
We normally set our music level at around -25 to -30 decibels but there’s no hard rule with this. As long as your viewers can still hear and understand any spoken audio, that’s the main thing that matters here.
Tip: If you’re an advanced user, you might find it easier to adjust the audio in the Fairlight Console where you have more control and pro level tools. This Fairlight desktop audio editor is a powerful audio post production tool!
Step 7: Color Grade your Video
The next step in the editing process is to color grade your video. There are a ton of professional color grading tools built into DaVinci but let’s stick with the basics for this beginner tutorial.
To enter the color grading area click the ‘Color’ tab where you can find the color nodes (layers) and color adjustment tools.
Next, start color grading (correcting) your clip with the ‘Color Wheel’ and then from there, we recommend you adjust and test each of these to get the look you’re after:
- Lift: changes the color of the dark areas of your shot
- Gain: changes the brightness of the bright (white) areas in your shot
- Gamma: changes the mid-range colors in your shot
- Temp: changes the warmth or coolness of your shot
- Tint: allows you to adjust the reds or greens in your shot
- Contrast: changes the contrast levels in your shot
- Saturation: allows you to change the amount of color in your shot
PRO TIP: If you want to apply these settings to the other clips or your B-roll, right click on your preview and select ‘Grab Still’, then hold down Command/Control and select all the clips you want to add the color settings to and right click on the Still and select ‘Apply Grade’.
Step 8: Export & Review Your Video Project
The final step in the process is to export your video!
- Click on ‘Deliver’ in the bottom menu and then click on the drop down arrow next to the YouTube icon in the top left menu and choose if you want to export in 720p, 1080p, or 2160p
- Give your file a name and then click ‘Browse’ to choose where you want to save it
- When you’ve reviewed your video and you’re happy with it, just hit ‘Add to Render Queue’ and then ‘Start Render’ to start saving your video
When your video is ready, we’d strongly recommend that you preview your video on a few different devices (phone, computer, tablet etc.) to make sure you’re happy with the overall look and feel of your video on multiple devices.
There you have it – the complete beginner’s tutorial to editing your videos in DaVinci Resolve!
From getting started to mastering our 8 step editing process, you’ll soon see just how amazing your videos can look when you’re able to edit in DaVinci Resolve. And to speed up your editing, here’s a list of the keyboard shortcuts for you!

Want more tips and editing tricks? See our tips, tools and step-by-step process to cut your video editing time in half here. Grab the FREE Primal Video Method!
FAQ
Is DaVinci Resolve 18 free?
Yes, DaVinci Resolve 18 is completely free! There is a paid version called DaVinci Resolve Studio that includes even more advanced features.
What is DaVinci Resolve 18?
DaVinci Resolve 18 is an amazing video editing software created by Blackmagic Designs. It’s one of the most advanced video editors available and is even used by Hollywood professionals!
Recommended Gear & Resources
Check out an up-to-date list of all the gear, software & tools we use and recommend right now at Primal Video on our resources page here!


