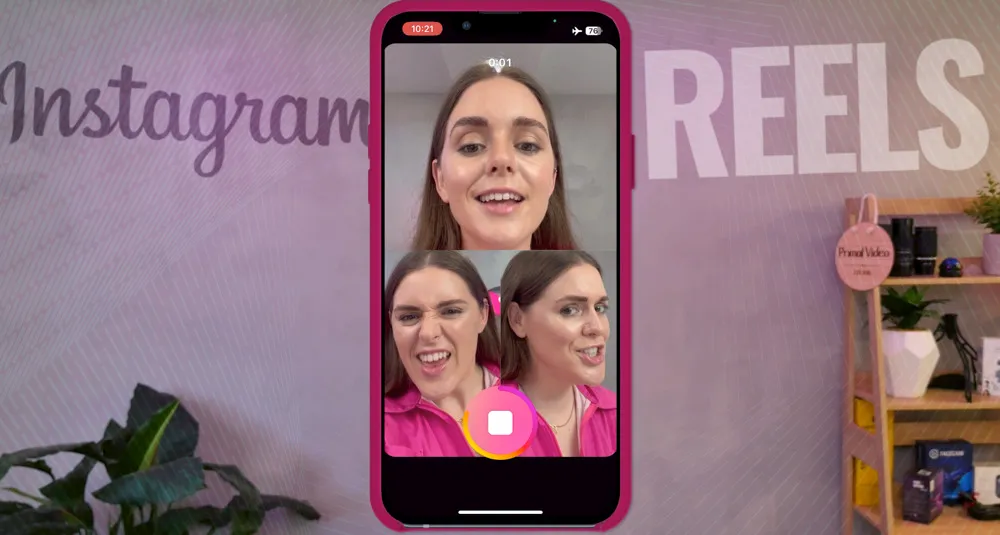
Reels are Instagram’s answer to TikTok’s short form videos. They’re short, sharp, engaging and binge-able videos. They’re also an incredible way to reach wider audiences.
If you’re wondering exactly how to make Instagram Reels, you’ve come to the right place!
In this ultimate guide we’ll cover everything you need to know from Instagram Reels video editing to how to increase views on Instagram Reels.
There are two main options when it comes to making Reels. You can create them in the Instagram app, either from scratch or using an Instagram template.
Or you can use professional third-party apps. These allow you to get really creative with your editing and you’ll end up with an incredible final product.
We’ll share how to make Instagram Reels using both options!
Here’s exactly what we’ll cover in our step-by-step Instagram Reels tutorial:
- What are Instagram Reels
- How to Make Reels Using the Instagram App
- How to Make Reels Using Instagram Templates
- How to Make Reels Using Awesome Filming & Editing Apps
- How to Upload Instagram Reels
Let’s dive in.
What are Instagram Reels?
So, what are IG Reels and what makes them different from other short form videos?
Stories vs Reels
Instagram Stories are vertical videos up to 15 seconds in length that disappear after 24 hours. Reels are also vertical videos but they can be up to 90 seconds in length and they remain visible unless you delete them.
This makes Reels really valuable because they can continue having an impact and bringing you value for a long time after you post them.
Instagram Reels vs TikTok Videos
Reels and TikTok are very similar. The main difference between the two is that TikTok supports videos up to three minutes in length. That’s significantly longer than Reels!
This might be something that we’ll see in the future with Reels, but for now we’re limited to 90 seconds.
Other than the length, a lot of features are the same. They’ve both got heaps of effects, filters and music that you can use. They both specialize in short, entertaining videos that people can consume quickly.
Because the content is so closely related, it’s an awesome idea to repurpose your content and use it on both platforms. In fact, you could even repurpose your YouTube Shorts into TikTok videos and Instagram Reels as well.
Now, back to our step-by-step guide on how to make Instagram Reels.
How to Make Reels on Instagram (in the app)
To get started, head to the Instagram app.
From the home page, click your Profile icon in the bottom right corner. Once you’re on your profile page, tap the + button in the top right corner.
Then select Reel.
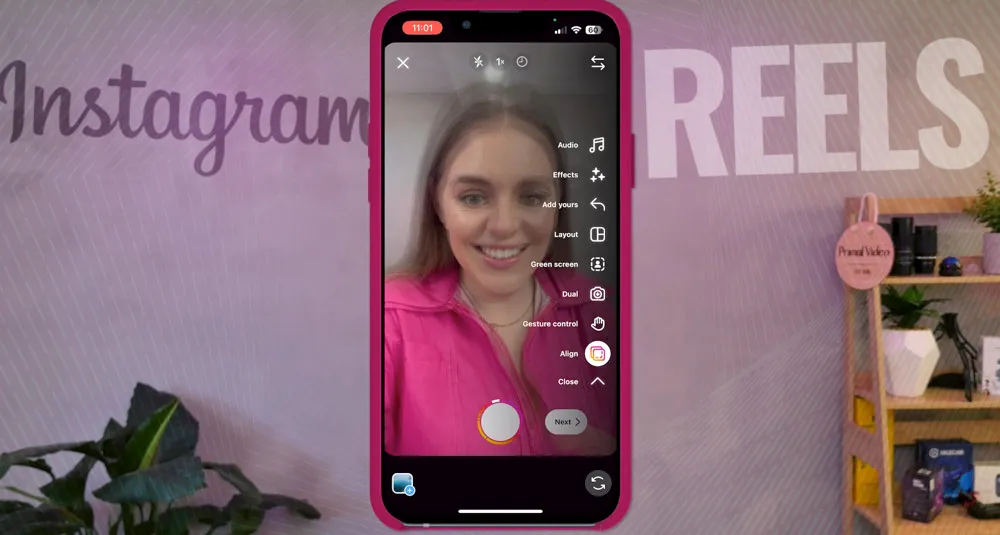
Instagram Reel Filming Interface
To show you how to create a Reel on Instagram from start to finish inside the Instagram app, let’s start by selecting Camera.
Now we’ll run through all the different tools in the Reels interface.
Settings
In the top right corner you’ll see the Settings icon. This is where you can check the camera settings for your Reels.
You can do things like automatically default to the front camera and decide which side of the screen you want the camera tools on.
Flash
Back to the filming interface, the first tool you’ll see along the top of the screen is Flash.
You can set your camera flash to On, Off or Auto.
Playback Speed
To the right of the Flash icon you’ll see the Speed icon which defaults as 1x. You can select that button and adjust the playback speed.
So you could record a video and have it play back in slow motion. Or you could get really tricky and record a video in slow motion and play it back in normal time.
Have you seen those Reels that seem to be exactly timed to the music? Maybe they’ve got some perfectly timed dance moves? This is one way people can achieve that.
Countdown Timer
Next up is the Countdown Timer. This is really helpful if you want to have a countdown before your video starts recording. You can choose from 3 seconds or 10 seconds.
Audio
Now let’s head to the tools in the sidebar. The first one is Audio and this is how you add music while filming.
There are heaps of audio tracks in the Instagram music library. You can search for any specific music tracks or trending audio in the top search bar.
If you want a specific section of a song, you can scroll through the track and select the exact audio section that you want to include in your Reel.
PRO TIP: Be wary of using audio from Instagram’s music library if you plan on repurposing the Reel on other platforms, as you could come up against some licensing issues. That’s why we use services like Epidemic Sound & Artlist for licensed audio tracks.
Effects
Next is the Effects tool. Select the button and you can swipe through a huge range of these.
This is where you’ll find all those popular looks - there’s even a Trending section you can check out. Simply tap the one you want to apply it to your camera.
As you can see, there are heaps of filters and effects you can play around with on the Instagram app
If you see one you like and want to use it at a later time, just click the Save button.
Layout
This is where you can choose from some different layout templates to change up the look of your Reel.
You can record individually in each of the layout sections or you can upload a pre-recorded video or image into the sections.
To delete any of the sections, just tap on it and a Trash icon will appear.
Green Screen
This is an awesome feature! Our resident Instagram Reels Superstar, The Jordana Grace, has found a lot of her most viral videos have been filmed using this green screen effect.
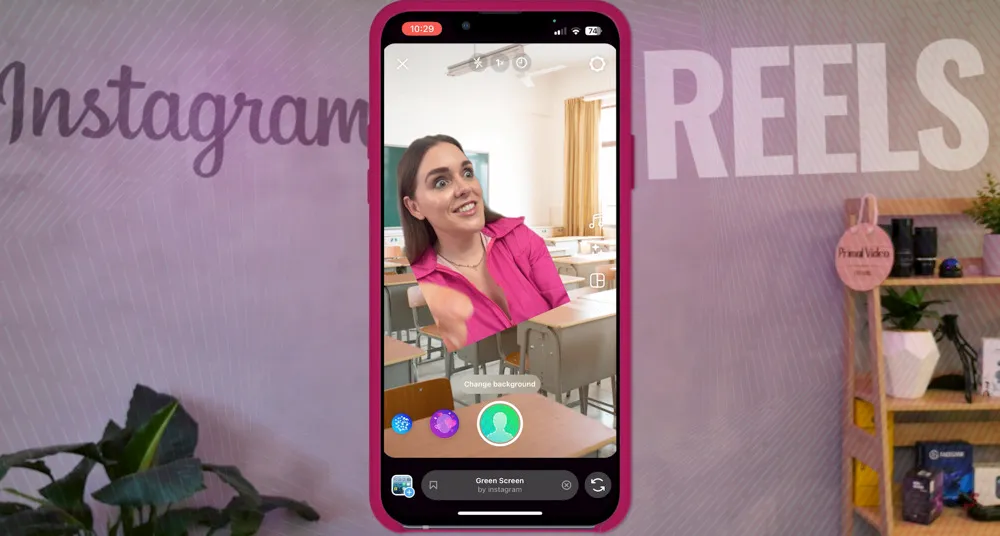
To use this tool, click on Green Screen and then down the bottom tap Change Background.
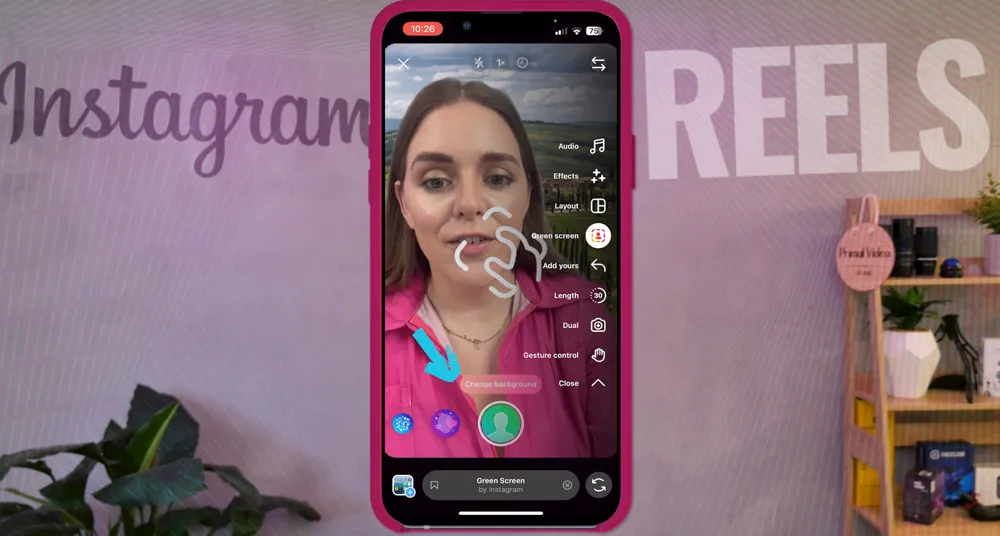
From here, you can choose an image or video from your camera roll or you can select one of Instagram’s Scenes.
Once you’ve set your background, it’s a good idea to make your image smaller so that Instagram users can see the background. To do this, you can pinch to zoom out.
Or you could start your Reel with your image being full screen and then make yourself smaller after a few seconds. This is a great way to get viewers curious about your Reel before revealing the topic & background.
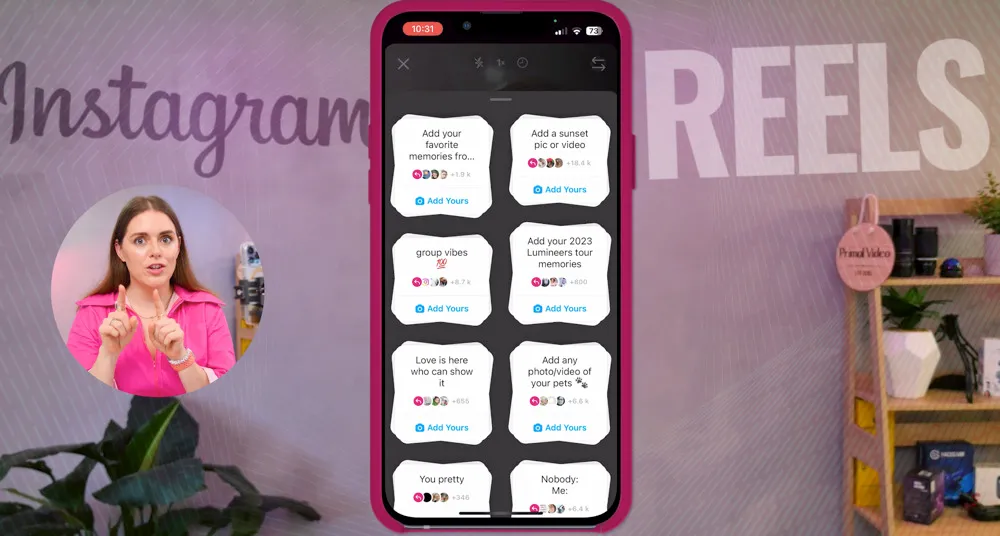
Add Yours
This is another great tool that allows you to prompt your viewers to connect and collaborate with your video.
You can start your own or you can scroll through and choose one that’s already been created.
You’ll see things like “Add your favorite memories from tour!” or “Show me your favorite coffee place”. Anything that others can relate and respond to.
Length
Setting the length or maximum duration of your video is super important! This should be the first thing you adjust when filming a Reel.
You can choose between 15 seconds, 30 seconds, 60 seconds or 90 seconds.
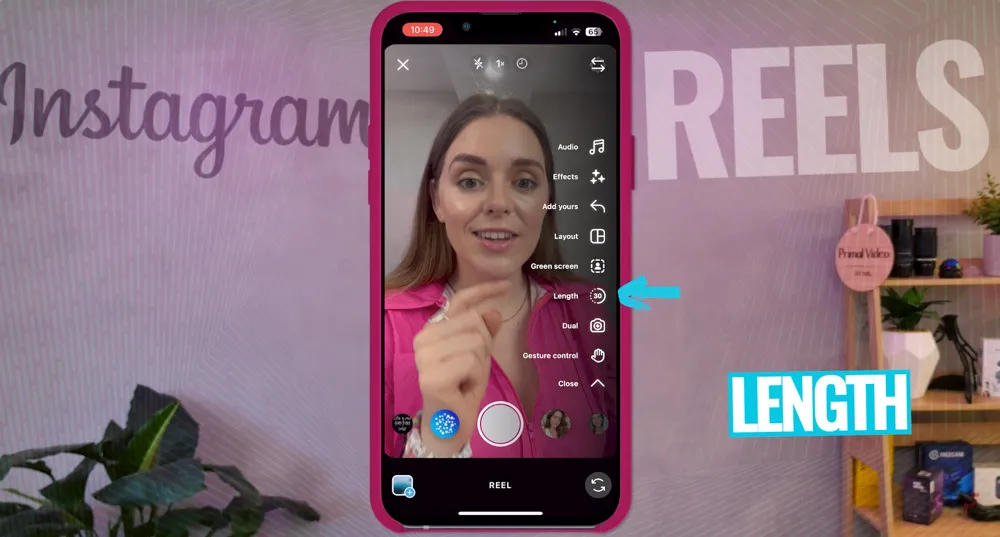
Once you set the video length, your Record button will now only allow you to record for that amount of time. So as you’re filming, you’ll see the red line progressing and once the red line completes the circle, you won’t be able to record anymore.
Don’t worry if your video doesn’t reach the length of time that you set - it will be automatically cropped down for you.
But if you go over the time limit, the end of your video will be cut off. So, we recommend selecting a higher duration so you don’t have to stress about running out of time.
Gesture Control
When this feature is switched on, you can simply raise your hand to start and stop filming.
We think this is a really cool feature that could make your filming workflow quicker and easier.
Align
Next up is the Align feature. This is great if you want to create seamless transitions between shots. It allows you to align your shot with the previous shot.
It will overlay the image in your last recording so that you can align the next shot as closely as possible. So this is a really fun tool that helps you make your shots really fluid.
Record
The most important button! Once you’re ready to start filming, you know what to do.
How To Edit Instagram Reels (in the app)
After you’ve finished filming your Reel on Instagram, click the Next button.
This is where you’ll see a Preview of your video.
PRO TIP: It’s a good idea to hit Download at this time to save out a raw version of your video without the watermark in case you want to repurpose it down the track.
Then hit Edit Video in the bottom left corner and this will take you to the editing screen.
You can do tons of things here, such as:
- Trim clips
- Reorder clips
- Delete clips
- Add new clips
- Replace clips
Once you’re happy with your clips, you can add transitions, text, music and stickers.
Wondering how to add text to Reels without going into this Edit Video section? You can add text, music, stickers and so on from the Preview screen.
PRO TIP: Want to add auto generated captions to your video? You’ll find this in the Stickers section.
Nice job, you’re done with filming and editing. Hit the Next button and this will take you to the Upload page.
Before we cover how to upload an Instagram Reel, we’ll run through the other options when it comes to creating a Reel on Instagram.
If you want to go straight into uploading, jump forward to How to Upload Instagram Reels.
How To Make Instagram Reels Using Templates
Using Instagram Templates is a super easy way to create amazing looking Reels, without spending hours in the editing process.
If you see an awesome Reel that someone’s already created and you can duplicate that using the template, why not give it a go? We’re big fans of working smarter, not harder!
Remember back to the beginning of this tutorial, when we first selected Reel from your Profile page there were three options: Camera, Drafts and Templates.
Now let’s select Templates. You can have a scroll through the different options here until you find a template that you like the look of.
Once you’ve found one, click on it and select Use As Template at the bottom. You’ll see how many clips and the duration of each clip at the bottom of the template.
From here, all you need to do is replace each of the clips with one of your own.
To do this, tap each clip and then find a clip from your camera roll that you want to use or film one directly using your camera.
PRO TIP: For a lot of templates, the clips only go for 1-2 seconds.
After you’ve added all your own clips in, click Next. This is where you can preview your amazing-looking Reel!
Now, there’s also another way you create Reels using templates.
The next time you’re scrolling through Reels (probably when you should be in bed!), you’ll notice some Reels have a Use Template button on them.
If you like the structure of the Reel, you can tap this button and then follow the same process to create a Reel using that template.
From here, you can publish your Instagram Reel. To learn how to do this, jump to How to Upload Instagram Reels.
Or if you want to kick your Reels up a notch, keep reading.
How To Make Pro-Level Instagram Reels (using third party apps)
Using third party apps allows you to get more creative, have more control, and create a higher quality video. You can use them to film AND edit Reels.
After lots of trials, we’ve narrowed it down to our favorite few apps to help you make Instagram Reels.
Best Filming App for Reels: FiLMiC Pro
You could think of this like your built-in camera app on steroids. Filmic Pro unlocks DSLR-like settings on your smartphone. It’s seriously impressive.
Here’s a quick rundown of the things you can do with Filmic Pro:
- Lock down your shutter speed
- Lock down ISO
- Adjust the focus while you’re recording
- Adjust volume levels
- Change the picture profiles
Interested in learning how to use FiLMiC Pro? Check our complete FiLMiC Pro tutorial here.
Now that you’ve filmed your Reel in top tier quality, it’s time to edit.
Best Editing App for Reels: CapCut
Our top recommendations for the best all-rounder app is CapCut. It’s really easy to use, has a ton of awesome features and there’s a completely free version available!
CapCut has some awesome features, such as:
- Text to speech & speech to text
- AI background removal
- Next-level filters and effects
- So much more!
There is a paid version, but we’ve found everything we need to create awesome Reels is available on the free version.
Want to learn more about editing in CapCut? Here’s our complete CapCut tutorial.
How to Post Reels On Instagram
Now it’s time to upload your Instagram Reel so it’s visible to viewers in the Reels tab.
If you’re publishing a Reel that you filmed and edited in the Instagram app, simply press Next after editing and you’ll arrive at the Upload page.
If you’re uploading a Reel that was filmed or edited in a third party app and saved onto your phone: go to your Profile, select the + button and tap Reel.
Here you can select a video from your phone gallery and hit Next to get to the Upload page.
Now you can add a caption. Include any keywords, hashtags and some good emojis!
To change the cover image of your Reel, tap on the Edit Cover and select any frame from within your video.
If you can’t find a good frame from your Reel, you can upload your own image from your camera roll. Press Add From Camera Roll and select the image from your photo gallery.
Once you’ve got a cover photo selected, tap Profile Grid in the top right corner. This is where you can crop your cover image so that it fits within the square shape on your main profile grid
Move the image around so that it’s in a position that will look good to people viewing your Instagram profile page.
There’s lots of other tools & settings you can adjust here:
- Allow share to feed: If you want the Reel to post in your Instagram feed as well as the Reels tab)
- Tag people: Tag any accounts you want to notify
- Invite collaborators: This Reel will show up in any collaborators’ grids
- Tag products: This is useful if you’re doing sponsored content
- Add topics: This is a good idea to help Instagram match your video to viewers)
- Add location: You can add your filming location
- Add poll: This can be fun for viewer engagement
- Add reminder: For example, if you’re talking about an event, you could add the start time as a reminder)
- Share to Facebook: This is a great idea if you want to expand your reach and get more views)
- Advanced settings: This is where you can set whether your Reel can be used as a template, schedule your Reel, hide the like count on your Reel and toggle on if the Reel is part of a paid partnership
And that’s everything! Now it’s time to share your Reel or save it as a draft to post at a later time.
Now you Know How to Make Instagram Reels Like a Pro!
It’s super easy to create awesome and entertaining videos on the Instagram app. If you want to create Reels that have even more of a wow-factor, you might want to check out the other creative tools we shared for filming and editing.
FiLMiC Pro allows you to film much higher quality Reels than you could achieve using just your built-in camera or the Instagram camera app.
CapCut is a super powerful editing app that will allow you to edit your Reels to perfection.
Now that you’ve learnt everything you need to know about how to make a Reel, it’s time to give it a shot and upload your first Instagram Reel! If you follow these steps, your Reels will be popping up in Trending Reels in no time!
Feeling confident with Reels? Check out our complete guide on How to Go Live on Instagram.
We hope you enjoyed our ultimate guide to Instagram Reels! If you found it useful, please share on social media or with someone you know who might appreciate the info.
FAQ
How do you make reels on Instagram?
To make a reel on Instagram using the app, you can go to the + button in the top right corner of your profile and select Reel.
Is there an easy way to make reels?
There sure is! If you’re looking for an easier way to make Reels, we’d recommend using an Instagram Template. All you need to do is select the clips you want to use and they’re automatically prefilled into the template. Learn more about Templates above.