Facebook Reels are quickly becoming one of the top Facebook trends right now!
If you’re wondering ‘what is Facebook Reels’ – it’s short form video content on the Facebook platform. Essentially, it’s Facebook’s version of TikTok and Instagram Reels.
As well as being entertaining to create and watch, Facebook Creator Reels are an awesome Facebook business & marketing strategy. If you want to know how to get followers on Facebook, this could be a solid way to expand your reach.
In this guide, we’ll run through a complete Facebook Reels tutorial so you can learn exactly how to make Reels on Facebook.
We’ll share everything from creating awesome Facebook Reels videos to how to upload Facebook Reels. Plus we’ll cover some great Facebook Reels tips along the way!
Here’s exactly what we’ll cover:
- How to Access The Facebook Reels Page
- Facebook Reels Interface
- How to Record Facebook Reels
- How to Add Text in Facebook Reels
- How to Reduce Background Noise in Facebook Reels
- How to Add Captions in Facebook Reels
- How to Add Stickers & GIFs on Facebook Reels
- How to Make Facebook Reels Using Pre-Recorded Videos
- How to Publish or Share Facebook Reels
Let’s get started.
How to Access The Facebook Reels Page
First things first, there are different ways to access and watch Facebook Reels based on whether you’re using a Facebook Profile or a Facebook Page.
Accessing Facebook Reels From A Facebook Profile
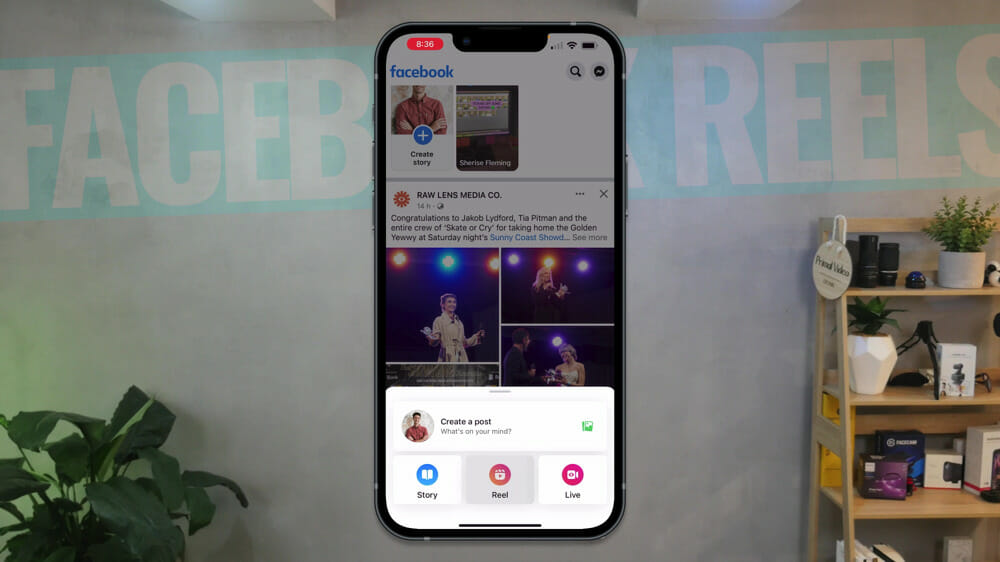
To access Facebook Reels from a profile, open the Facebook app and hit the + button in the top right corner. Then select Reel.

Accessing Facebook Reels From A Facebook Page
To access Reels from a Facebook page, open the Facebook app, click the + button in the bottom menu bar and select Reel. Alternatively you can select Reels at the top of your feed and tap Create reel.
Now that you’re in the Facebook Reels tab, let’s take a look at the interface.

Facebook Reels Interface
Along the top menu bar you can access:
- Camera: You can record footage for your Reels here
- Music: There’s lots of music and audio tracks available
- Effects: You can get creative and choose from tons of weird & wonderful effects
- Green Screen: There are preset Scenes or you can upload videos or photos to be your background with the green screen effect
Below that you can access the photos and videos from your camera roll.
Now let’s dive into creating Reels on Facebook.

How to Record Facebook Reels
Once you go to the Camera section you’ll have access to some of those same features as well as some new ones to help you in creating videos:
- Audio
- Speed
- Effects
- Timer
- Green screen

Down the bottom you’ll see the big Record button. You can either tap it to start recording and tap it to end recording. Or you can hold it down to record and then release to stop recording.
When you’re recording, you’ll see the progress bar along the top. This shows how much time you have left for filming. The maximum duration is 90 seconds.

If you want to add additional clips after the initial recording, click Edit in the bottom left corner.
From there tap Add in the bottom menu and then select either Camera if you’d like to record another clip or Gallery if you’d like to add a pre-recorded video or image.
Then you’ll see a White Dot in the progress bar to indicate a new clip.

You can add as many clips as you like so long as they’re within the 90 second time limit.
Once you finish recording you’ll see clips on the video editing timelines for each of the clips in your video.
If you want to learn how to add text to your Reels on Facebook, read on!
How to Add Text in Facebook Reels
On the video editing timeline, tap Add text below your video clips.

From here you can:
- Type your desired text
- Choose from different text styles
- Adjust text size, text color & background color
- Select an AI voice to read out your written text

This text to voice feature in Facebook Reels is pretty cool and allows you to get creative with your videos. There are currently five different voices you can choose from.
To delete a text element, you can click and drag it to the bottom of the screen until a Trash icon appears.

How to Reduce Background Noise in Facebook Reels
To reduce background noise in any of your clips, tap the Noise reducer button on the right side of the screen.
You’ll see a sliding bar from OFF to MAX so that you can determine how much of your background noise you’d like to remove.
Then hit Done and those settings will be applied.

How to Add Captions in Facebook Reels
To add captions or subtitles to your video, select Captions in the right menu.
This will automatically transcribe the video, which generally only takes a few seconds.

It’s awesome how easy it is to add captions. This is a great idea for your Reels as a lot of people listen to Reels without volume. So having the captions on screen means they won’t automatically swipe your Reel away since they don’t know what’s going on!
Now, Facebook won’t always get the captions right so you can hit the Edit captions button to make any adjustments to the captions.
There are also a number of different caption styles you can choose from.

How to Add Stickers & GIFs on Facebook Reels
If you want to add any stickers, GIFs or emojis to your Facebook Reel you can tap the Stickers button in the right menu bar.
There are tons of different options you can play around with here to get the look and feel you’re after.

How to Make Facebook Reels Using Pre-Recorded Videos
As you can see, it’s really easy to create an awesome Facebook Reel directly from the Facebook app just using your built-in phone camera. But what if you just want to create a Reel using your own video footage you’ve already shot?
To do that, go to Add in the bottom menu bar and select Gallery.

From here, you can tap the Select multiple button to allow you to upload multiple clips at once or you can add each clip individually.
Once you have all the clips on your video editing timeline, you can adjust the start and end times by dragging the yellow handles.
From here you can use all the tools we mentioned above such as adding text and adjusting video speed to polish your Facebook Reel.
When you’re finished editing, select Done and then hit Next. This will take you to the final step before your Reel is live in the Facebook feed!

How to Publish or Share Facebook Reels
You’ve created your own Reel on Facebook and now you’re at the final step!
This is where you can:
- Add a caption that includes any hashtags and mentions
- Select the visibility of the Reel/whether it will be shown in the Facebook feed
- Tag people
- Select a location
- Specify if this Reel will also be shared to Instagram Reels

After you’re happy with all those settings, you can hit Share Now.
Your new Facebook Reel will now be published!
Now You Know How To Create Reels On Facebook
There you have it, our complete guide on how to create awesome short form videos for Facebook Reels!
We covered everything you need to know from making Reels on Facebook to how to upload Reels.
If you want to level up your Facebook Reels game, check out our complete CapCut Tutorial. CapCut has a bunch of awesome video editing tools that will help you create even more amazing short videos for Facebook Reels.
FAQ
How do I create a reel on Facebook?
You can create reels on Facebook by hitting the + button and selecting Reel.
How do Facebook reels work?
Facebook reels are short form video content that’s very similar to TikTok videos and Instagram reels. You can watch Reels by going to the Reels page on Facebook and you create them by following the step-by-step tutorial above!
What app is used to make reels on Facebook?
There are lots of options when it comes to making Facebook Reels. You can create a Reel using just the Facebook app or you can use a third party video editing tool such as CapCut if you’d like access to some more professional features.
Recommended Gear & Resources
Check out an up-to-date list of all the gear, software & tools we use and recommend right now at Primal Video on our resources page here!


