Cameras have come a long way since the first Kodak was released back in 1888. Modern DSLR and mirrorless cameras now come equipped with endless settings, and playing around with these can change the entire look and feel of your video.
With so many camera settings to choose from, many people immediately feel overwhelmed and decide to take the easy route by keeping their cameras set to auto mode.
While automatic settings can usually deliver good results, there’s a better way to do things for even better results. And that is to forego auto mode and manually adjust the DSLR video settings instead.
Important: When available, we use affiliate links and may earn a commission!
Some of you may be thinking, is it worth all the hassle to change around all of the camera settings manually? Well, the answer is yes, and the good news is that there’s really not that much hassle involved at all.
To learn about how to adjust your camera settings for optimal results, check out our full tutorial so you can create great videos, every time.
9 Important DSLR Video Settings
Modern cameras have what seems to be an infinite number of camera settings for video, but there’s actually only 9 that you really need to focus on to create a quality video which are:
- Video Resolution
- Frame Rate
- Video Bitrate
- Shutter Speed
- Aperture
- ISO
- White Balance
- Setting the Microphone
- Locking the Focus
We’ll be covering each of these below in more detail so you know exactly how to set your camera to get high-quality video footage every time. So if you’re ready to learn all about the best camera and DSLR video settings for each of the camera features above, let’s jump in!
Pro Tip: As you play around with your camera’s settings, it’s recommended that you follow this list in the exact order that it’s written. Then, every time you go to set your camera up for shooting, you can check each one off the list as you go.
Setting #1: Video Resolution
First up is video resolution. Video resolution refers to the overall quality of the video and it’s based on pixel count. The higher the pixel count, the better the resolution and the crisper the footage.
Most cameras have a few different resolution options to choose from, including:
- 320x240p
- 720x480p
- 1280x720p
- 1920x1080p
- 3840x2160p (AKA 4K)
We recommended that you have your video resolution set to 1920×1080 pixels or higher. Ideally, you’ll set the res to 4K or even higher but not all cameras have this option.

A good rule of thumb to follow is to always start at the highest resolution possible. If you need to lower the resolution later on, you can do that in the video editing phase. However, it doesn’t work the same vice versa and it’s not possible to get a better resolution after the shooting phase.
So when in doubt, always start high.
The One Exception…
There’s just one exception to the “start high” rule, and that is if you’re using a device or app that isn’t capable of editing high-resolution footage. In this case, it’s perfectly OK to lower the resolution for smoother editing and uploading.
Setting #2: Frame Rate
The next setting to focus on is the camera’s frame rate, which is measured in frames per second (FPS). The rate of FPS is what makes up the movement of your video.

This camera setting is an easy one to set since the default is 30 FPS for the NTSC region. In most cases, this frame rate works well, especially for those of you who are uploading to YouTube.
However, if you want to go for a more cinematic look, you might consider lowering the frame rate to 24 FPS (or 25 FPS if you’re in a PAL region).
Setting #3: Video Bitrate
Once you’re happy with the frame rate, it’s time to manually adjust your camera’s video bitrate which controls the quality of the footage captured in each frame.
The bitrate rate is essentially the amount of data captured to build up the resolution within every frame of the video and is measured in megabits per second, or Mbps.
A higher bitrate means that more data is captured, which also means you’ll be working with a larger file.
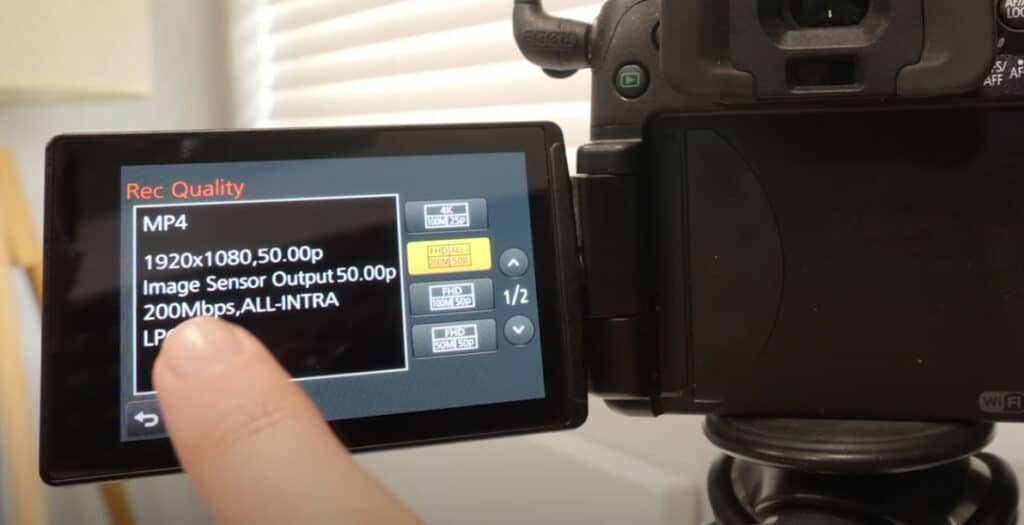
Setting the bitrate, depends entirely on the camera you’re using since every device offers access to different bitrates. Another thing to keep in mind is that bitrates aren’t comparable across the board – 18 Mbps might be the highest option available on one camera, but on another, it could be the lowest setting.
To get a better idea of your camera’s bitrate offering, do a quick Google search. Just type the make and model number of your camera into the search bar to find out what bitrate options you have access to. That way, you can make a more informed decision on which Mbps setting is best.
Setting #4: Shutter Speed
Now that you’ve got resolution, frame rate, and bitrate figured out, it’s time to move on to the settings that affect the actual look and feel of your shot. First up is shutter speed, and this setting plays a major role in how the motion of the footage comes across to the viewer.
It also helps to determine the exposure and brightness of the shot, so needless to say, this is an important setting to understand. By correctly setting your shutter speed, you’ll be able to eliminate the risk of any flickering lights in your shot too.
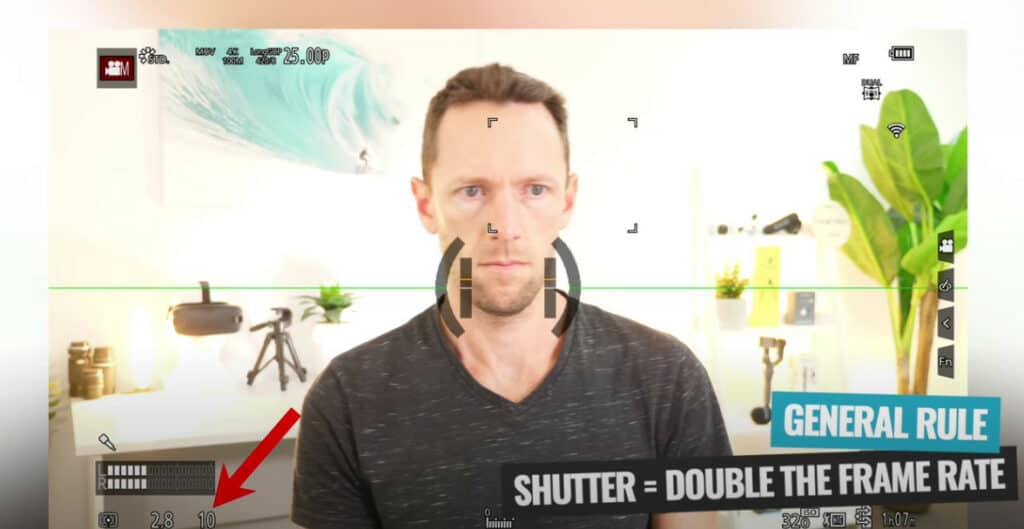
The frame rate setting you’ve selected is what determines the ideal shutter speed for your video. The general rule of thumb is for the shutter speed to be double the frame rate. So a frame rate of 30 FPS would mean a shutter speed of 60 (or 1/60 of a second).
If you’ve gone with the cinematic look by setting the frame rate to 24 FPS, ideally you’d set the shutter speed to 1/48. However, not all cameras offer this setting, but 1/50 is close enough and will still get you great results.
Setting #5: Aperture
Next, let’s explore how to set your aperture. Adjusting your aperture means adjusting the opening in the camera lens to increase or reduce the amount of light in the shot. You can think of it like the human pupil; a larger pupil means more light is let into the eye.
Widening the lens opening – or decreasing the aperture – creates more light in the shot, while reducing its size – or increasing the aperture – creates a darker shot.
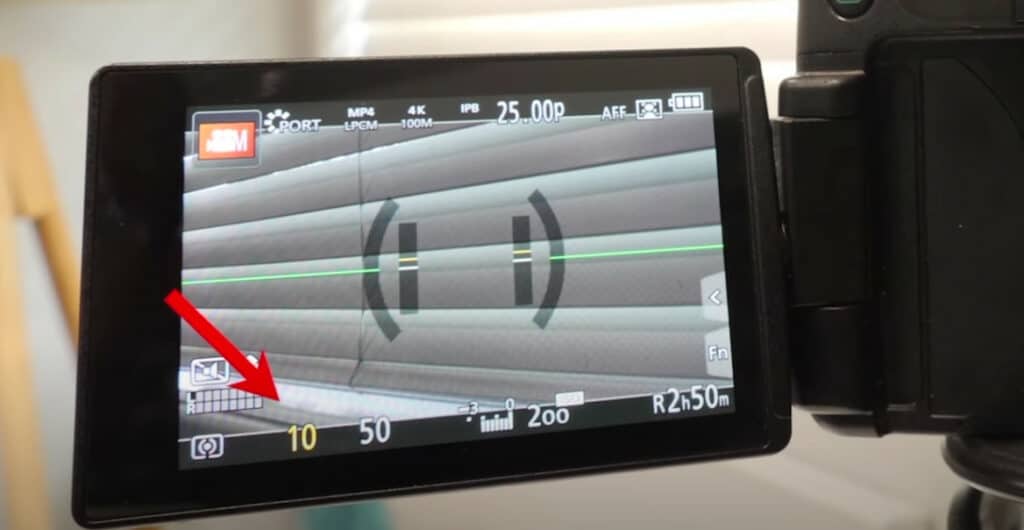
This isn’t just about adjusting brightness, though. The aperture can change the entire look of the shot and by adjusting it, you’ll be able to do things like blur out the background while keeping the subject in focus.
The blurry background look is in right now, so if that’s what you’re going for, check out our tutorial on How to Get a Blurry Background in Videos.
Setting #6: ISO
Piecing together your shutter speed, aperture, and our next setting, ISO, is what truly dictates the brightness of your shot. These 3 settings are often called the “exposure triangle” since they all play a major role in how a video looks in terms of brightness.
After setting the shutter speed to match the frame rate and adjusting the aperture to get the perfect look for your shot, ISO always comes next. Similar to the aperture, ISO is another setting for brightening or darkening your shot.

When setting the ISO, just lower the number to get a darker shot or increase it to brighten things up. ISO settings depend on the make and model of your camera, but generally, most cameras can handle a DSLR video setting for ISO between 800 and 1600.
If you’ve got the ISO setting to the lowest it will go and the shot still looks too bright, it’s possible to use something called an ND Neutral Density Filter. This is like using a pair of sunglasses for your camera lens, so it’s especially useful for those of you who will be filming outdoors.

Setting #7: White Balance
White balance, or color temperature, is another setting that can drastically change the look and feel of the shot. By setting the white balance incorrectly, the footage could end up looking blue – or even make the subject look like an orange Oompa-Loompa!
Many cameras come with preset white balance settings that are configured for shooting on acloudy day, sunny day, or using indoor lighting. Another option is to manually set the color temperature number, also called the Kelvin number.

Before testing different Kelvin numbers, it’s best to try the different presets first to see if any of them match the look you’re going for. If that doesn’t work, try setting the Kelvin number to match the lighting setup of the video shoot.
Setting #8: Setting the Microphone
With setting #8, we’re focusing on getting the audio just right by setting the microphone. Although cameras have auto mic settings, it’s always best to manually adjust this feature.
With automatic microphone settings, the camera is constantly working to adjust the audio levels. That means if the video’s subject pauses for even just a brief few seconds, the camera will automatically boost up the volume to make up for the lack of sound.
When the subject starts talking again, the audio will sound loud, even distorted, to the audience. The easy way around this is to manually set the volume level of the camera’s built-in microphone.
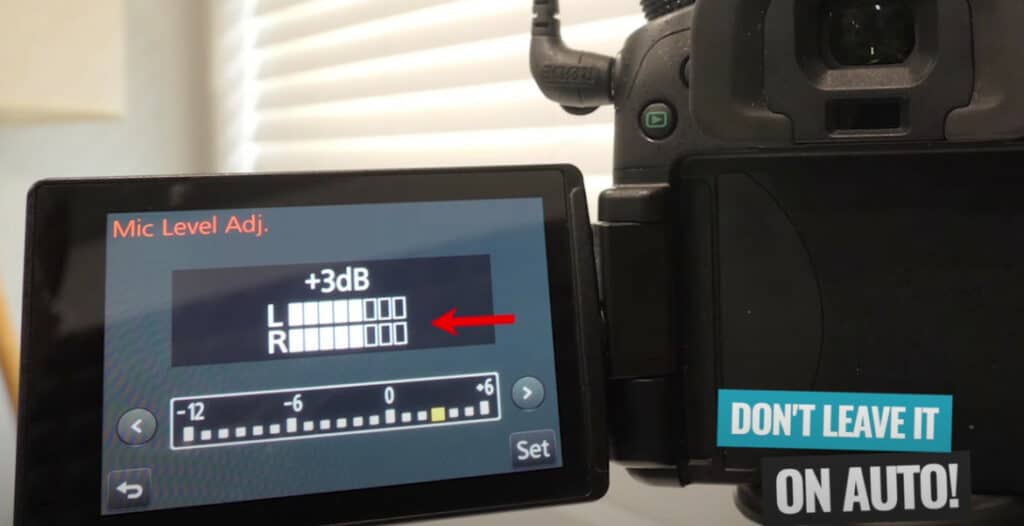
Tips for Setting the Microphone
The first thing you’ll do is go into the camera’s mic/audio settings. This is where you’ll see options for adjusting the microphone volume.
Many cameras show a visual representation of the video audio in real-time (bars that move up and down as the audio gets louder or quieter). As you set the volume, test things out to make sure the audio never goes above the maximum point on these bars.

If you’re using an external mic for crisp, clear audio, don’t forget to check out our guide on the Best Microphones for Video!
Setting #9: Locking the Focus
Cameras nowadays are designed to automatically adjust their focus based on the surroundings. While this is a great feature in some scenarios, auto focus is NOT something that you should strive for while you shoot.
That’s why Setting #9 is all about locking the focus. When you manually set the focus and lock it onto a specific point, you don’t have to worry about the camera taking the focus off of the video subject and placing it onto something in the background.
If that were to happen, the subject would look blurry and out-of-focus, which we can all agree is not ideal.
How to Manually Set the Focus
Setting a camera’s focus manually is a lot easier if you have an extra set of hands. With 2 people, the video’s subject can sit on screen while the other person sets the focus point.
But what if it’s just you? There are 2 options here:
- Use a placeholder in the shot
- Utilize your camera’s WiFi controls
If you’re creating this video alone, the first method is to use a placeholder to help set the focus. Bring something into the shot – a pillow, a backpack, or anything that you can bring into the shot to hold the focus point while you change the setting.
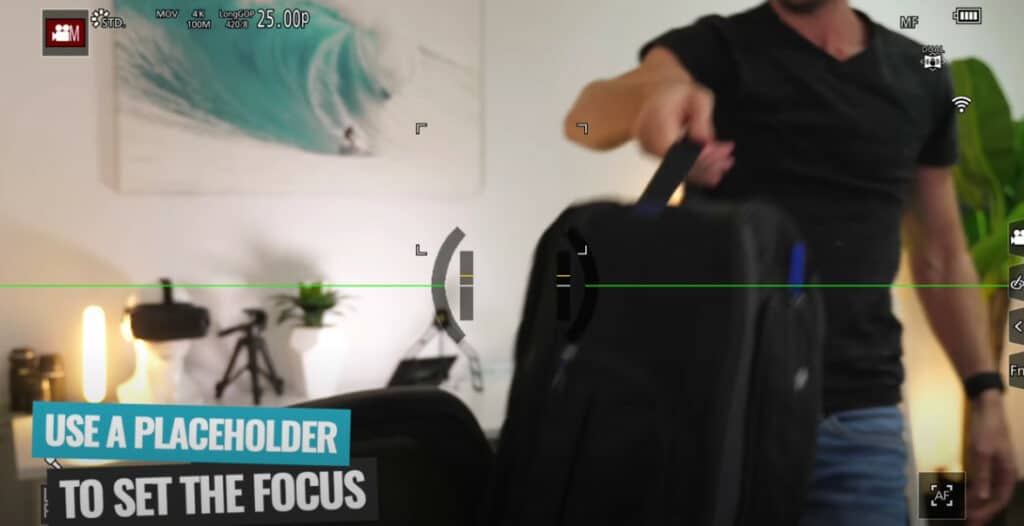
Once you’ve got the focus locked in, move the placeholder out of the shot and take your rightful place in front of the camera.
Another option for solo focus-setting is to use a camera’s WiFi control capabilities if it has that feature. Thanks to modern technology, it’s possible to adjust many camera settings from a phone or tablet, and that includes locking down the focus.
Now You’re Ready to Select Camera Settings Like a Pro!
There you have it – all the best camera and DSLR video settings for shooting videos like a pro every time!
Like we said, it’s best to go through this checklist in order each time you shoot so that you know you’ve got the ideal settings locked into place to go before filming.
Once you’ve shot your footage with all these ideal settings, move on to the editing phase with our free download on the ULTIMATE Process for Editing Videos Faster.
FAQ
What are the best settings for video recording?
There are 9 camera settings you need to focus on to create a high quality video. They are video resolution, frame rate, video bitrate, shutter speed, aperture, ISO, white balance, microphone and focus.
How can I improve my DLSR video quality?
Manually adjusting your settings, as shown in the steps above, is a great way to improve your DSLR video quality.
Are DSLR good for video recording?
Absolutely! DSLR cameras are great for recording high quality video. But if you’re tossing up what type of camera is right for you, check out our guide on Smartphone VS DSLR Cameras.
Links
When available, we use affiliate links and may earn a commission!
Recommended Camera Gear:
- Panasonic LUMIX GH4 (Amazon)
- Sigma 18-35mm f1.8 lens (Amazon)
- Metabones Canon EF Lens to Micro Four Thirds Speed Booster lens adaptor (Amazon)
Recommended Gear & Resources
Check out an up-to-date list of all the gear, software & tools we use and recommend right now at Primal Video on our resources page here!

